Wednesday, March 30, 2016

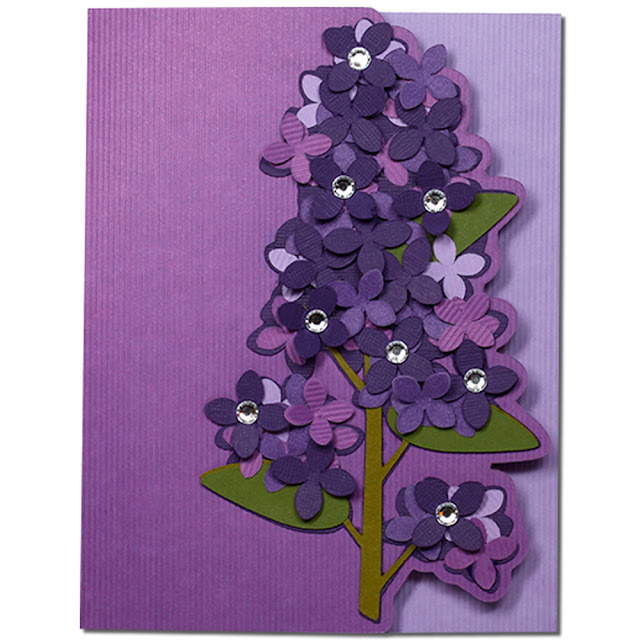
Lilac Design Cut Card


Lilac Design Cut Card-JMRush
Approximate Card size: H 5.50” X W 4.25”

This design is compatible with both 8X12 and 12X12 mats and can be used horizontally or vertically.


1.Cut design pieces.
2. Fold the card base. Glue the large solid flower silhouette (green) to the front of the card.
3. Glue the cut out flower piece (dark purple) to it's matching base ( light purple).
4. Attach the combined cut out flower piece to the large solid flower silhouette on the front of the card using foam adhesive squares.

5. Finish with enamel dots to decorate the center of the flowers.

Lilac Card


Lilac Card-JMRush
Approximate Card size: H 5.50” X W 4.25”

This design is compatible with both 8X12 and 12X12 mats.


1.Cut design pieces. ( I used double sided card stock)
2. Fold the card base. Glue the large flower branch silhouette to the front of the card.
3. Glue the stem to the top of the card.
4. Glue the leaves to the top of the card.
5. - 7. Glue the flower petals to the front of the card. I started with the the 7 lightest colored petals then glued the shade darker (save a few of each color section to curve and glue later) Curve the darkest ( largest ) flower section so that the center is down and the tips of the petals are up. Curve the remaining few that you saved from each color section. 
8. Glue the bottom centers of the largest flower section and attach them to the card front. 
9. Glue the remaining curved flowers to the front of the card.
10. Finish by placing adhesive jewels in the center of several of the flowers:)


Lattice Rose Lantern (Flameless)


Lattice Rose Lantern (Flameless)-JMRush
Lantern size: W 3 x D 3 x H 7”


This Flameless Lattice Rose Lantern features cut outs to simulate the look of lattice. This design is compatible with both 8X12 and 12X12 mats.


1.Cut design pieces. ( I used double sided card stock)
2. Fold the score lines of the lantern body. Center the two lantern body pieces. Apply glue to the backside of the left side tab on the right body lantern piece. Attach to the other lantern piece making sure that the bottoms align (joining the two body pieces).
3. Glue the lattice rectangles to the open panels on the combined lantern body, centering each one.
4.-6. Glue the circular hangers together. ( Make sure the stems of this piece remain separate) Glue one of the stems to the inside of the top of the third from the left window panel. (The other stem will be glued inside the lantern later)
7. Apply glue to the top tab and to the side long tab on the very left side. Secure the long side tab to the other side creating a box.
8. This is what it should look like:)
9. Applying glue to one top tab at a time, begin to secure the top tabs to the inside of the next angled triangle.  The other Circular hanger stem will be glued to the inside of the opposite side of the lantern.
10. Apply glue to the top tabs of the Lantern square base and secure to the inside of the sides.
11. Repeat for the bottom tabs creating a shallow box.
12. Glue the grass design to each side of the lantern square base.
13. Curve your flower petals and leaves as you like.
14. Use pieces of foam adhesive squares to attach the three largest flower petal pieces. Largest on bottom and offsetting the petal placement. Glue the smallest flower petal piece and place a enamel dot in the center. 
15. Use a foam adhesive square to attach the rose to the top and glue the leaves underneath.
16. Place the lantern top in it’s base. Finish with by placing a flameless candle inside:)

Monday, March 28, 2016

Boxer Dog Card


Boxer Dog Card-JMRush
Approximate Card size: W 5.50” X H 4.25”

This design is compatible with both 8X12 and 12X12 mats.

  1. Cut design pieces. 
  2. Fold the card base. Glue the smallest dog silhouette to the solid largest dog silhouette.
  3. Glue the smaller face with a eye hole to the larger face with an eye hole (You only need to use the bottom face piece if you wish for your dog to have a white mark on his face:) Glue the neck marking and socks on the silhouette with a ear hole( if you wish to use them) and glue the collar on. Glue the socks on the combined silhouette ( if you wish to use them). Use foam adhesive squares to attach the last dog silhouette to the top of the combined dog silhouette. Glue the collar on. 
  4. Use foam adhesive squares to attach the dog silhouette with a ear hole to the combined dog silhouettes. On the top dog silhouette- glue the tip of the nose down. Glue the combined silhouette to the card base.
  5. Use a adhesive dot for the nose and jewels to decorate the collar.


Thursday, March 24, 2016

Daschund Dog Treat Box

Daschund Dog Treat Box-JMRush
Approximate Box size: W 5” X H 2.75” X D 1.50”


This design is perfect for small gifts or goodies for your Dog Groomer, Veterinarian, dog lover, or for special treats for your dog. This design is compatible with both 8X12 and 12X12 mats.


  1. Cut design pieces. 
  2. Flip the box base over- pretty side down. Fold the score lines on the card base. Glue the dog silhouette without a smile to the solid dog silhouette base. Glue the small ear piece to the larger ear base.
  3. Apply glue to the  bottom side of the small side tabs. Attach to the tabs directly above.
  4. Apply glue to the lower large square side tabs. Attach to the combined side tabs that you have already glued, forming a box.
  5. Use foam adhesive squares to attach the dog silhouette with a smile to the combined dog silhouettes. On the top dog silhouette- glue the tip of the nose and the tip of the tail down. Glue the collar on. Attach the combined ear to the combined dog silhouette using a foam adhesive square.
  6. Use a adhesive dots for the nose and jewels to decorate the collar. Fill with goodies:)

Wednesday, March 23, 2016

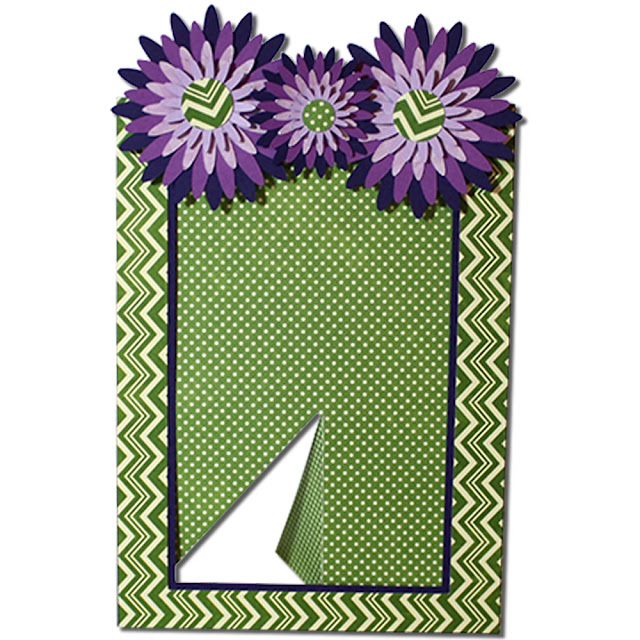
Puff Flower 4X6 Mailable Frame


Puff Flower 4X6 Mailable Frame-JMRush
Mailable Flat Frame size: W 4.75” X 6.5”

This self standing frame fits a 4X6 photo and can stand vertical or horizontally. This design is compatible with both 8X12 and 12X12 mats and the stand folds flat so it is perfect for mailing. 


1.Cut design pieces. (I used double sided card stock)
2.Glue the smaller Rectangular mat to the larger one.
3. Separate the kick stand leg from the frame base. (This frame can be used Horizontally or Vertically:)
4. Glue the top of the frame base to the combined mats.
5.-7. Glue the flower shapes together ( largest on bottom to smallest on top)
8. Using foam adhesive squares, attach the center circles to each flower.
9.-10. Using foam adhesive squares, attach the combined flowers to the front of your combined frame.
11. Insert picture.
12. Ta Da:)


Cherry Blossom Card

Cherry Blossom Card-JMRush
Approximate Card size: H 5.50” X W 4.25”


This design is compatible with both 8X12 and 12X12 mats.


  1. Cut design pieces. (I used Vellum paper for the top layer of petals)
  2. Fold the card base. Glue the branch designs to the front of the card. Curve the small stamens -insides of the flowers- (small petal design with a hole in the center:) so that the petals are higher than the center.   Color should be on the inside of each piece. Glue the bud pieces (pieces with three points) to the bud base (piece with three curves at the top). Attach small pieces of foam adhesive squares to the very center of the flower bases.
  3. Glue the centers of the curved small stamen pieces to the center of the vellum flower petals.
  4. Attach the combined flower pieces to the flower bases that you already prepped with foam adhesive squares. Center each one and off set the petals.
  5. Glue the combined buds to the branches.
  6. Use foam adhesive squares to attach three of the combined flowers to the branches. ( see finished photo they are the flowers with gems in the centers). Use glue to attach the rest of the combined flowers.
  7. Finish by placing adhesive gems in the center of three of the flowers. ( I used a brown sharpie to color the pink gems to get the desired color:)


Tuesday, March 22, 2016

Labrador Retriever Card

Labrador Retriever Card-JMRush
Approximate Card size: W 5.50” X H 4.25”

This design is compatible with both 8X12 and 12X12 mats.


  1. Cut design pieces. ( I used double sided card stock for the card base)
  2. Fold the card base. Glue the largest dog silhouette (solid) to the coordinating shape on the front of the card base.
  3. Glue the smallest dog silhouette to the largest dog silhouette on the front of the card base. 
  4. Use foam adhesive squares to attach the last dog silhouette to the top of the combined dog silhouette. Glue the collar on. Use a foam adhesive square to attach the ear. Use a adhesive enamel dot for the nose:) 

Scottish Terrier Card


Scottish Terrier Card-JMRush
Approximate Card size: W 5.50” X H 4.25”

This design is compatible with both 8X12 and 12X12 mats. 


  1. Cut design pieces. ( I changed the color of the collar to match the inside color of the card)
  2. Fold the card base. Glue the largest dog silhouette (solid) to the coordinating shape on the front of the card base.
  3. Glue the smallest dog silhouette to the largest dog silhouette on the front of the card base. 
  4. Use foam adhesive squares to attach the dog silhouette with one ear to the top of the combined dog silhouette. Glue the collar on.
  5. Use a adhesive enamel dot for the nose:) 


Poodle Card

Poodle Card-JMRush
Approximate Card size: W 5.50” X H 4.25”


This design is compatible with both 8X12 and 12X12 mats.


  1. Cut design pieces.
  2. Fold the card base. Glue the largest dog silhouette to the coordinating shape on the front of the card base.
  3. Glue the dog silhouette without a mouth to the largest dog silhouette on the front of the card base. Glue the small circular leg poms to each leg on this piece.
  4. Use foam adhesive squares to attach the dog silhouette with a smile on top of the combined dog silhouette.
  5. Glue the head pom and tummy pom to the combined dog silhouette. Use foam adhesive squares to attach the ear, tail pom, and top leg poms. Glue the collar on.
  6. Use a adhesive enamel dot for the nose and adhesive jewels to decorate the collar:)

Monday, March 21, 2016

Weenie Dog Card

Weenie Dog Card-JMRush
Approximate Card size: W 5.50” X H 4.25”

This design is compatible with both 8X12 and 12X12 mats.
You can purchase this design here: https://www.silhouettedesignstore.com/artists/485222


  1. Cut design pieces.
  2. Fold the card base. Glue the largest dog silhouette to the coordinating shape on the front of the card base. Use foam adhesive squares to attach the dog silhouette with a smile on top of the dog silhouette without the smile.
  3. Glue the small ear to the top of the larger ear. Glue the collar to the combined dog silhouette.
  4. Use a foam adhesive square to attach the combined ear to the combined dog silhouette. Glue the combined dog silhouette to the large dog silhouette on the front of the card base. 
  5. Use adhesive dots for the nose and eye:)

Daffodil 3D Card

Daffodil 3D Card-JMRush
Approximate Card size: W 5.50” X H 4.25”


This design is compatible with both 8X12 and 12X12 mats.

  1. Cut design pieces.
  2. Fold the Card base. Use foam adhesive squares to attach the Daffodil centers to the Daffodil flower base. Use enamel dots in the center of each flower.
  3. Glue the leaves on the back of each flower.
  4. Use foam adhesive squares to attach each flower to the front of the card base. 

Watering Can Tulip Card

Watering Can Tulip Card-JMRush
Approximate Card size: W 5.50” X H 4.25”


This design is compatible with both 8X12 and 12X12 mats.


  1. Cut design pieces.
  2. Fold the Card base. Glue the tulip large flower petals to the stems.
  3. Glue the largest watering can to the front of the card base. Glue the curved lines to the top of the smaller watering can. Use pieces of foam adhesive squares to attach the single tulip petals to the combined tulips.
  4. Glue the combined tulips to the largest watering can on the front of the card base.
  5. Glue the handle and pour spout to the smaller watering can.
  6. Use foam adhesive squares to attach the smaller watering can to the larger watering can.
  7. Finish with a ribbon and a enamel adhesive dot:)

Monday, March 14, 2016

Spring Flower Box Window Card

Spring Flower Box Window Card-JMRush
Approximate Card size: H 5.50” X W 4.25”


This design is compatible with both 8X12 and 12X12 mats. This card uses an optional vellum piece in the window to create a glass effect. 
1. Cut design pieces.
2. Fold the card base. Glue the square vellum piece to the front of the window cut out of the front of the card base (aligning it close to the top of the cut outs).
3. Glue the window on top of the vellum piece.
4. Glue the leaves in the flower box section of the window.
5. Use pieces of foam adhesive squares to attach the flowers to the leaves.
6. Use pieces of foam adhesive squares to attach the planter box and then again for the ledge of the planters box. Finish with enamel adhesive dots in the center of each flower:)

Chameleon Card


Chameleon Card- JMRush

Card size: 5.5” x 4.25”

This cute card has a paper piecing Chameleon that can be used with the card or separately. This design is compatible with both 8X12 and 12X12 mats. 


1. Cut design pieces.
2. Glue the chameleon with the smallest eye to the solid chameleon base.
3. Glue the chameleon with the largest eye hole to the combined chameleon.
4. Use a pieces of foam adhesive squares to attach the circular eye piece to the combined chameleon.
5. Fold the card base. Glue the chameleon to the front of the card base:)


Tuesday, March 8, 2016

German Shephard Hug Gift Card Holder

German Shepherd Hug Gift Card Holder-JMRush
Approximate Size: W 4” X H 7”

This design features character arms that open to a hidden gift card pocket. This design is perfect for giving gift cards for Easter, Birthdays, Father’s/Mother’s Day, or for any occasion. This design is compatible with both 8X12 and 12X12 mats. Fits most gift cards and comes with an optional puppy tongue.
1.Cut design pieces. (I used double sided card stock for the card base)
2. Fold the card along score lines. 
3. Apply glue the bottom of the side tabs on the card base. Secure by folding upward toward the card base.
4. Glue the Circular Medallion piece to the matching shape on the solid large face base. Glue the collar to the corresponding shape on the solid large face base. Glue the narrow face piece with open eyes to the top of the narrow face piece with eye holes and open mouth.
5. Place foam adhesive squares to the top backside of the narrow combined face piece and glue to the bottom of this section. Attach to the large face piece with eye, mouth, and ear cut-outs. Glue the small muzzle open mouth piece to the top of the small muzzle open mouth teeth piece.
6. Glue the smallest rounded muzzle piece to the top of the combined small muzzle open mouth piece. Use a piece of foam adhesive to the top backside of the nose and apply glue to the bottom. Secure to the top of the combined small muzzle open mouth piece.
7.-8.Using foam adhesive squares on the top backside and glue on the bottom, attach the small muzzle open mouth piece to the narrow combined face piece. (Note: If you are using the optional tongue it needs to be glued to the center of the backside of this piece before you attach.)
9. Glue the Combined face to the solid large face piece. The jaw should not be attached.
10. Using foam adhesive squares at the top and glue at the bottom, attach  the combined face to the card base lining up the cheeks of the dog. Insert gift card.
11.-12 The hands tuck into the slots on the front. Use a foam adhesive square to attach the heart in the center of the hands. Finish with ribbon and add adhesive jewels for the eyes:)

Iris Fence Card


Iris Fence Card-JMRush
Approximate Card size: W 5.50” X H 4.25”


This design is compatible with both 8X12 and 12X12 mats. Design elements can be used independently. 


1. Cut design pieces.
2. Glue the fence to the cover of the card base. Glue the full flower petal shape to the flower base. 
3.  Curve the leaves of each combined flower. Using pieces of foam adhesive squares, attach the double flower petal shape to the combined flower pieces. Using pieces of foam adhesive squares, attach the single flower petal.
4. Use foam adhesive squares to secure the top back of each flower to the card base. Glue the stem/leaf section of each flower to the card base.
5. Using foam adhesive squares, attach the grass to the front of the card.
6. Fold the score line on the card base:)

Daffodil Picket Fence Basket


Daffodil Picket Fence Basket-JMRush
Basket size: W 3.5 x D 3.25 x H 2” (H 4.5” with Handle)

This cute Daffodil basket is perfect for Easter goodies. Daffodils, picket fence basket, and grass design features can be used separately. This design is compatible with both 8X12 and 12X12 mats.


1. Cut design pieces. ( I used double sided card stock).
2. Fold all score lines.
3.  Apply glue to the bottom of the top two tabs. Secure to the    rectangular fence shape just above the tabs.
4. Apply glue to the tabs just below.  Secure to the rectangular fence shape just below the tabs. You now have a box shape.
5. Insert the handle tab through the top slot on the side of the basket starting from the inside and passing the tab through to the outside of the basket. 
6. Tuck this tab into the bottom slot going from the outside of the basket in to the inside of the basket. Repeat for the other handle tab on the other side.
7. This is what your basket should look like:)


8. Image of Design pieces.
9.Glue the full flower petal shape to the flower base.
10. Using pieces of foam adhesive squares, attach the circular flower petal to the center of the combined flower pieces.
11. Using foam adhesive squares, attach the Daffodils to the basket with the larger Daffodil in the center of each side.
12. Using pieces of foam adhesive squares, attach the grass on top the Daffodils at the bottom of the basket.
13. Finish with Adhesive jewels in the center of each flower and fill with goodies:)

Friday, March 4, 2016

Bunny Hug Treat Box


Bunny Hug Treat Box-JMRush
Approximate box size: W 3” x D 2.25 x H .75” (H 4.25” including Bunny head)


This treat box features character arms that open to a small treat box. This design is perfect for Easter. This design is compatible with both 8X12 and 12X12 mats.


1.Cut design pieces. (I used double sided card stock for the card base). 
2. Fold the box base along score lines. It is not necessary to fold the score lines closest to the tip of each paw. 
3.Apply glue to the two top tabs and secure them to the top (head) panel.
4. Apply glue to the bottom two tabs and secure them to the bottom panel creating a box.
5. Apply glue to the bottom of the bottom section of the narrow strip. Attach to the back of the box. 
6.Glue the Bunny face without ear cut outs to the solid Bunny face base.
7. Glue the Bunny face with ear but outs to the top of the combined Bunny face.
8. Using foam adhesive squares, attach the combined face piece to front of the box centering it with the bunny head shape on the box base.
The paws tuck into the slots on the narrow strip in the center. Attach a foam adhesive square in the center of this strip and secure the heart into place. Fill with goodies and finish with a ribbon:)

Lamb Hug Treat Box


Lamb Hug Treat Box-JMRush
Approximate box size: W 3” x D 2.25 x H .75” (H 4.5” including Lamb head)


This treat box features character arms that open to a small treat box. This design is perfect for Easter, birthday parties, or baby showers. This design is compatible with both 8X12 and 12X12 mats.

1.Cut design pieces. (I used double sided card stock for the card base). 
2. Fold the box base along score lines. It is not necessary to fold the score lines closest to the tip of each paw. Glue the lamb face with eye cut outs to it’s matching solid base. Glue the spiral lamb hair to it’s matching shape solid base piece.
3.Apply glue to the two top tabs and secure them to the top (head) panel.
4. Apply glue to the bottom two tabs and secure them to the bottom panel creating a box.
5. Apply glue to the bottom of the bottom section of the narrow strip. Attach to the back of the box. 
6. Attach the combined spiral lamb hair piece to the combined lamb face using foam adhesive squares. Glue the heart nose into place.
7.Glue the hooves to the tops of the paws.Using foam adhesive squares, attach the combined face piece to front of the box centering it with the Lamb head shape on the box base.
8.The paws tuck into the slots on the narrow strip in the center. Attach a foam adhesive square in the center of this strip and secure the heart into place.
9. Using foam adhesive squares, attach the the tail on the back. 
10. Fill with goodies and finish with enamel dots for the eyes and a ribbon:)

Thursday, March 3, 2016

Tulip Picket Fence Basket


Tulip Picket Fence Basket-JMRush
Basket size: W 3.5 x D 3.25 x H 2” (H 4.5” with Handle)


This cute Tulip basket is perfect for Easter goodies. Tulips, picket fence basket, and grass design features can be used separately. This design is compatible with both 8X12 and 12X12 mats.


1. Cut design pieces. ( I used double sided card stock).
2. Fold all score lines.
3.  Apply glue to the bottom of the top two tabs. Secure to the    rectangular fence shape just above the tabs.
4. Apply glue to the tabs just below.  Secure to the rectangular fence shape just below the tabs. You now have a box shape.
5. Insert the handle tab through the top slot on the side of the basket starting from the inside and passing the tab through to the outside of the basket. 
6. Tuck this tab into the bottom slot going from the outside of the basket in to the inside of the basket. Repeat for the other handle tab on the other side.
7. This is what your basket should look like:)
8. 
9.Glue the full flower petal shape to the flower base.
10. Using pieces of foam adhesive squares, attach the single flower petals to the center of the combined flower pieces.
11. Using foam adhesive squares, attach the tulips to the basket alternating colors.
12. Using pieces of foam adhesive squares, attach the grass on top the tulips at the bottom of the basket.
13. Finish with a bow if you like and fill with goodies:)


Bounce Bunny Hug Gift Card Holder


Bounce Bunny Hug Gift Card Holder-JMRush
Approximate Size: W 4” X H 7.25”

This design features character arms that open to a hidden gift card pocket. This design is perfect for giving gift cards for Easter, birthdays, or celebrating a newborn baby’s arrival. This design is compatible with both 8X12 and 12X12 mats.


1.Cut design pieces. (I used double sided card stock for the card base)
2. Fold the card along score lines. Glue the Bunny head with cut outs to it’s matching base.
3. Apply glue the bottom of the side tabs on the card base. Secure by folding upward toward the card base. Glue the inner ear shapes to the corresponding shape on the combined Bunny head.
4. Attach the combined Bunny head to the front of the card base using foam adhesive squares. Insert gift card.
5. Using foam adhesive squares, attach the fluffy tail to the backside of the card base.
6. The hands tuck into the slots on the front. Use a foam adhesive square to attach the heart in the center of the hands. Finish with ribbon:)