
These designs and more can be found at Silhouettedesignstore.com and jamieandjenn.com
Saturday, October 31, 2015
Wednesday, October 28, 2015
Flower Card

Flower Card-JMRush
Card size: 5.5” x 4.25”
This design is compatible with both 8X12 and 12X12 mats.

1.Cut design pieces.
2. Pre-Fold all score lines.
3.Starting with the Large flower bundle, apply glue to the folded edge of the smaller heart shape petal. ( I used hot glue which was messy but, I didn’t have patience for each petal to dry with regular glue;)
4. Secure to the folded center of the the larger heart shape petal.
5. Repeat for all Heart shaped petals.
6. Apply glue to the Large flat flower shape. (I ran hot glue from the dip of the heart to the center of the flower.)
7.Secure the heart petals to the flat flower shape. Repeat for all four petal combos.
8.Repeat for the two smaller flowers.
9. Fold the leaves in half lengthwise and curve them as you like.
10. Apply adhesive gems to the center of each flower.
11. Glue the leaves onto the back of the flowers.
12. Glue the flowers onto the card. Ta Da:)!
Monday, October 26, 2015
Autumn Leaves with Detail

Autumn Leaves with detail- JMRush
These fall leaves can be used with the nested detailing pieces or as solid leaves. Use them to decorate, for scrapbook pages, gift bags, or for fall themed crafting projects.
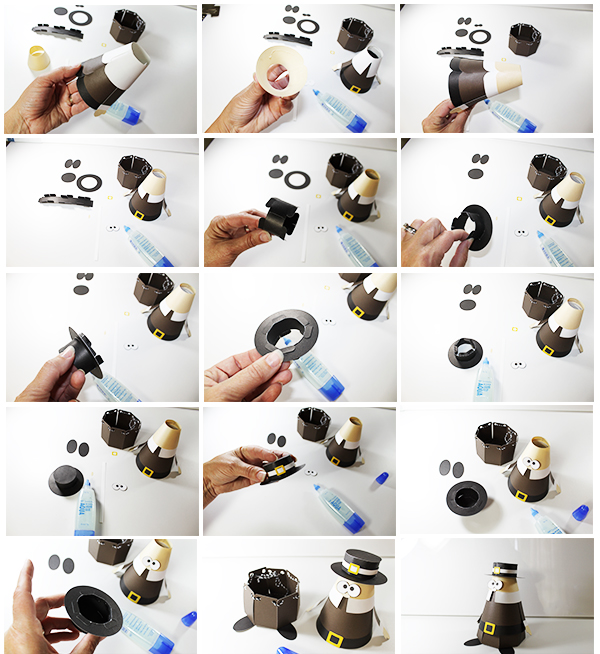
Pilgrim Girl Cone Container

Pilgrim Girl Cone Container-JMRush
Basket size: W 4" X H 2.25”
Pilgrim Girl Size (approximate): W 6” X H 6.25”
This Pilgrim Girl Cone Treat container can be filled with goodies for a gift or used as a center piece for your Thanksgiving feast. 20” of 1/4” ( or smaller width) ribbon or twine is needed to complete the basket. This design is compatible with 8x12 or 12X12 mats.


- Cut the design pieces.
- Pre-fold all score lines.
- Using 20” of 1/4” or smaller ribbon or twine, lace it through the holes of the Octagonal design piece to create a basket. Tie a bow to secure.
- Starting with the largest curved body piece, insert the tab into the slot.
- Apply glue to the inside of the cone on the inside of the tab.
- Secure into place. Repeat for each Curved cone body section.
- Repeat for each Curved body section.
- Apply glue to the inside of the second largest curved body piece.
- Place it on top of the largest curved cone body section and secure. Make sure that the seams align in the back.
- Apply glue to the back side of the hands and secure them onto the arm pieces.
- Apply glue to the backside of the rectangular cuff pieces and secure them on top of the wrists of the arm pieces.
- Apply glue to the backsides of the top of the arms.
- Secure the arms onto the the joined cone body sections.
- Apply glue to the inside of the collar cone body section.
- Secure the collared section on top of the joined cone body sections, making sure the the seams in the back align.
- Apply glue to the inside of the face section.
- Glue to on top of the belt buckle sections, aligning the seams in the back.
- Pre-curve the triangular hair piece, making sure that the edges with align.
- Apply glue to the top of the scored edge.
- Secure the edges together.
- Apply glue to the inside of the hair section and glue on top of the coned body sections. Glue the white eye section to the solid eye section.
- Glue the eyes and the nose into place.
- Slide the smaller open circle onto the hat base.
- Apply glue to the top of the bottom tabs of the hat base.
- Secure the tabs on the bottom of the open circle.
- Apply glue to the top of the open circle.
- Secure the larger open circle on top of the smaller open circle.
- Apply glue to the top of the tabs on the hat section.
- Secure the solid circle on top.
- Apply glue to the top base of the feet and secure to the bottom of the basket piece.
- Apply glue to the top of the hair cone section(I used a hot glue gun for this step) and glue the hat into place.
- Fill your pilgrim with goodies to give as a gift or use him as a festive Holiday decoration:)
Pilgrim Cone Container

Pilgrim Cone Container-JMRush
Basket size: W 4" X H 2.25”
Pilgrim Size (approximate): W 6” X H 5.”
This Pilgrim Cone Treat container can be filled with goodies for a gift or used as a center piece for your Thanksgiving feast. 20” of 1/4” ( or smaller width) ribbon or twine is needed to complete the basket. This design is compatible with 8x12 or 12X12 mats.

- Cut the design pieces.
- Pre-fold all score lines.
- Using 20” of 1/4” or smaller ribbon or twine, lace it through the holes of the Octagonal design piece to create a basket. Tie a bow to secure.
- Starting with the largest curved body piece, insert the tab into the slot.
- Apply glue to the inside of the cone on the inside of the tab.
- Secure into place. Repeat for each Curved cone body section.
- Repeat for each Curved body section.
- Apply glue to the inside of the second largest curved body piece.
- Place it on top of the largest curved cone body section and secure. Make sure that the seems align in the back.
- Glue the rectangular belt buckle onto the largest Cone section on the front of your pilgrim.
- Apply glue to the back side of the hands and secure them onto the arm pieces.
- Apply glue to the backside of the rectangular cuff pieces and secure them on top of the wrists of the arm pieces.
- Apply glue to the backsides of the top of the arms.
- Secure the arms onto the the cone sections with the belt buckle.
- Apply glue to the inside of the collar cone body section.
- Secure the collared section on top of the belt buckle sections, making sure the the seams in the back align.
- Apply glue to the inside of the face section.
- Glue to on top of the belt buckle sections, aligning the seams in the back.
- Glue the whites of the eyes to the solid eye section.
- Connect the hat section together by placing the tab into the slot
- Place the open circular ring on top of the hat section.
- Apply glue to the bottom of the top of the bottom hat section tabs.
- Secure onto the bottom circular brim of the hat.
- Apply glue to the top of the hat tabs.
- Place the full circle piece on top and secure into place.
- Glue on the hat band and buckle. (Seam goes in the back).
- Glue on the eyes and the nose.
- Apply glue to the inside of the hat.
- Place the hat on top of the cone sections and secure into place.
- Fill your pilgrim with goodies to give as a gift or use him as a festive Holiday decoration:)
Thankful Blessed Word Art

Thankful Blessed Word Art- JMRush
This Multi-layer Word Art can be used for scrapbook pages, gift bags, decorating, or for any crafting projects.
Christmas Light Bulbs

Christmas Light Bulbs- JMRush
These Multi-layer Bulbs can be used for scrapbook pages, gift bags, decorating, or for Christmas themed crafting projects.
Santa Cone Container

Santa Cone Container-JMRush
Basket size: W 4" X H 2.25”
Santa Size (approximate): W 6” X H 7”
This Santa Cone Treat container can be filled with goodies for a gift or used as a center piece for your Christmas celebrations. 20” of 1/4” ( or smaller width) ribbon or twine is needed to complete the basket. This design is compatible with 8x12 or 12X12 mats.


- Cut the design pieces.
- Pre-fold all score lines.
- Using 20” of 1/4” or smaller ribbon or twine, lace it through the holes of the Octagonal design piece to create a basket. Tie a bow to secure.
- Starting with the largest curved body piece, insert the tab into the slot.
- Apply glue to the inside of the cone on the inside of the tab.
- Secure into place. Repeat for each Curved cone body section.
- Repeat for the scalloped body section.
- Repeat for the face cone section.
- Repeat for the hat scalloped section.
- Roll the triangular top piece into a cone shape.
- Apply glue and secure, aligning the edges.
- Glue the top fluff piece to the top of the hat.
- Glue the belt buckle an button into place.
- Tuck the hand pieces under the scalloped body section and glue into place. Eyes and nose also is glued into place.
- Glue the hat section into place.
- Now that all of the design pieces are in place we can glue the cone sections together.
- Glue the scalloped hat section to the face section, Making sure all the seams in the back align.
- Glue the face cone section to the top of the scalloped Body section, aligning the seams in the back.
- Apply glue to the inside of the largest scalloped edge curved cone body section and secure it to the top of the largest straight bottom section. (Make sure that the seams align in the back).
- Your Santa is complete. Fill him with goodies to give as a gift or use him as a festive Holiday decoration:)
I am your biggest FAN! Card

I am your biggest FAN! Card- JMRush
Card size: 5.5” x 4.25”
This cute card is a paper piecing design file that uses a play on words to express how much you admire that special someone and will leave them “blown away” with your thoughtfulness;) This design is compatible with both 8X12 and 12X12 mats.
You can purchase this design here: https://www.silhouettedesignstore.com/artists/485222

Snowman Cone Container

Snowman Cone Container-JMRush
Basket size: W 4" X H 2.25”
Snowman Size (approximate): W 6” X H 4.75”
This Snowman Cone Treat container can be filled with goodies for a gift or used as a center piece for your Christmas or Winter celebrations. 20” of 1/4” ( or smaller width) ribbon or twine is needed to complete the basket. This design is compatible with 8x12 or 12X12 mats.


- Cut the design pieces.
- Using 20” of 1/4” or smaller ribbon or twine, lace it through the holes of the Octagonal design piece to create a basket. Tie a bow to secure.
- Starting with the largest curved body piece, insert the tab into the slot.
- Apply glue to the inside of the cone on the inside of the tab.
- Secure into place. Repeat for each Curved cone body section.
- Repeat for each scalloped body section.
- Pre-fold score lines on the hat piece.
- Insert the tab into the slot of the Hat piece.
- Place the circular hat brim piece over it.
- Apply glue to the inside bottom of the tab and secure the brim into place.
- Apply glue to the top of the tabs.
- Place the full circle hat piece on top, creating the snowman's hat.
- Apply glue to the inside of the smallest scalloped body piece on secure it to the next largest. (Making sure that the seams align in the back each time)
- Repeat for the next largest sized scalloped piece.
- Repeat for the next largest sized scalloped piece.
- Glue the snowman’s arms into place.
- Glue the face and buttons into place.
- Apply glue to the inside of the hat.
- Place the hat on top of your snowman and secure into place.
- Tie ribbons for decoration. Fill him with goodies to give as a gift or use him as a festive Holiday decoration:)
Tree Cone Container

Tree Cone Container-JMRush
Basket size: W 4" X H 2.25”
Tree Size (approximate): W 6” X H 6.5”
This Tree Cone Treat container can be filled with goodies for a gift or used as a center piece for your Christmas or Winter celebrations. 20” of 1/4” ( or smaller width) ribbon or twine is needed to complete the basket. This design is compatible with 8x12 or 12X12 mats.


Monday, October 19, 2015
Boo Ghost Card

Boo Ghost Card-JMRush
W 5” x H 5”(approximate):
This design is compatible with 8x12 or 12X12 mats.

Turkey Slider Hatch Treat Box

Turkey Slider Hatch Treat Box-JMRush
Finished Box Dimensions (approximate)- W 2” x H 4” x D 7/8”
This cute little Turkey treat box has a hatch opening and will hold 3-4 “mini” candies. This design is compatible with 8x12 or 12X12 mats.


- Cut the design pieces.
- Pre-Fold all score lines.
- Apply glue to the tabs on each side.
- Secure the tabs to the inside of the lower box tabs creating a half box.
- Apply glue to the outside of each side of the half box.
- Secure to the inside of the side panel on each side.
- Place the pointed tabs on the upper section through the slot of the inside wing piece. You will need to bend the pointed tabs to get them into place. (Do not fold them) Make sure that the tab is on the outside of the wing piece. Repeat on the other side.
- Glue the upper section’s wings to the box base ( careful not to glue the tabs. They must remain free for the hatch to open properly.)
9. This is what you box should look like.
10. Apply a dab of glue to the upper edges of the wing section on each side -again being careful not to glue the tabs.
11. It should look like this:)
12. Glue the hind feathers together.
13. Glue the teat drop shaped gobbler onto the face backing then glue the beak and eyes into place.
14. Glue the head feathers into place then the completed face. The feet are glued to the bottom of the box and the hind feathers to the back.
15. Slightly curve the side wings and glue them into place on the side of the box.
16. Ta Da! Your Turkey is complete:)
Turkey Cone Container

Turkey Cone Container-JMRush
Basket size: W 4" X H 2.25”
Turkey Size (approximate): W 6” X H 5.5”
This Turkey Cone Treat container can be filled with goodies for a gift or used as a center piece for your Thanksgiving feast. 20” of 1/4” ( or smaller width) ribbon or twine is needed to complete the basket. This design is compatible with 8x12 or 12X12 mats.


- Cut the design pieces.
- Pre-fold all score lines.
- Using 20” of 1/4” or smaller ribbon or twine, lace it through the holes of the Octagonal design piece to create a basket. Tie a bow to secure.
- Apply glue to the Turkey toes.
- Secure the Turkey toes to the bottom of the basket.
- Place the tab inside the slot of the curved body piece.
- Apply glue to the inside of the tab.
- Secure the glued tab to the inside of the curved body piece.
- Continue this step for all curved body pieces.
- Glue the single hind feather and the larger double hind feather together.
- Glue the smaller double hind feather on top of the section.
- Glue the gobbler tear drop to the backdrop of the face section
- Glue the beak into place on the face section.
- Glue the white of the eyes into place.
- Assemble the head feathers by glueing the center and the two side feathers together.
- Apply glue to the inside of the Largest scalloped curved body section.
- Secure it to the the Large bottom straight cone lining up the seems on the back side.
- Repeat for the next scalloped body piece securing it on top of step 17.
- Make sure your seams are aligned:)
- Repeat for the next scalloped body piece securing it on top of step 18.
- Make sure your seams are aligned:)
- Roll the triangular top piece into a cone shape.
- Test fit that the edges will align.
- Apply glue to the scored edge.
- Secure the cone together.
- Apply glue to the inside of the top piece.
- Secure it to the top of the body section making sure that the seams align.
- Glue the hind feathers onto the back seemed side of the turkey body.
- Glue the face and head feathers into place.
- Apply a dab of glue to the top of each wing and secure onto the body.
- You can curve the wings if you like.
- TA DA! Your Turkey is Complete and ready to be filled with goodies or sit and look pretty;)
Look what an awesome job Dianne Jenkins did with this herd of Turkeys:) Adorable! Thanks for the project pictures Dianne. Love it!:)


Sunday, October 18, 2015
Pumpkin Envelope Pouch


Pumpkin Envelope Pouch-JMRush
Finished Pouch Dimensions:
W 3” x H 5.25”
Fill this cute little Pumpkin pouch with your favorite candy bar or use it as a cutlery holder for your Halloween/Thanksgiving party. Use this Pumpkin plain or choose from the four mix and match Jack-O-Latern faces included in this file. The pouch’s super easy construction makes it perfect for Halloween or Thanksgiving parties. This design is compatible with 8x12 or 12X12 mats.

Skeleton Box

Skeleton Box-JMRush
Finished Box Dimensions (approximate):
W 3” x H 2.5” x D 2.5”
You can fill this cute skeleton box with your favorite goodies. This design is compatible with 8x12 or 12X12 mats.

Bat Wobble Arms Box

Bat Wobble Arms Box-JMRush
Finished Box Dimensions including handle (approximate):
W 3” x H 4.5” x D 2.5”
This cute little Bat has arms that “wobble” when moved. You can fill this Bat box with your favorite goodies. This design is compatible with 8x12 or 12X12 mats.

Ghost Wobble Arms Box

Ghost Wobble Arms Box-JMRush
Finished Box Dimensions including handle (approximate):
W 3” x H 4.5” x D 2.5”
This cute little ghost has arms that “wobble” when moved. Fill this cute little ghost box with your favorite goodies and it is perfect for classroom parties or for sending a “Boo” to the neighbors. This design is compatible with 8x12 or 12X12 mats.

Pumpkin Box with handle

Pumpkin Box with Handle-JMRush
Finished Box Dimensions including handle (approximate):
W 3” x H 5.5” x D 2.5”
This design is compatible with 8x12 or 12X12 mats.

Skull Crossbones Envelope Pouch

Skull Crossbones Envelope Pouch-JMRush
Finished Pouch Dimensions:
W 3” x H 5.25”
Fill this cute little Skull Crossbones pouch with your favorite candy bar or use it as a cutlery holder for your Halloween/Pirate party. The pouch’s super easy construction makes it perfect for parties. This design is compatible with 8x12 or 12X12 mats.

Subscribe to:
Posts (Atom)