Wednesday, September 28, 2016

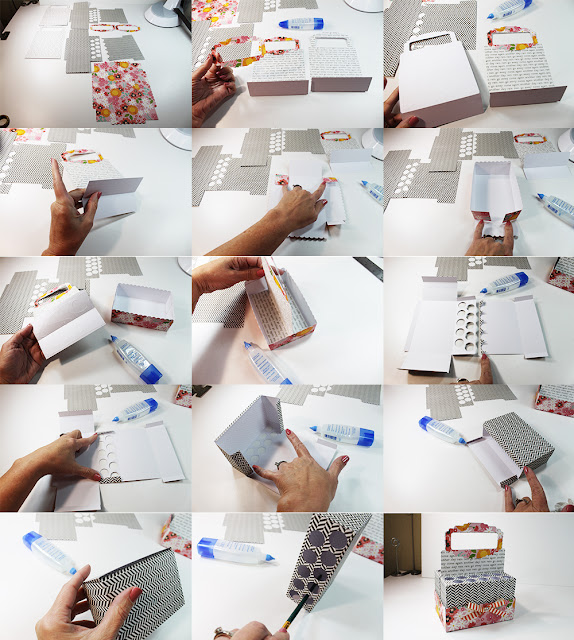
Colored Pencil Caddy


Colored Pencil Caddy-JMRush
Approximate size: W 5.5” X  H 7.25” X D 3.5”

This caddy is perfect for organizing and keeping up to 24 colored pencils handy. This caddy is perfect for your craft room or to be used as a gift for teachers, artists, or any color book enthusiast. This design is compatible with 8x12 or 12X12 mats.

You can purchase the Silhouette design file here: https://www.silhouettedesignstore.com/artists/485222


1.Cut design pieces. ( I used doubled sided card stock but it’s not necessary)
2. Fold the score lines on the two handle bases. Glue the scalloped handle pieces to the front of each of the handle bases; centering around the coordinating shape of the handle.
3. Apply glue to the backside of one of the combined handle base pieces being careful not to apply glue to the bottom section under the score line. Glue the backsides of the two combined handle bases together.
4. Image of the two bottom sections not glued together:)
5. Flip the caddy box base over ( pretty side down). Fold the score lines on the caddy box base. Apply glue to the backside of the two top tabs. Secure to the panel in the center.
6. Repeat for the bottom two tabs forming a box shape.
7. Apply glue to the bottom sections of the combined handle piece. Center and attach to the inside of the caddy box base.
8. Image of the combined handle glued inside the caddy box base.
9. Flip one set of the pencil box pieces over (pretty side down). Fold the score lines. Apply glue to the backside of the scalloped edge of the smaller pencil box piece. Align with the circles and score lines of the larger pencil box piece and secure.
10. Apply glue to the backsides of the top center and bottom center tabs. Secure to the rectangle shapes above and below to the left of the tabs.
11.  Apply glue to the tabs in the center of the combined pencil box and secure to the large rectangle to the right.
12.  Apply glue to the small tabs and the long tab. The two small tabs fit inside the box and the long tab is also glued inside the pencil box.
13. Image of the tab being secured. Repeat for the other two pencil box pieces.
14. Hint: (I used the end of a paintbrush to help secure the tabs to the inside of the pencil box)
15. I finished with a ribbon:)


High Top Shoe Centerpiece


High Top Shoe Centerpiece-JMRush
Approximate Centerpiece size: W 10.50” X H 6.25”


This design has eyelet holes to interlace a ribbon, features a fold out stand, and is compatible with both 8X12 and 12X12 mats. 

You can purchase the Silhouette design file here: https://www.silhouettedesignstore.com/artists/485222
See also:  High Top Shoe Invitation


  1. Cut design pieces. ( I used double sided card stock).
  2. Fold the kick stand out of the large base shoe (with only circular holes).
  3. Apply glue to the backside of the large shoe piece with the star cut out. ( Be careful not to apply glue to the area that will touch the kick stand on the base shoe)
  4. Center and secure to the base shoe; aligning the eyelet holes.
  5. Make sure the kick stand is not glued down and is still operational. 
  6. Glue the smallest shoe piece to the top of the combined shoe; centering it and aligning the eyelet holes.
  7. I used approximately 36” of 1/8” ribbon and  looped the ribbon through the bottom eyelet of the combined shoe. Pull the ribbon so that the ends are even each side.
  8. Thread one side of the ribbon through each eyelet.
  9. Repeat with the other side of the ribbon threading the opposite way as before (under or over the top of the card) Tie your ribbon:)

Monday, September 19, 2016

High Top Shoe Invitation


High Top Shoe Invitation-JMRush
Approximate Card size: W 5.50” X H 3.25”
Fits and A2 envelope

This design has eyelet holes to interlace a ribbon, comes with an optional print and cut insert to help organize your party details, and is compatible with both 8X12 and 12X12 mats. 

You can purchase the Silhouette design file here: https://www.silhouettedesignstore.com/artists/485222


  1. Cut design pieces. ( I used double sided card stock). Print and cut the optional Invitation insert pieces.
  2. Flip the card base over ( pretty side down). Glue the optional Print and cut invitation inserts to the coordinating shapes on the card base. 
  3. Glue the eyelets ( circles), single larger circle design, toe, and bottom runner pieces to the front of the high top piece. Fold the card base along the score line.
  4. Glue the combined high top piece to the front of the card. 
  5. Using approximately 21” of 1/8” ribbon (or smaller) loop the ribbon through the bottom eyelet of the combined card. Pull the ribbon so that the ends are even each side.
  6. Thread one side of the ribbon through each eyelet.
  7. Repeat with the other side of the ribbon threading the opposite way as before ( under or over the top of the card)
  8. Tie your ribbon and fill out your party information on the inside of the card:) 


Thursday, September 15, 2016

Skull Tea Light Banner (Flameless)

Skull Tea Light Banner (Flameless)-JMRush

Approximate size of each box: W 1. 5/8” X  H 1. 5/8” X D 1. 5/8”

This cute little skull box is the perfect size to hold one battery operated flameless tea light candle. This file and can be used independently or can be duplicated and strung together to create a banner for Halloween parties. This design is compatible with 8x12 or 12X12 mats. 

You can purchase the Silhouette design file here: https://www.silhouettedesignstore.com/artists/485222


1.Cut design pieces. ( I used double sided card stock and vellum paper)
2. Flip the cube base over ( pretty side down). Apply glue to the inside edges of the open square. Secure the small vellum square over the open square; centering it.
3. Insert a ribbon for hanging your cube.
4. Fold the score lines of the cube. Use pieces of foam adhesive squares to attach the skull to the skull base.
5. Apply glue to the top two tabs and secure to the square panel just above the tabs that has the hanging ribbon in it.
6. Apply glue to the next two tabs on the cube base and secure the lower panel to them.
7. Insert a Flameless battery operated tea light. (I used a color changing tea light)
8. Close the lid - Glue the combined skull piece to square that has the vellum piece. Do NOT glue the lid. The lid must open to turn the tea lights on and off:)
9. Tie the ribbon. The skull boxes can be duplicated and strung together to make a banner.

Dry Erase and Highlighter Caddy


Dry Erase and Highlighter Caddy-JMRush 
Approximate size: W 5.5” X  H 7.25” X D 3.5”

This caddy is perfect for organizing and keeping up to 20 Dry erase or highlighter markers handy. This design is compatible with 8x12 or 12X12 mats.

You can purchase the Silhouette design file here: https://www.silhouettedesignstore.com/artists/485222

You may also be interested in:


1.Cut design pieces.
2. Fold the score lines on the two handle bases. Glue the scalloped handle pieces to the front of each of the handle bases; centering around the coordinating shape of the handle.
3. Apply glue to the backside of one of the combined handle base pieces being careful not to apply glue to the bottom section under the score line. Glue the backsides of the two combined handle bases together.
4. Image of the two bottom sections not glued together:)
5. Flip the caddy box base over ( pretty side down). Fold the score lines on the caddy box base. Apply glue to the backside of the two top tabs. Secure to the panel in the center.
6.Repeat for the bottom two tabs forming a box shape. 
7. Apply glue to the bottom sections of the combined handle piece. Center and attach to the inside of the caddy box base.
8. Image of the combined handle piece glued inside the caddy base.
9. Flip one set of the marker box pieces over (pretty side down). Fold the score lines. Apply glue to the backside of the scalloped edge of the smaller marker box piece. Align with the circles and score lines of the larger marker box piece and secure.
10. Apply glue to the backsides of the top center and bottom center tabs. Secure to the rectangle shapes above and below to the left of the tabs.
11. Apply glue to the tabs in the center of the combined marker box and secure to the large rectangle to the right.
12. Apply glue to the small tabs and the long tab. The two small tabs fit inside the box and the long tab is also glued inside the marker box.
13. Image of the tab being secured. Repeat for the other two marker box pieces.
14. Helpful Hint- I used the end of a paintbrush inside of the marker holes to help secure the tabs into place.
15. I finished with a ribbon:)

Tuesday, September 13, 2016

Fine Point Marker Caddy


Fine Point Marker Caddy-JMRush
Approximate size: W 5.5” X  H 7.25” X D 3.5”

Custom sized for markers of .50” circumference


This caddy is perfect for organizing and keeping up to 24 fine point markers handy. This caddy is perfect for your craft room or to be used as a gift for teachers, artists, or any color book enthusiast. This design is compatible with 8x12 or 12X12 mats.

You can purchase the Silhouette design file here: https://www.silhouettedesignstore.com/artists/485222

You may also be interested in:
 Ultra Fine Point Marker Caddy  http://jmrushdesigns.blogspot.com/2016/09/ultra-fine-point-marker-caddy.html


Dry Erase and Highlighter Caddy http://jmrushdesigns.blogspot.com/2016/09/dry-erase-and-highlighter-caddy.html


1.Cut design pieces.
2. Fold the score lines on the two handle bases. Glue the scalloped handle pieces to the front of each of the handle bases; centering around the coordinating shape of the handle.
3. Apply glue to the backside of one of the combined handle base pieces being careful not to apply glue to the bottom section under the score line. Glue the backsides of the two combined handle bases together.
4. Image of the two bottom sections not glued together:)
5. Flip the caddy box base over ( pretty side down).Fold the score lines on the caddy box base. Apply glue to the backside of the two top tabs. Secure to the panel in the center.
6.Repeat for the bottom two tabs forming a box shape.
7. Apply glue to the bottom sections of the combined handle piece. Center and attach to the inside of the caddy box base.
8. Image of the combined handle glued inside the caddy box base.
9. Flip one set of the marker box pieces over (pretty side down). Fold the score lines. Apply glue to the backside of the scalloped edge of the smaller marker box piece. Align with the circles and score lines of the larger marker box piece and secure.
10. Apply glue to the backsides of the top center and bottom center tabs. Secure to the rectangle shapes above and below to the left of the tabs.
11.Apply glue to the tabs in the center of the combined marker box and secure to the large rectangle to the right.
12. Apply glue to the small tabs and the long tab. The two small tabs fit inside the box and the long tab is also glued inside the marker box.
13. I used the end of a paintbrush to help secure the glue of the tabs to the box. Repeat for the other two marker box pieces.
14. I finished with a ribbon:)


Ultra Fine Point Marker Caddy


Ultra Fine Point Marker Caddy-JMRush
Custom sized for markers of 7/16” circumference


This caddy is perfect for organizing and keeping up to 24 ultra fine point markers handy. This caddy is perfect for your craft room or to be used as a gift for teachers, artists, or any color book enthusiast. This design is compatible with 8x12 or 12X12 mats.

Approximate size: W 5.5” X  H 7.25” X D 3.5”

You can purchase the Silhouette design file here: https://www.silhouettedesignstore.com/artists/485222

You may also be interested in:


1.Cut design pieces. ( The handle pieces will be longer then shown in this tutorial)
2. Fold the score lines on the two handle bases. Glue the scalloped handle pieces to the front of each of the handle bases; centering around the coordinating shape of the handle.
3. Apply glue to the backside of one of the combined handle base pieces being careful not to apply glue to the bottom section under the score line. Glue the backsides of the two combined handle bases together.
4. Image of the two bottom sections not glued together:)
5. Flip the caddy box base over ( pretty side down).
6. Fold the score lines on the caddy box base. Apply glue to the backside of the two top tabs. Secure to the panel in the center.
7.Repeat for the bottom two tabs forming a box shape.
8. Apply glue to the bottom sections of the combined handle piece. Center and attach to the inside of the caddy box base.
9. Image of the combined handle glued inside the caddy box base.
10. Flip one set of the marker box pieces over (pretty side down). Fold the score lines. Apply glue to the backside of the scalloped edge of the smaller marker box piece. Align with the circles and score lines of the larger marker box piece and secure.
11. Apply glue to the backsides of the top center and bottom center tabs. Secure to the rectangle shapes above and below to the left of the tabs.
12. Apply glue to the tabs in the center of the combined marker box and secure to the large rectangle to the right.
13. Apply glue to the small tabs and the long tab. The two small tabs fit inside the box and the long tab is also glued inside the marker box.
14. Image of the tab being secured. Repeat for the other two marker box pieces.
15. I finished with a ribbon:) ( The handle piece will be longer then shown in this tutorial)


Wednesday, September 7, 2016

Taco Truck Treat Box


Taco Truck Treat Box-JMRush

Approximate size: W 6.25” X  H 3.5” X D 2”


The Taco Truck Treat Box has an attached lid and is great for party favors or to use as a centerpiece for parties. This design is compatible with 8x12 or 12X12 mats. 

You can purchase the Silhouette design file here: https://www.silhouettedesignstore.com/artists/485222


There is a Color Guide at the end of this tutorial for the design pieces:)

 1.Cut design pieces. ( I used double sided card stock)  (I grouped all of the color groups to help. You can highlight and ungroup your color sets as needed with your Silhouette program:)
2. Glue the largest circles to the matching shapes on the solid truck shapes.
3. Glue the truck shapes with cut outs to the coordinating solid truck shape. Glue the second largest circles to the largest circles that you just attached to the solid truck shape; centering it within the circles.
4. Glue the smaller door frames to the larger ones (2).Use foam adhesive squares to attach the third largest circles to the combined circles on the combined truck shape; centering them. Glue the scalloped curtain shape to the inside top of the large window on the combined truck shape.
5. Glue the front grill shape with cut outs to it’s solid base. Glue the Taco sign to it’s solid base. Glue the rectangular window shapes to the coordinating shapes.
6. Glue the three pepper pieces together- Largest on bottom to smallest on top. Glue the four taco pieces together- Largest on bottom to smallest on top. Then glue the two small squiggly lettuce pieces to the combined tacos. Glue the smallest white circles to the combined grill shape in the coordinating shapes. Glue the small open circles to the solid red circles (tail lights) Glue the hat shapes to both sides of the solid hat base. Glue the half moon shapes (brown) hat shadows to the coordinating shapes on both sides of the combined hat. Glue the two smallest circles to the insides of the headlights of the combined front grill section.
7. Flip the box bases over ( pretty side down) as shown in the photo. Fold the score lines. Apply glue to the backside of the long tab in the center. Line up the two box base pieces and attach.
8. Fold the tabs on the smallest box base piece and align with the the bottom section to the left of the seam. Apply glue to the top tab and secure into place.
9. Apply glue to the backside of the tab on the upper left box base-closest to the center. Attach to the center strip to the right of the tab.
10. Apply glue to the backside of the top tab of that same piece and secure to the right side panel.
11. Apply glue to the backsides of the two tabs of the bottom strip of the combined box base- first set from the center of the combined box base. Secure to the side panels.
12.  Repeat for the next two tabs-creating a box shape. Allow to dry.
13. Repeat for the last two tabs-creating a box shape. Allow to dry. 
14. Glue the front and back windshield combined pieces to their coordinating rectangular shaped panels ( these pieces have open rectangle shapes that are similar:)
15. Glue the solid rectangular spaces to their coordinating shapes on the front and top of the truck box base.
16. Image of the backside.
17. Glue the combined truck shape to it’s coordinating box base side.
Repeat for the other side. (Be careful not to glue the top backside of truck design with a window so as not to glue the box tab closure slot)
18. Glue the combined door into place. Use foam adhesive squares to attach the combined pepper, combined taco, and Taco sign into place.


19. Glue the long wheel hub to the coordinating side. (do not glue the very front of the long wheel hug piece- toward the front of the truck) Fold the score lines.
20. Use foam adhesive squares to attach the smaller wheel hub shape to the larger one.
21. Glue the other long wheel hub to the other side. (do not glue the very back of the long wheel hug piece- toward the back of the truck) Fold the score lines. Glue the end section to the other side of the truck tucking under the long wheel hub on the other side.
22. Image of the bumpers corner.
23. Glue the combined door to the coordinating shape on the other side of the box. Attach the last smaller wheel hub to the coordinating shape using foam adhesive squares.
24. Glue the combined round tail lights (two) to the backside of the truck.
25. Glue the combined grill piece with headlights to the front of the truck box base.
26. Insert the combined hat into the slot in the top of your box.
27. Apply glue to the front of one of the tabs and to the back of the other tab on the inside lid section of your box. Secure to the inside of the lid.
28. Image of the inside lid with tabs glued.
29. Other side of the Taco Truck:)


Color Guide


Potion Bottle Lanterns


Poison Potion Bottle Lantern (Flameless)-JMRush
Lantern size: W 3 x D 3 x H 9”

This Flameless lantern features a print and cut label design and when vellum paper is used, a transparent frosted effect is created.This design is compatible with both 8X12 and 12X12 mats. 


You can purchase the Silhouette design file here: https://www.silhouettedesignstore.com/artists/485222


Poison Potion Bottle Lantern (Flameless)-JMRush
Lantern size: W 3 x D 3 x H 9”

Raven's Claw Potion Bottle Lantern (Flameless)-JMRush
Lantern size: W 3 x D 3 x H 9”

Witch's Brew Potion Bottle Lantern (Flameless)-JMRush
Lantern size: W 3 x D 3 x H 9”

You can purchase the Silhouette design file here: https://www.silhouettedesignstore.com/artists/485222


1.Cut design pieces. ( I used double sided card stock and vellum paper)
2. Flip the two lantern pieces over ( pretty side down) Fold the score lines of the lantern body. Center the two lantern body pieces. Apply glue to the backside of the right side tab on the left lantern body piece. Attach to the other lantern piece making sure that the bottoms align (joining the two body pieces).
3. Glue the rectangular vellum pieces to the open areas of the lantern body- centering each rectangle with the open window area of the lantern body.
4. Glue the two triangular vellum pieces to the coordinating shapes on the lantern body.
5. Apply glue to the side long tab on the very right side. Secure the long side tab to the other side creating a box.
6. Apply glue to the top tab and secure it to the triangular panel to it’s left side.
7. Repeat for all of the tabs until the top is complete.
8. Glue the small bottle top shaped vellum to the backside of one of the two bottle top designs; centering it with the coordinating shape.
9. Glue the other matching bottle top shape sandwiching the vellum in-between.
10. The combined bottle top slides into the two slots on the top of the lantern body.
11. Fold the score lines on the lantern square base. Apply glue to the top two tabs of the Lantern square base and secure to the inside of the sides.
12. Repeat for the bottom two tabs creating a shallow box.
13.-14. Place a flameless candle inside and the lantern body in it’s base. I used a color changing candle. I finished with a ribbon on top and decorated the print and cut label with enamel dots:)