Pumpkin Flip Top Box-JMRush
Approximate size: W 4" X H 5.25” X D 1.5”
The Pumpkin Flip Top Box has a top that is attached to the box base on one side and a tab closure on the other side. This file is great for party favors or to use as a centerpiece for your Autumn parties. This design is compatible with 8x12 or 12X12 mats.
You can purchase the Silhouette design file here: https://www.silhouettedesignstore.com/artists/485222
1.Cut design pieces. ( I used double sided card stock)
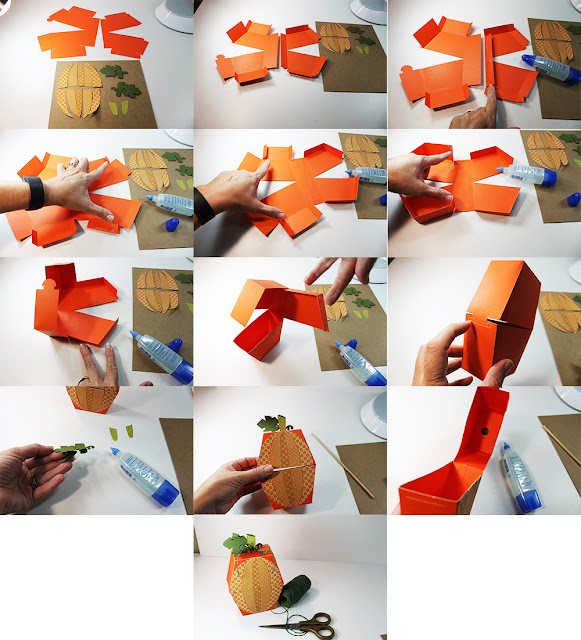
2. Flip Box base over ( pretty side down) just as image shows. Fold score lines up on the box base pieces.
3. Align the box base pieces so that the larger pieces is on the left and has the tab on the lower left and the smaller piece is on the right and has the small indented tab on the upper right. Apply glue to the backside of the long side tab on the right side smaller box base piece. Align with the edge of the other box base and secure. ( You want the tab to be on the inside of your box).
4. Apply glue to the small side tabs- one on the top and one on the bottom ( where my thumb and finger are in the picture). Secure to the rectangular tab shapes creating 90 degree angles.
5. Apply glue to the backside of the tabs closest to the outside the left box base- one on the top and one on the bottom ( where my thumb and finger are pointing). Secure to the tab directly below for the top tab and directly above for the lower tab.
6. Apply glue to the backside of the tabs closest to the center- one on the top and one on the bottom of the right side box base. Secure to the center strip.
7. Apply glue to the outer sides of the 90 degree angles on the outside of the right bottom section. Secure to the inside of the left box base sections creating a box and lining up the edges.
8. Apply glue to the outer sides of the 90 degree angles on the outside of the right upper section. Secure to the inside of the left box base
9. Your box is now complete:) Tuck the closure tab into the slot in the bottom section to close.
10. Glue the two stem leaf pieces together on the stem part only ( make sure that the half circle tabs at the bottom and leaf shapes are still separate.)
11. Glue the two small stem designs to each side of the combined stem/leaf piece. Curl the leaves as you like and insert the half circle tabs of the combined stem piece into the top of your box. Glue the pumpkin design pieces to the front of your box as shown.
12. Inside the top of the box base, apply glue to outer side of the two half circle tab pieces. Secure to the inside of the top of the box base.
13. Finish by adding a ribbon. Fill with goodies and enjoy:)


No comments:
Post a Comment