
Pilgrim Cone Container-JMRush
Basket size: W 4" X H 2.25”
Pilgrim Size (approximate): W 6” X H 5.”
This Pilgrim Cone Treat container can be filled with goodies for a gift or used as a center piece for your Thanksgiving feast. 20” of 1/4” ( or smaller width) ribbon or twine is needed to complete the basket. This design is compatible with 8x12 or 12X12 mats.

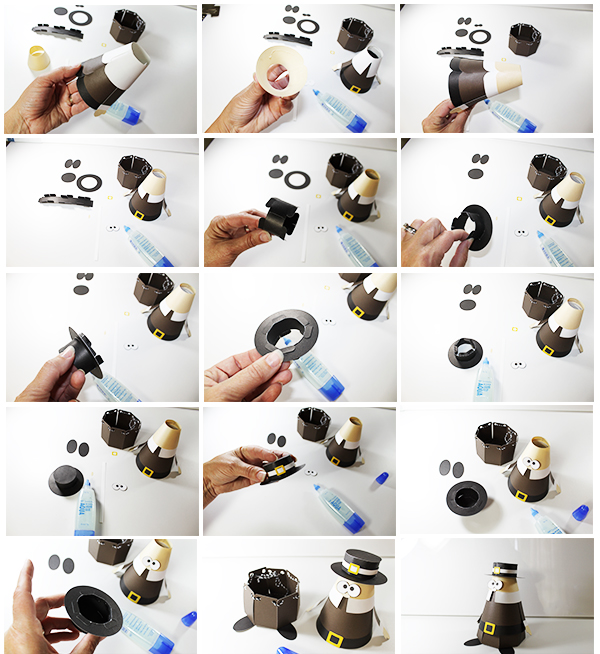
- Cut the design pieces.
- Pre-fold all score lines.
- Using 20” of 1/4” or smaller ribbon or twine, lace it through the holes of the Octagonal design piece to create a basket. Tie a bow to secure.
- Starting with the largest curved body piece, insert the tab into the slot.
- Apply glue to the inside of the cone on the inside of the tab.
- Secure into place. Repeat for each Curved cone body section.
- Repeat for each Curved body section.
- Apply glue to the inside of the second largest curved body piece.
- Place it on top of the largest curved cone body section and secure. Make sure that the seems align in the back.
- Glue the rectangular belt buckle onto the largest Cone section on the front of your pilgrim.
- Apply glue to the back side of the hands and secure them onto the arm pieces.
- Apply glue to the backside of the rectangular cuff pieces and secure them on top of the wrists of the arm pieces.
- Apply glue to the backsides of the top of the arms.
- Secure the arms onto the the cone sections with the belt buckle.
- Apply glue to the inside of the collar cone body section.
- Secure the collared section on top of the belt buckle sections, making sure the the seams in the back align.
- Apply glue to the inside of the face section.
- Glue to on top of the belt buckle sections, aligning the seams in the back.
- Glue the whites of the eyes to the solid eye section.
- Connect the hat section together by placing the tab into the slot
- Place the open circular ring on top of the hat section.
- Apply glue to the bottom of the top of the bottom hat section tabs.
- Secure onto the bottom circular brim of the hat.
- Apply glue to the top of the hat tabs.
- Place the full circle piece on top and secure into place.
- Glue on the hat band and buckle. (Seam goes in the back).
- Glue on the eyes and the nose.
- Apply glue to the inside of the hat.
- Place the hat on top of the cone sections and secure into place.
- Fill your pilgrim with goodies to give as a gift or use him as a festive Holiday decoration:)
No comments:
Post a Comment