Showing posts with label SVG Cut. Show all posts

Monday, April 24, 2017

Unicorn Hug Gift Card Holder


Unicorn Hug Gift Card Holder - JMRush
Approximate Size: W 4.25” x H 6.5”

This design features character arms that open to a hidden gift card pocket. This design is perfect for giving gift cards for Birthdays, Easter, Valentine’s Day, or for any occasion. This design is compatible with both 8X12 and 12X12 mats and fits most gift cards.


You can purchase this Silhouette design file here: https://www.silhouettedesignstore.com/artists/485222

You can purchase the SVG and Cricut file here:

1. Cut the design pieces. ( I used double sided card stock)
2. Fold the Card Base at the score lines. Glue the Unicorn head with ear, eye, and nose cut outs to it’s coordinating solid base. Glue the unicorn horn with cut outs to it’s coordinating solid base. Glue the eyes with eyelashes to the circles with small circle cut outs; aligning at the small circle. 
3. Apply glue the bottom of the side tabs on the card base. Secure by folding upward toward the card base.
4. Curl the eyelashes on the combined eyes as you like:) Glue the combined eyes to the coordinating shapes on the combined Unicorn head; aligning the small circles.
5. Curl the hair and tail pieces as you like. Glue the small hair piece to the combined unicorn head. 
6. Use a foam adhesive square to attach the combined unicorn horn to the combined unicorn head; aligning at the top of the horn. Use foam adhesive squares to attach the combined Unicorn head to the coordinating shape on the card base.
7. Glue the hooves to the hoover shapes on the card base. Use foam adhesive squares to attach the large hair piece to the back of the card base.
8. Insert gift card.
9. Fold the gift card section upward and tuck the hooves into the slots on the front of the gift card section (card base).
10. Attach the tail to the back of the card base with a foam adhesive square.

11. Finish with a ribbon:)

Wednesday, April 12, 2017

Bunny Glasses Basket


Bunny Glasses Basket-JMRush
Approximate Basket Dimensions: W 3” x D 2.50” X H 2.50” (H 5.5” including the handle)

This design is compatible with both 8X12 and 12X12 mats and is perfect for Easter goodies or Birthday party treats.

You can purchase this design here: https://www.silhouettedesignstore.com/artists/485222
Boy Bunny Glasses Basket-JMRush

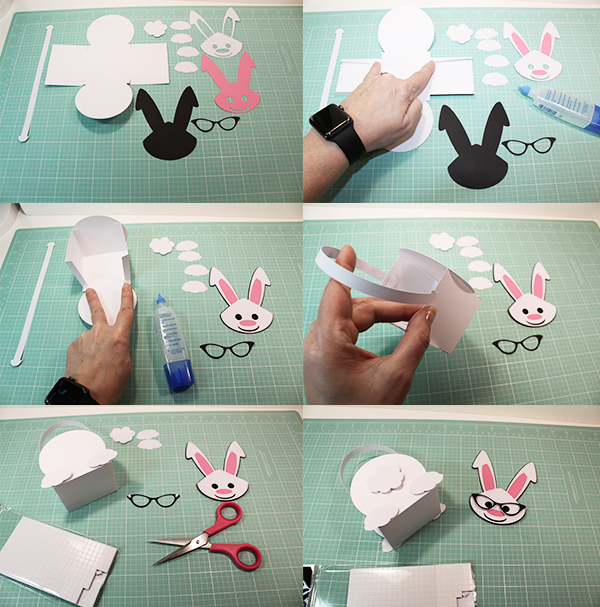
  1. Cut design pieces. I used double sided card stock.
  2. Glue the bunny’s head with eye/nose/mouth cut outs to the coordinating shape with eye and mouth cut outs.  Apply glue to the side tabs on the top section and secure to the rounded shape on each side.
  3. Repeat for the bottom tabs creating a box. Glue the combined bunny head to it’s coordinating solid shape piece.
  4. Insert the handle into the side slots.
  5. Attach two of the bunny paws to the front bottom sides of the box using foam adhesive squares. Use small pieces of foam adhesive to attach the girl bunny glasses and glue for the boy glasses.
  6. Flip the box over and attach the bunny tail piece and remaining two bunny paws to the backside of the box using a foam adhesive square. Using foam adhesive squares, attach the combined bunny’s head to the front of the box. I finished the bunny with a Ribbon for the girl and a bow tie for the boy. I accentuated the eyes enamel adhesive jewels:)

Thursday, December 1, 2016

Winter Birdhouse Ornament Gift Tag


Winter Birdhouse Ornament Gift Tag- JMRush 
Approximate size: W 4.5” X H 5.75”


This design can be used as a gift tag or ornament and is compatible with both 8X12 and 12X12 mats. 

You can purchase the Silhouette design file here: https://www.silhouettedesignstore.com/artists/485222


1. Cut design pieces. (Be careful not to scrap the little circles that are grouped with two of the groupings:)
2. Flip the Base piece (with a circular hanger) over ( pretty side down). Center and glue the solid birdhouse shape to the base. (This is optional and is used for writing if you will be using this for a gift tag and not an ornament) Flip this combined piece back over ( pretty side up).  Glue the pinecone cut out pieces to their coordinating pinecone solid bases.  Glue the small circle to the larger one; centering it. Flip the smaller birdhouse group (with cut outs) over ( pretty side down).  Attach pieces of foam adhesive squares to it and to the triangular roof shaped birdhouse top.
3. Flip the smaller birdhouse back over and attach it to the larger one; centering it. Flip the smaller triangular roof piece back over and attach it to the larger one; aligning at the top and the outside edges. Flip this combined triangular roof piece over ( pretty side down) and attach foam adhesive squares. Flip the combined circle piece over and attach a piece of foam adhesive square to it.
4. Flip the combined triangular roof piece over and attach it to the combined base piece. Flip the combined birdhouse piece over and attach it to the combined base. Flip the combined circle piece over and attach it to the front of the combined birdhouse. Curve the pine needles and combined pinecones as you like. Glue two of the pine needle sets to the top of the combined birdhouse. Flip the combined pinecones over (pretty side down) and attach a foam adhesive square to each one. 
5. Flip the combined pinecones back over and attach to the combined birdhouse.
6. Glue the other two sets of pine needles to the combined birdhouse. I finished with a ribbon and enamel dots:)

Sunday, November 27, 2016

Stacked Winter Fox Card


Stacked Winter Fox Card- JMRush 
Approximate Card size: H 5.50” X W 4.25”

This design is compatible with both 8X12 and 12X12 mats. 

You can purchase the SVG and Cricut file here:

You can purchase the Silhouette design file here: https://www.silhouettedesignstore.com/artists/485222


1. Cut design pieces.
2. Fold the card base. Glue the solid head base piece to the solid head piece with the scarf at the bottom. Glue the face piece to the head piece with ear cut outs.
3. Glue the combined face/head piece to the combined head/scarf piece. Glue the nose to the combined head piece.
4. Use foam adhesive squares to attach the combined fox head piece to the front leg body piece and then to the full body piece. Glue the combined fox to the front of the card.
5. I used adhesive enamel dots to accentuate the eyes:)


Stacked Winter Squirrel Ski Card

Stacked Winter Squirrel Ski Card- JMRush 
Approximate Card size: W 5.50” X H 4.25”

This design is compatible with both 8X12 and 12X12 mats.

You can purchase the Silhouette design file here: https://www.silhouettedesignstore.com/artists/485222

You can purchase the SVG and Cricut file here:


1. Cut design pieces. (There is an additional nose piece not shown in this tutorial) ( I ended up using a textured/marbled brown card stock for three of the four squirrel body pieces)
2. Fold the card base. Glue the skis to the squirrel base piece.
3. Glue the large squirrel piece to the coordinating shape on the combined squirrel base piece. 
4. Glue the small squirrel body piece (with no arms) to the combined squirrel base piece. 
5. Glue the tip of the single ski pole to the combined squirrel base at the coordinating shape. Tuck the single ski pole under the arm of the last squirrel body piece and glue to the combined squirrel base piece.
6. Glue the scarf to the coordinating shape on the combined squirrel base.
7. Glue the head to the combined squirrel base piece.
8. Use foam adhesive squares to attach the combined squirrel to the front of the card.Glue the small nose to the combined squirrel. I used adhesive enamel dots to accentuate the eye:)


Wednesday, November 23, 2016

Ice Skates Gift Tag


Ice Skates Gift Tag- JMRush 

This design is compatible with both 8X12 and 12X12 mats.

You can purchase the Silhouette design file here: https://www.silhouettedesignstore.com/artists/485222

You can purchase the SVG and Cricut compatible design file here: https://www.jamieandjenn.com

This tutorial contains both the single and double ice skate gift tag images.
  1. Cut Design pieces.
  2. Glue the ice skate shapes to the coordinating shapes on the largest ice skate shape.
  3. Flip the combined ice skate over and glue the last ice skate shape on.
  4. Using approximately 22” of 1/8” ribbon (or smaller) loop the ribbon through the bottom eyelet of the combined card. Pull the ribbon so that the ends are even each side.
  5. Thread on side of the ribbon through each eyelet.
  6. Repeat with the other side of the ribbon threading the opposite way as before ( under or over the top of the card)
  7. Tie your ribbon.
  8. Loop a ribbon through the top loop of the combined ice skate.

Ice Skate Gift Tag Single


Ice Skate Gift Tag Single- JMRush 


This design is compatible with both 8X12 and 12X12 mats.

You can purchase the Silhouette design file here: https://www.silhouettedesignstore.com/artists/485222

This tutorial contains both the single and double ice skate gift tag images.
  1. Cut Design pieces.
  2. Glue the ice skate shapes to the coordinating shapes on the largest ice skate shape.
  3. Flip the combined ice skate over and glue the last ice skate shape on.
  4. Using approximately 22” of 1/8” ribbon (or smaller) loop the ribbon through the bottom eyelet of the combined card. Pull the ribbon so that the ends are even each side.
  5. Thread on side of the ribbon through each eyelet.
  6. Repeat with the other side of the ribbon threading the opposite way as before ( under or over the top of the card)
  7. Tie your ribbon.
  8. Loop a ribbon through the top loop of the combined ice skate.

Ice Skate Card


Ice Skate Card- JMRush 
Approximate Card size: W 5.” X H 3.5”

This design is compatible with both 8X12 and 12X12 mats.

You can purchase the Silhouette design file here: https://www.silhouettedesignstore.com/artists/485222


  1. Cut Design pieces. (I used double sided card stock)
  2. Glue the ice skate shapes to the coordinating shapes on the card base.
  3. Fold the combined card.
  4. Open the card and glue the solid ice skate shape to the inside coordinating shape.
  5. Using approximately 22” of 1/8” ribbon (or smaller) loop the ribbon through the bottom eyelet of the combined card. Pull the ribbon so that the ends are even each side.
  6. Thread on side of the ribbon through each eyelet.
  7. Repeat with the other side of the ribbon threading the opposite way as before ( under or over the top of the card)
  8. Tie your ribbon.

Tuesday, November 15, 2016

Santa’s Sleigh Lantern (Flameless)


Santa’s Sleigh Lantern (Flameless)-JMRush
Approximate Lantern size: W 3 x D 3 x H 7” (H 7.75” with Star Hanger)


This Flameless lantern features Santa’s sleigh and reindeer in flight which is wrapped around each of the four sides. A layered transparent frosted effect is created when vellum paper is used. This design is compatible with both 8X12 and 12X12 mats.


You can purchase the Silhouette design file here: https://www.silhouettedesignstore.com/artists/485222

1.Cut design pieces. ( I used double sided card stock and vellum paper)
2.Center and glue the rectangular silhouettes to the open rectangle mat shapes. Glue the jingle bells to the jingle bell solid base shapes.
3. Center and glue the combined rectangular silhouette shapes to the coordinating shapes on the lantern base.
4.Flip the two combined lantern base pieces over ( pretty side down and as shown). Fold the score lines.
5.Apply glue to the front edges (perimeter) of the rectangular star cut out pieces. (There is one star panel that is different. It will be matched up to the lantern base panel with the half moon.) Flip them over and attach them to the lantern base; centering each one. 
6.Center the two lantern body pieces. Apply glue to the backside of the right side tab on the left lantern body piece. Attach to the other lantern piece making sure that the bottoms align (joining the two body pieces). 
7.-8.Glue the Star shaped hangers together. (Make sure the stems of these piece remain separate)
9. Glue one of the stems of the Star hanger combined piece to the inside of the top of the panel with santa on it. (The other stem will be glued inside the lantern later)
10.-11.-12. Apply glue to the top of the side long tab on the very left side. Secure the long side tab to the other side creating a box.


13. Apply glue to the top tab with the circle hanger and secure it to the triangular panel to it’s left side.
14. Image of the tab secured to the panel.
15.-16. Repeat for the next tab. 
17. Apply glue to the remaining unsecured Star hanger stem.
18. Secure it to the opposite side of the lantern top.
19. Continue securing the top tabs until the top is fully enclosed.
20. I sometimes use a long object (pencil eraser end) to help secure the tabs on the inside of the lantern top base.
21. Fold the score lines on the lantern square base. 
22.Apply glue to the top two tabs of the Lantern square base and secure to the inside of the sides.
23. Repeat for the bottom two tabs creating a shallow box.

24. Place a flameless candle inside and the lantern top in it’s base.( Shown is a W 1.5” x H 6.5 color changing flameless candle. I ended up using a 2.75” x H 4” color changing pillar flameless candle in the final product image:). 


25.-26. I finished by stringing a ribbon through the openings in the combined jingle bells and tied the ribbon around the top of the star hanger at the top of the lantern.

Wednesday, October 26, 2016

Werewolf Hug Treat Box


Werewolf Hug Treat Box-JMRush
Approximate box size: W 3.” x D 2.25 x H .75” 
(W 4.50 X H 4.25” including character)

This treat box features character arms that open to a small treat box. This design is perfect for Halloween parties or for your special trick or treaters. This design is compatible with both 8X12 and 12X12 mats. 

You can purchase the Silhouette design file here: https://www.silhouettedesignstore.com/artists/485222


1.Cut design pieces. (I used double sided card stock for the box base).
2. Fold the box base along score lines. Glue the eye pieces to the coordinating eye base shape. Using pieces of foam adhesive squares, attach the ears to the the coordinating shapes on the box base.
3. Glue the werewolf face to the combined eyes. Using a piece of foam adhesive square, attach the nose to the combined werewolf face.
4. Flip the combined werewolf face over and attach foam adhesive squares to the top and glue along the bottom. Attach to the box base. 
5. Glue the fangs into place. Apply glue to the two top tabs of the box base and secure them to the top (head) panel.
6. Apply glue to the bottom two tabs and secure them to the bottom panel creating a box.
7. Apply glue to the bottom tab of the center narrow strip section. Secure the center narrow strip tab to the backside of the inside of the box.
8. Flip the paw shapes over. Attach a foam adhesive square to the curvy edge and glue along the straight line.
9. Glue the hands to the coordinating shapes on the box base hands; aligning with the edge of the box. The hands tuck into the slots of the center strip:) Finish with a ribbon:)

Mummy Hug Treat Box


Mummy Hug Treat Box-JMRush
Approximate box size: W 3.” x D 2.25 x H .75” 
(W 3.25 X H 4.25” including character)


This treat box features character arms that open to a small treat box. This design is perfect for Halloween parties or for your special trick or treaters. This design is compatible with both 8X12 and 12X12 mats.


You can purchase the Silhouette design file here: https://www.silhouettedesignstore.com/artists/485222


1.Cut design pieces. (I used double sided card stock for the box base).
2.-3.  Fold the box base along score lines. Attach the mummy face wrap to the mummy skull using pieces of foam adhesive squares. Attach the combined mummy skull to the skull solid base using foam adhesive squares.  Use pieces of foam adhesive squares to attach the eye balls into the coordinating shapes. Glue the mummy hands to the mummy hands solid base.
4. Glue the combined mummy to the coordinating shape on the box base. Glue the bottom of the combined mummy layers if needed.
5. Apply glue to the two top tabs and secure them to the top (head) panel.
6. Apply glue to the bottom two tabs and secure them to the bottom panel creating a box.
7. Apply glue to the bottom tab of the center narrow strip section. Secure the center narrow strip tab to the backside of the inside of the box.
8. Glue the hands to the coordinating shapes on the box base hands; aligning with the edge of the box. The hands tuck into the slots of the center strip. Finish with a bow:)


Monday, October 24, 2016

Spooky Scene Triptych Card


Spooky Scene Triptych Card-JMRush
Approximate size: W 5.25 x H 4.25”

The Nativity Triptych Card features a front cover that depicts a haunted house and is bordered by

side panels that depict a grave yard scene with a raven on one side and a grave yard scene with an owl on the other. The card opens to a blank back page ( like a regular card ) and fits in a regular envelope. This design is compatible with both 8X12 and 12X12 mats. 


You can purchase the Silhouette design file here: https://www.silhouettedesignstore.com/artists/485222


1.Cut design pieces. (I used double sided card stock)
2. Fold the card base along the score lines. Glue the haunted house panel to the slightly larger haunted house panel. Glue the larger solid rectangle piece to the inside center of the card base.
3. Center and glue the owl panel to the front of it’s coordinating panel on the card base. Repeat for the raven silhouette panel. 
4. Fold the top flap on the cad base down and glue the combined haunted house panel to the front of this flap; centering it.


Spooky Lantern (Flameless)


Spooky Lantern (Flameless)-JMRush
Approximate Lantern size: W 3 x D 3 x H 7” (H 8” with Star Topper)


This Flameless lantern features a Spooky Haunted House design which is wrapped around each of the four sides. A layered transparent frosted effect is created when vellum paper is used. This design is compatible with both 8X12 and 12X12 mats. 

You can purchase the Silhouette design file here: https://www.silhouettedesignstore.com/artists/485222


1.Cut design pieces. ( I used double sided card stock and vellum paper)
2. Flip the two lantern pieces over ( pretty side down) 
3. Glue the rectangular vellum pieces to the open areas of the lantern body- centering each rectangle with the open window area of the lantern body. 
4. Glue the triangular vellum pieces to the top triangular open areas of the lantern body- centering each triangle with the open window area of the lantern body.
5. Glue the Star shaped hangers together. ( Make sure the stems of these piece remain separate)
6. Glue one of the stems of the star hanger combined piece to the inside of the top of the third from the left window panel. (The other stem will be glued inside the lantern later)
7. Fold the score lines of the lantern body. 
8. Center the two lantern body pieces. Apply glue to the backside of the right side tab on the left lantern body piece. Attach to the other lantern piece making sure that the bottoms align (joining the two body pieces).
9. Apply glue to the side long tab on the very right side. Secure the long side tab to the other side creating a box.
10. Apply glue to the top tab with the star hanger and secure it to the triangular panel to it’s left side.
11. Repeat for the next tab. Continue applying glue to the top tabs until the top is complete.
12. Apply glue to the other side of the star hanger piece and secure to the opposite side inside the lantern. Hard to see pic of the inside…sorry.
13. Fold the score lines on the lantern square base.
14. Apply glue to the top two tabs of the Lantern square base and secure to the inside of the sides.
15. Repeat for the bottom two tabs creating a shallow box.
16. Place a flameless candle inside and the lantern top in it’s base.( I used a W 2.75” x H 4” pillar color changing flameless candle). I finished with a ribbon on top:)


Wednesday, October 12, 2016

Golden Retriever Hug Gift Card Holder


Golden Retriever Hug Gift Card Holder-JMRush
Approximate Card size: W 4” X H 5.75”


This design features character arms that open to a hidden gift card pocket. This design is perfect for giving gift cards for Birthdays, Father’s/Mother’s Day, a thank you for your vet/groomer, or for any occasion. This design is compatible with both 8X12 and 12X12 mats and fits most gift cards.


You can purchase the Silhouette design file here: https://www.silhouettedesignstore.com/artists/485222


1.Cut design pieces. (I used double sided card stock for the card base) ( There is a heart shaped piece in this file that is not shown at the beginning of this tutorial)
2. Fold the card along score lines. Glue the tongue to the backside of the  fullest dog head. Glue this combined head to the dog head base with a collar; centering around the eyes. Apply glue the bottom of the side tabs on the card base. Secure by folding upward toward the card base.
3. Glue the next largest dog head to the combined dog head base; centering around the nose.
4. Glue the next largest dog head to the combined dog head; centering around the nose.
5. Glue the last dog head pieces to the combined dog head; centering them with their coordinating shapes on the combined dog head. Glue the largest dog nose on the combined dog head base.
6. Glue the small dog nose piece on top of the larger one on the combined dog head base. I used small enamel dots to accentuate the dog’s eyes.
7. Use foam adhesive squares to attach the combined dog head to the front of the card base (make sure not to attach the collar section of the combined dog head, as you will need it to flex a bit when you fold the card). Insert gift card.
8. The hands tuck into the slots on the front. I popped the dog’s collar to the front of the gift card section. Use a foam adhesive square to attach the heart in the center of the hands. Finish with ribbon :)