Showing posts with label Trick or treat. Show all posts

Wednesday, October 26, 2016

Werewolf Hug Treat Box


Werewolf Hug Treat Box-JMRush
Approximate box size: W 3.” x D 2.25 x H .75” 
(W 4.50 X H 4.25” including character)

This treat box features character arms that open to a small treat box. This design is perfect for Halloween parties or for your special trick or treaters. This design is compatible with both 8X12 and 12X12 mats. 

You can purchase the Silhouette design file here: https://www.silhouettedesignstore.com/artists/485222


1.Cut design pieces. (I used double sided card stock for the box base).
2. Fold the box base along score lines. Glue the eye pieces to the coordinating eye base shape. Using pieces of foam adhesive squares, attach the ears to the the coordinating shapes on the box base.
3. Glue the werewolf face to the combined eyes. Using a piece of foam adhesive square, attach the nose to the combined werewolf face.
4. Flip the combined werewolf face over and attach foam adhesive squares to the top and glue along the bottom. Attach to the box base. 
5. Glue the fangs into place. Apply glue to the two top tabs of the box base and secure them to the top (head) panel.
6. Apply glue to the bottom two tabs and secure them to the bottom panel creating a box.
7. Apply glue to the bottom tab of the center narrow strip section. Secure the center narrow strip tab to the backside of the inside of the box.
8. Flip the paw shapes over. Attach a foam adhesive square to the curvy edge and glue along the straight line.
9. Glue the hands to the coordinating shapes on the box base hands; aligning with the edge of the box. The hands tuck into the slots of the center strip:) Finish with a ribbon:)

Mummy Hug Treat Box


Mummy Hug Treat Box-JMRush
Approximate box size: W 3.” x D 2.25 x H .75” 
(W 3.25 X H 4.25” including character)


This treat box features character arms that open to a small treat box. This design is perfect for Halloween parties or for your special trick or treaters. This design is compatible with both 8X12 and 12X12 mats.


You can purchase the Silhouette design file here: https://www.silhouettedesignstore.com/artists/485222


1.Cut design pieces. (I used double sided card stock for the box base).
2.-3.  Fold the box base along score lines. Attach the mummy face wrap to the mummy skull using pieces of foam adhesive squares. Attach the combined mummy skull to the skull solid base using foam adhesive squares.  Use pieces of foam adhesive squares to attach the eye balls into the coordinating shapes. Glue the mummy hands to the mummy hands solid base.
4. Glue the combined mummy to the coordinating shape on the box base. Glue the bottom of the combined mummy layers if needed.
5. Apply glue to the two top tabs and secure them to the top (head) panel.
6. Apply glue to the bottom two tabs and secure them to the bottom panel creating a box.
7. Apply glue to the bottom tab of the center narrow strip section. Secure the center narrow strip tab to the backside of the inside of the box.
8. Glue the hands to the coordinating shapes on the box base hands; aligning with the edge of the box. The hands tuck into the slots of the center strip. Finish with a bow:)


Thursday, October 20, 2016

Vampire Boy Hug Treat Box


Vampire Boy Hug Treat Box-JMRush
Approximate box size: W 3.” x D 2.25 x H .5” 
(W 5.5 X H 4.75” including character)

This treat box features character arms that open to a small treat box. This design is perfect for Halloween parties or for your special trick or treaters. This design is compatible with both 8X12 and 12X12 mats.

You can purchase the Silhouette design file here: https://www.silhouettedesignstore.com/artists/485222


1.Cut design pieces. (I used double sided card stock for the box base) ( I changed the color of the hair piece in the final image).
2. Glue the full vampire head with cut outs to the slightly larger one with fangs.Glue the vampire face with large eye openings to the vampire face base that has smaller eye openings.  Glue the cuff pieces with circle cut outs to the slightly larger cuff base pieces; aligning on the smallest edge.
3. Glue the vampire hair into place on the combined vampire head piece. Glue the combined vampire face to the combined vampire head base. I used a small piece of foam square adhesive to attach the spider and added enamel dots to the vampire’s eyes and spider body to accentuate those shapes. Glue the collar into place on the box base; aligning the notches with the coordinating shapes on the base. 
4. Using foam adhesive squares, attach the combined vampire head to the coordinating shape on the box base. Glue the bow tie piece just underneath the combined head on the box base. Fold the box base along score lines.
5.  Apply glue to the two top tabs of the box base and secure them to the top (head) panel.
6. Apply glue to the bottom two tabs and secure them to the bottom panel creating a box.
7. Apply glue to the bottom tab of the center narrow strip section. Secure the center narrow strip tab to the backside of the inside of the box.
8. Glue the hands to the coordinating shapes on the box base hands; aligning with the edge of the box. Glue the cuff pieces into place. The hands tuck into the slots of the center strip:) Finish with a ribbon for a bow tie:)

Vampire Girl Hug Treat Box


Vampire Girl Hug Treat Box-JMRush
Approximate box size: W 3.” x D 2.25 x H .5” 
(W 4.5 X H 4” including character)

This treat box features character arms that open to a small treat box. This design is perfect for Halloween parties or for your special trick or treaters. This design is compatible with both 8X12 and 12X12 mats.

You can purchase the Silhouette design file here: https://www.silhouettedesignstore.com/artists/485222


1.Cut design pieces. (I used double sided card stock for the box base).
2. Glue the full vampire head with cut outs to the slightly larger one with fangs.Glue the vampire face with large eye openings to the vampire face base that has smaller eye openings.  Glue the hand pieces to the larger cuff/web base pieces.
3. Glue the vampire hair into place on the combined vampire head piece. Glue the combined vampire face to the combined vampire head base.
4. Glue the collar into place on the box base. I used a small piece of foam square adhesive to attach the spiders and added enamel dots to the vampire’s eyes and spider’s bodies to accentuate those shapes.
5. Using foam adhesive squares, attach the combined vampire head to the coordinating shape on the box base. Fold the box base along score lines.
6.  Apply glue to the two top tabs of the box base and secure them to the top (head) panel.
7. Apply glue to the bottom two tabs and secure them to the bottom panel creating a box.
8. Apply glue to the bottom tab of the center narrow strip section. Secure the center narrow strip tab to the backside of the inside of the box.
9. Glue the hands to the coordinating shapes on the box base hands. The hands tuck into the slots of the center strip:)


Wednesday, October 19, 2016

Zombie Hug Treat Box


Zombie Hug Treat Box-JMRush
Approximate box size: W 3.” x D 2.25 x H .5” 
(W 3. X H 5” including character)

This treat box features character arms that open to a small treat box. This design is perfect for Halloween parties or for your special trick or treaters. This design is compatible with both 8X12 and 12X12 mats. 

You can purchase the Silhouette design file here: https://www.silhouettedesignstore.com/artists/485222


1.Cut design pieces. (I used double sided card stock for the box base).
2. Glue the smallest Zombie head to the slightly larger one. Glue the tiny eye pieces to the coordinating shapes on the zombie head combined piece.
3. Glue the combined zombie head to the zombie solid head base. Fold the box base along score lines.
4. Using foam adhesive squares, attach the combined zombie head to the coordinating shape on the box base. Glue the neck/collar piece just underneath the combined head on the box base. Apply glue to the two top tabs of the box base and secure them to the top (head) panel.
5. Apply glue to the bottom two tabs and secure them to the bottom panel creating a box.
6. Apply glue to the bottom tab of the center narrow strip section. Secure the center narrow strip tab to the backside of the inside of the box.
7. Glue the hands to the coordinating shapes on the box base hands; aligning with the edge of the box. The hands tuck into the slots of the center strip:) Finish with a ribbon:)

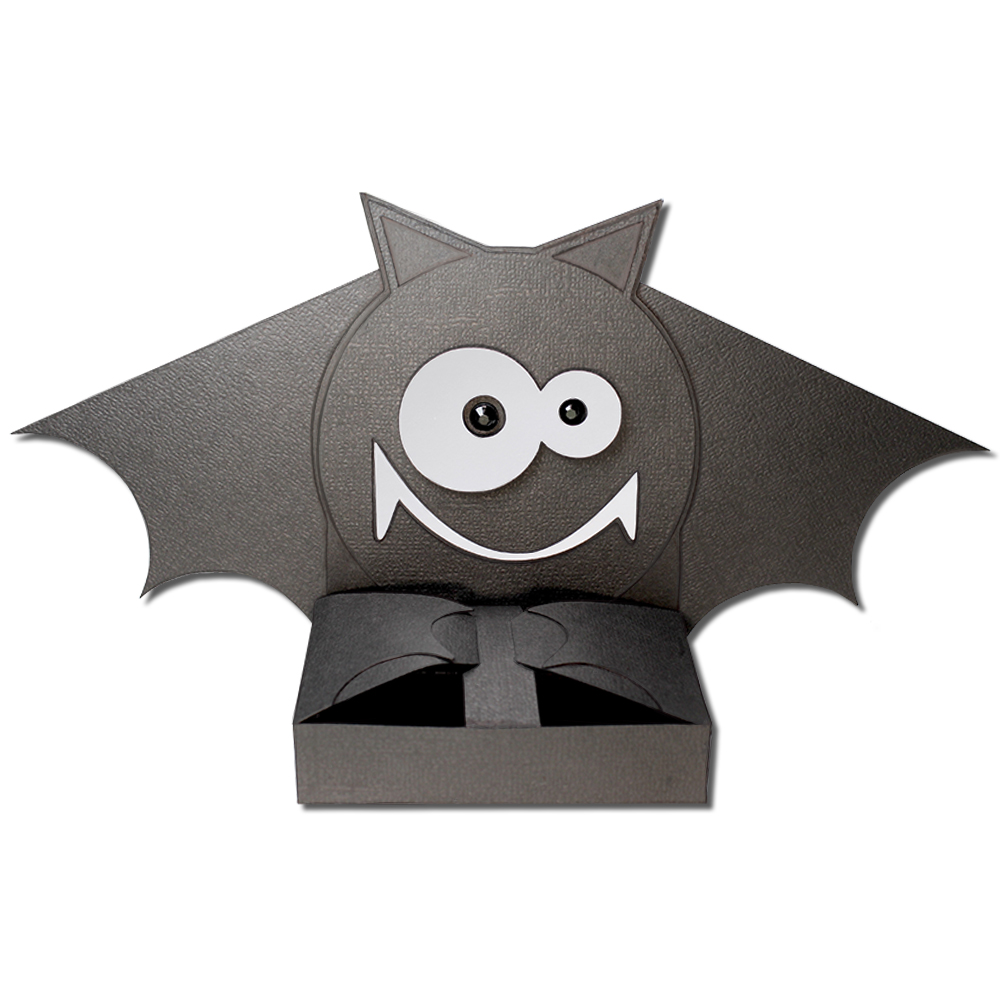
Bat Hug Treat Box

Bat Hug Treat Box-JMRush
Approximate box size: W 3.25” x D 2.25 x H .75” 
(W 8.5 X H 4.25” including character)

This treat box features character arms that open to a small treat box. This design is perfect for Halloween parties or for your special trick or treaters. This design is compatible with both 8X12 and 12X12 mats.

You can purchase the Silhouette design file here: https://www.silhouettedesignstore.com/artists/485222


1.Cut design pieces. (I used double sided card stock for the box base).
2. Glue the Bat head to the coordinating shape on the box base.
3. I used enamel dots to accentuate the eyes and then used foam adhesive squares to attach the eye shape to the box base; centering and aligning with the coordinating shape. Glue the mouth the to the coordinating shape on the box base.
4. Fold the box base along score lines.
5. Apply glue to the two top tabs and secure them to the top (head) panel.
6. Apply glue to the bottom two tabs and secure them to the bottom panel creating a box.
7. Apply glue to the bottom tab of the center narrow strip section. Secure the center narrow strip tab to the backside of the inside of the box.
8. Glue the hands to the coordinating shapes on the box base hands; aligning with the edge of the box. The hands tuck into the slots of the center strip:)
9. Apply a small line of glue on the top inside edge of the wings and attach to the backside of the box; aligning with the bottom and the edge of the box base:)

Tuesday, October 18, 2016

Skeleton Hug Treat Box


Skeleton Hug Treat Box-JMRush
Approximate box size: W 3.25” x D 2.25 x H .75” 
(W 3.25 X H 4.5” including character)

This treat box features character arms that open to a small treat box. This design is perfect for Halloween parties or for your special trick or treaters. This design is compatible with both 8X12 and 12X12 mats.


You can purchase the Silhouette design file here: https://www.silhouettedesignstore.com/artists/485222


1.Cut design pieces. (I used double sided card stock for the box base).
2. Glue the skeleton to the coordinating shape on the box base. Fold the box base along score lines.
3. Apply glue to the two top tabs and secure them to the top (head) panel.
4. Apply glue to the bottom two tabs and secure them to the bottom panel creating a box.
5. Apply glue to the bottom tab of the center narrow strip section. Secure the center narrow strip tab to the backside of the inside of the box.
6. Glue the hands to the coordinating shapes on the box base hands. The hands tuck into the slots of the center strip:)
7. Finish with a ribbon:)


Black Cat Hug Treat Box


Black Cat Hug Treat Box-JMRush
Approximate box size: W 3.25” x D 2.25 x H .75” 
(W 3.5 X H 5.25” including character)

This treat box features character arms that open to a small treat box. This design is perfect for Halloween parties or for your special trick or treaters. This design is compatible with both 8X12 and 12X12 mats.


You can purchase the Silhouette design file here: https://www.silhouettedesignstore.com/artists/485222


1.Cut design pieces. (I used double sided card stock for the box base).
2. Use foam adhesive squares to attach the cat nose to the cat nose/whisker base and again to attach the combined nose/whisker piece to the cat head.
3. Use foam adhesive squares to attach the combined cat head to the box base; centering and aligning with the coordinating shape. I used enamel dots to accentuate the eyes.
4. Fold the box base along score lines.
5. Apply glue to the two top tabs and secure them to the top (head) panel.
6. Apply glue to the bottom two tabs and secure them to the bottom panel creating a box.
7. Apply glue to the bottom tab of the center narrow strip section. Secure the center narrow strip tab to the backside of the inside of the box.
8. Glue the hands to the coordinating shapes on the box base hands. The hands tuck into the slots of the center strip:)
9. Use foam adhesive squares to attach the tail to the backside of the box; aligning with the bottom of the box base. Finish with a ribbon:)


Witch Hug Treat Box

Witch Hug Treat Box-JMRush

Approximate box size: W 3.25” x D 2.25 x H .75” 
(W 5.5 X H 6.25” including character)

This treat box features character arms that open to a small treat box. This design is perfect for Halloween parties or for your special trick or treaters. This design is compatible with both 8X12 and 12X12 mats.

You can purchase the Silhouette design file here: https://www.silhouettedesignstore.com/artists/485222

1.Cut design pieces. (I used double sided card stock for the box base).
2. Use foam adhesive squares to attach the hat to the witch head base. Apply glue to the bottom section.
3. Glue the box base to the bottom section of the combined witch head base; aligning with the hat and ears.
4. Glue the eyes to the backside of the witch face piece.
5. Glue the combined witch face to the combined box base; aligning with the face shape and hat of the combined box base. Glue the collar underneath; aligning with the collar of the combined box base.
6. Use a piece of foam square adhesive to attach the nose. I used enamel dots to accentuate the eyes.
7. I glued a ribbon to the hat.
8. Fold the box base along score lines.
9. Apply glue to the two top tabs and secure them to the top (head) panel.
10. Apply glue to the bottom two tabs and secure them to the bottom panel creating a box.
11. Apply glue to the bottom tab of the center narrow strip section. Secure the center narrow strip tab to the backside of the inside of the box.
12. Glue the hands and sleeve strips to the coordinating shapes on the box base hands. The hands tuck into the slots of the center strip:)


Ghost Hug Treat Boxes


Ghost Hug Treat Boxes-JMRush
Approximate box size: W 3.25” x D 2.25 x H .75” 
(W 3.25 X H 4.25” including character)

This treat box features character arms that open to a small treat box. This design is perfect for Halloween parties or for your special trick or treaters. This design is compatible with both 8X12 and 12X12 mats. 

You can purchase the Silhouette design file here: https://www.silhouettedesignstore.com/artists/485222


1.Cut design pieces. (I used double sided card stock for the box base).
2. Fold the box base along score lines.
3. Apply glue to the two top tabs and secure them to the top (head) panel.
4. Apply glue to the bottom two tabs and secure them to the bottom panel creating a box.
5. Apply glue to the bottom tab of the center narrow strip section. Secure the center narrow strip tab to the backside of the inside of the box.
6. The hands tuck into the slots on the narrow strip in the center. BOY only: Glue the small circles to the large circles. Use foam adhesive squares to attach the eyes to the box base. - Both glue the face pieces into place and finish with a ribbon:)


Friday, October 14, 2016

Frankenstein and Frankenstein Bride Hug Treat Box

Frankenstein and Frankenstein Bride Hug Treat Box-JMRush
Approximate box size: W 3.25” x D 2.25 x H .75” 
(W 3.75 X H 4.75” including character)

This treat box features character arms that open to a small treat box. This design is perfect for Halloween parties or for your special trick or treaters. This design is compatible with both 8X12 and 12X12 mats.

You can purchase the Silhouette design file here: https://www.silhouettedesignstore.com/artists/485222

1.Cut design pieces. (I used double sided card stock for the box base).
2. Fold the box base along score lines. Glue the Eyes to the Eye Base piece.
3. Glue the large screw pieces to the coordinating shapes on the box base. Apply glue to the two top tabs and secure them to the top (head) panel.
4. Apply glue to the bottom two tabs and secure them to the bottom panel creating a box.
5. -6. Apply glue to the bottom tab of the center narrow strip section. Secure the center narrow strip tab to the backside of the inside of the box.
7. For the Frankenstein Bride only: Glue the small rectangle piece to the larger rectangle piece; centering and aligning at the top of the large rectangle piece. Glue the curvy hair strips into place.
8. Using foam adhesive squares, attach the combined eye piece to the larger rectangle piece. Glue the mouth into place. For Frankenstein only: 
Glue the scar piece to the top center of the combined rectangle piece.
9. Using foam adhesive squares, attach the combined head to the box base. I used enamel dots to accentuate the eyes and added a ribbon. The hands tuck into the slots on the narrow strip in the center. I used pieces of foam adhesive squares to attach the long oval screw head pieces to the coordinating shapes on the combined frankenstein heads:)


Tuesday, August 30, 2016

Zombie Treat Box


Zombie Treat Box-JMRush
Approximate Box size: W 2.75” X W 1” X H 4.25”


This treat box design has an attached lid and is compatible with both 8X12 and 12X12 mats.

You can purchase the Silhouette design file here: https://www.silhouettedesignstore.com/artists/485222


  1. Cut design pieces. ( I used double sided card stock)
  2. Flip the box base over like shown (pretty side down). Fold the box base score line. Apply glue to the backside of the tab on the bottom right. Attach to the upper panel to the right.
  3. Apply glue to the backside of the tab on the bottom left. Attach to the panel to the left.
  4. Apply glue to the long vertical tab on the left and to the bottom horizontal tab. Attach to the panel to the right. Your box will be complete.
  5. Tuck the tab into the slot in the back. 
  6. Attach the zombie head to the solid zombie head base using pieces of foam adhesive squares. (I used enamel dots to accentuate the eyes in between these two layers. You can place the zombie head on top the head base temporarily and use a marker to place a guide mark through the eye holes to find placement:) Glue the smaller zombie face to the larger one-centering it.
  7. Attach the combined zombie face to the combined zombie head using foam adhesive squares.
  8. Glue the small eyes to the coordinating shapes on the combined zombie head. Attach the combined zombie head to the front of the treat box using foam adhesive squares and finish with a ribbon bow tie.


Pumpkin Treat Box


Pumpkin Treat Box-JMRush
Approximate Box size: W 2.75” X W 1” X H 4.25”


This treat box design has four optional Jack-O-Lantern faces that can be used, has an attached lid, and is compatible with both 8X12 and 12X12 mats. 


You can purchase the Silhouette design file here: https://www.silhouettedesignstore.com/artists/485222


  1. Cut design pieces. ( I used double sided card stock)
  2. Flip the box base over like shown (pretty side down). Fold the box base score line. Apply glue to the backside of the tab on the bottom right. Attach to the upper panel to the right.
  3. Apply glue to the backside of the tab on the bottom left. Attach to the panel to the left.
  4. Apply glue to the long vertical tab on the left and to the bottom horizontal tab. Attach to the panel to the right. Your box will be complete.
  5. Tuck the tab into the slot in the back.
  6. Glue the two stem leaf pieces together on the central stem part only and making sure that the half circle shapes at the bottom and leaves are still separate.
  7. Curl the leaves as you like.
  8. Glue the two small stem designs to each side of the combined stem/leaf piece.
  9. Insert the combined stem/leaf piece into the slot on the top of the treat box.
  10. Apply glue to the inside of the leaf/stem small tabs and secure to the top of the lantern. Hold until secure.
  11. Apply glue to the backside of the small circle piece.
  12. Cover the tabs on the inside of the lid portion of the treat box. Finish by adding a ribbon or twine and apply one of the four Jack-O-Lantern faces if desired.

Monday, August 29, 2016

Mummy Treat Box


Mummy Treat Box-JMRush
Approximate Box size: W 2.75” X W 1” X H 4.25”


This treat box design has an attached lid and is compatible with both 8X12 and 12X12 mats. 

You can purchase the Silhouette design file here: https://www.silhouettedesignstore.com/artists/485222


  1. Cut design pieces. ( I used double sided card stock)
  2. Flip the box base over like shown (pretty side down). Fold the box base score line. Apply glue to the backside of the tab on the bottom right. Attach to the upper panel to the right.
  3. Apply glue to the backside of the tab on the bottom left. Attach to the panel to the left.
  4. Apply glue to the long vertical tab on the left and to the bottom horizontal tab. Attach to the panel to the right. Your box will be complete.
  5. Tuck the tab into the slot in the back. Attach the mummy face wrap to the mummy skull using pieces of foam adhesive squares.
  6. Attach the combined mummy skull to the skull solid base using foam adhesive squares.
  7. Attach the eyes to the coordinating shapes on the combined skull using pieces of foam adhesive squares.
  8. Attach the combined mummy skull to the front of the treat box using foam adhesive squares and finish with a ribbon bow tie.

Skull Treat Box


Skull Treat Box-JMRush
Approximate Box size: W 2.75” X W 1” X H 4.25”


This treat box design has an attached lid and is compatible with both 8X12 and 12X12 mats.

You can purchase the Silhouette design file here: https://www.silhouettedesignstore.com/artists/485222

  1. Cut design pieces. ( I used double sided card stock)
  2. Flip the box base over like shown (pretty side down). Fold the box base score line. Apply glue to the backside of the tab on the bottom right. Attach to the upper panel to the right.
  3. Apply glue to the backside of the tab on the bottom left. Attach to the panel to the left.
  4. Apply glue to the long vertical tab on the left and to the bottom horizontal tab. Attach to the panel to the right. Your box will be complete.
  5. Tuck the tab into the slot in the back.
  6. Attach the skull to the skull solid base using foam adhesive squares.
  7. Attach the eyes to the coordinating shapes on the combined skull using pieces of foam adhesive squares.
  8. Attach the combined skull to the front of the treat box using foam adhesive squares and finish with a ribbon bow tie.

Ghost Treat Box- Girl and Boy


Ghost Treat Box- Girl and Boy-JMRush
Approximate Box size: W 2.75” X W 1” X H 4.25”

This treat box design has an attached lid and is compatible with both 8X12 and 12X12 mats. 

You can purchase the Silhouette design file here: https://www.silhouettedesignstore.com/artists/485222


  1. Cut design pieces. ( I used double sided card stock)
  2. Flip the box base over like shown (pretty side down). Fold the box base score line. Apply glue to the backside of the tab on the bottom right. Attach to the upper panel to the right.
  3. Apply glue to the backside of the tab on the bottom left. Attach to the panel to the left.
  4. Apply glue to the long vertical tab on the left and to the bottom horizontal tab. Attach to the panel to the right. Your box will be complete.
  5. Tuck the tab into the slot in the back.
  6. Glue each of the ghost’s arms to the edge of the back side ( with the tab/slot at the top)
  7. For the boy ghost, Glue the small circle eyes to the larger white circles; centering them. Glue the mouth into place and use pieces of foam adhesive squares to attach the eyes to the front of the treat box. I used enamel dots to accentuate the eyes and finished with a ribbon bow tie. Fill with goodies:) — For the girl, glue the mouth and eyes to the front of the treat box and finish with a ribbon at the top corner.