Showing posts with label Gift Tag. Show all posts

Wednesday, December 14, 2022

Nativity Scene Gift Tag Ornament


Nativity Scene Gift Tag Ornament-JMR


Approximate size: H 3.5” X W 2.5”


This Nativity Scene design doubles as a gift tag and ornament and is compatible with both 8X12 and 12X12 mats.

You can purchase the Silhouette design file here: https://www.silhouettedesignstore.com/artists/485222


You can purchase the SVG and Cricut compatible file here:https://www.jamieandjenn.com  Coming Soon:)


  1. Cut the design pieces. I used double sided card stock.
  2. Glue the black nativity scene to the blue nativity scene shape. (Optional) Flip the gold glitter ornament base over and center the white rectangle shape and attach with glue. This space is for writing a gift message.
  3. Using a ribbon, loop through each of the two circular hangers to create a ribbon hanger:)

Thursday, December 1, 2022

Wagon Wheel Gift Tag Ornament

Wagon Wheel Gift Tag Ornament-JMR


Approximate size: H 3.75” X W 3.25”


This wagon wheel design doubles as a gift tag and ornament and is compatible with both 8X12 and 12X12 mats. 


You can purchase the Silhouette design file here: https://www.silhouettedesignstore.com/artists/485222


You can purchase the SVG and Cricut compatible file here:https://www.jamieandjenn.com  Coming Soon:)

  1. Cut the design pieces. I used double sided card stock.
  2. Glue the silver hollow circle shape to the coordinating spoked brown silhouette with a circular hanger. Glue the smallest silver hollow circle to the small brown hollow circle; centering it.
  3. Glue the brown hollow circular shape to the combined ornament shape.
  4. (Optional) Flip the combined ornament over and attach the white circle with glue. This hollow circle is for writing a gift message.
  5. Flip the combined ornament over and attach a ribbon and twine for a hanging loop:)

Cowboy Hat Gift Tag Ornament

Cowboy Hat Gift Tag Ornament-JMR


Approximate size: H 2.5” X W 4”


This Cowboy Hat design doubles as a gift tag and ornament and is compatible with both 8X12 and 12X12 mats. 

You can purchase the Silhouette design file here: https://www.silhouettedesignstore.com/artists/485222


You can purchase the SVG and Cricut compatible file here:https://www.jamieandjenn.com  Coming Soon:)


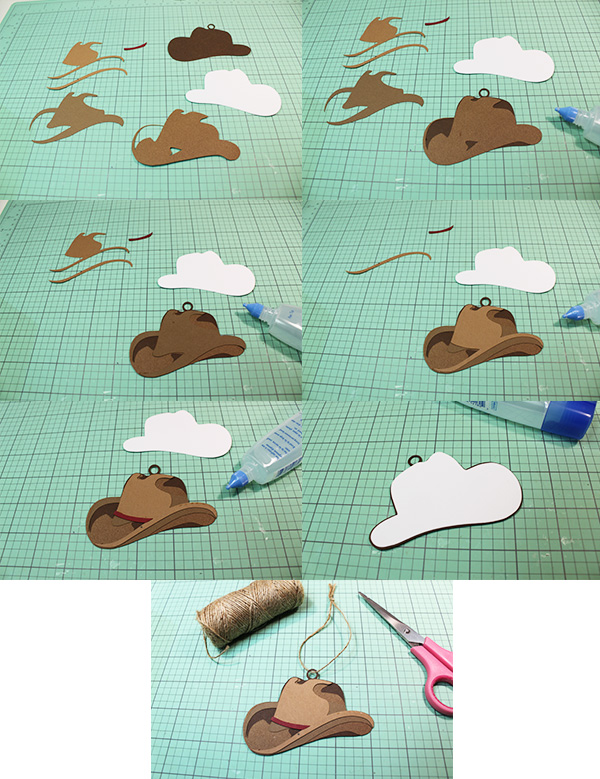
  1. Cut the design pieces. I used double sided card stock.
  2. Glue the hat shape with cut outs to the brown hat base.
  3. Glue the smaller hat shape to the coordinating shape on the combined hat.
  4. Glue the smallest hat shape to the combined hat.
  5. Glue the thin long brim piece to the coordinating shape on the combined hat. Glue the small red hat band into place on the combined hat.
  6. (Optional) Flip the combined ornament over and center the white hat shape and attach with glue. This shape is for writing a gift message.
  7. Flip the combined ornament over and attach a piece of twine for hanging:)

Windmill Gift Tag Ornament

Windmill Gift Tag Ornament-JMR


Approximate size: H 5” X W 2.5”


This Windmill design doubles as a gift tag and ornament and is compatible with both 8X12 and 12X12 mats.


You can purchase the Silhouette design file here: https://www.silhouettedesignstore.com/artists/485222


You can purchase the SVG and Cricut compatible file here:https://www.jamieandjenn.com  Coming Soon:)


  1. Cut the design pieces. I used double sided card stock.
  2. (Optional) Flip the combined ornament over and center the white windmill and attach with glue. This shape is for writing a gift message.
  3. Return the ornament to the front. Glue the brown “x” design frame work shape to the coordinating shape on the combined base.
  4. Attach the silver windmill to the combined ornament base with foam adhesive squares.
  5. Attach a ribbon and a button to finish:)

Cow Head Gift Tag Ornament

Cow Head Gift Tag Ornament-JMR


Approximate size: H 4.5” X W 4.25”


This CowHead design doubles as a gift tag and ornament and is compatible with both 8X12 and 12X12 mats.


You can purchase the Silhouette design file here: https://www.silhouettedesignstore.com/artists/485222


You can purchase the SVG and Cricut compatible file here:https://www.jamieandjenn.com  Coming Soon:)


  1. Cut the design pieces. I used double sided card stock.
  2. Glue the silver cow head ornament shape with a circle cut out hole to the coordinating solid brown silhouette with a circular hanger.
  3. Attach the black cow head to the combined ornament base with foam adhesive squares.
  4. (Optional) Flip the combined ornament over and center the white circle and attach with glue. This circle is for writing a gift message. 
  5. Return the ornament to the front. Attach a ribbon to finish:)

Bull Head Gift Tag Ornament

Bull Head Gift Tag Ornament-JMR


Approximate size: H 4.25” X W 4.25”


This Bull Head design doubles as a gift tag and ornament and is compatible with both 8X12 and 12X12 mats. 

You can purchase the Silhouette design file here: https://www.silhouettedesignstore.com/artists/485222


You can purchase the SVG and Cricut compatible file here:https://www.jamieandjenn.com  Coming Soon:)


  1. Cut the design pieces. I used double sided card stock.
  2. Glue the silver bull head ornament shape with a circle cut out hole to the coordinating solid brown silhouette with a circular hanger.
  3. Attach the black bull head to the combined ornament base with foam adhesive squares.
  4. (Optional) Flip the combined ornament over and center the white circle and attach with glue. This circle is for writing a gift message. 
  5. Return the ornament to the front. Attach a ribbon and a jingle bell to finish:)
 

Sheriff Star Gift Tag Ornament


Sheriff Star Gift Tag Ornament-JMR


Approximate size: H 4.5” X W 4.25”


This Sheriff Star design doubles as a gift tag and ornament and is compatible with both 8X12 and 12X12 mats. 


You can purchase the Silhouette design file here: https://www.silhouettedesignstore.com/artists/485222


You can purchase the SVG and Cricut compatible file here:https://www.jamieandjenn.com  Coming Soon:)


  1. Cut the design pieces. I used double sided card stock.
  2. Glue the silver barb wire ornament shape with a circle cut out hole to the coordinating solid brown silhouette with a circular hanger.
  3. (Optional) Flip the combined ornament over and center the white star and attach with glue. This star is for writing a gift message. 
  4. Return the ornament to the front. Fold the star shape at the score lines making sure that the center of each of the star triangles is a peak. Attach the 3D star to the combined ornament base with foam adhesive squares.
  5. Attach a ribbon and a button to finish:)
 

Wednesday, November 23, 2022

Barn Gift Tag Ornament


Barn Gift Tag Ornament-JMR


Approximate size: H 4” X W 4.5”


This Barn design doubles as a gift tag and ornament and is compatible with both 8X12 and 12X12 mats. 


You can purchase the Silhouette design file here: https://www.silhouettedesignstore.com/artists/485222


You can purchase the SVG and Cricut compatible file here:https://www.jamieandjenn.com  Coming Soon:)


  1. Cut the design pieces. I used double sided card stock.
  2. Glue the red barn silhouette to the brown slightly larger barn silhouette with a circular hanger. Glue the pinecone cut out shapes to the coordinating pinecone solid shapes.
  3. Glue the doors to the combined barn base as shown. Use pieces of foam adhesive squares to attach the narrow barn roof to the barn base.
  4. Glue the center of two of the pine needle designs together as shown. Repeat for the other two pine needle set.
  5. Glue one of the pine needle sets to the barn base as shown.
  6. Repeat for the other set of pine needles.
  7. Tuck the combined pinecones between the pine needles and attach with glue.
  8. I curved the pine needles and added a ribbon and adhesive jewel to the center of the ribbon and twine for a hanging ribbon.
  9. (Optional) Flip the barn base over and glue the white barn silhouette to the back for writing a gift message:)

Running Horse Gift Tag Ornament


Running Horse Gift Tag Ornament-JMR


Approximate size: H 4.5” X W 4”


This Running Horse design doubles as a gift tag and ornament and is compatible with both 8X12 and 12X12 mats.


You can purchase the Silhouette design file here: https://www.silhouettedesignstore.com/artists/485222


You can purchase the SVG and Cricut compatible file here:https://www.jamieandjenn.com  Coming Soon:)


  1. Cut the design pieces. I used double sided card stock.
  2. Glue the silver ornament shape with a circle cut out hole to the coordinating solid brown silhouette with a circular hanger.
  3. Glue the horse circular shape to the combined ornament shape.
  4. (Optional) Flip the combined ornament over and center the white circle and attach with glue. This circle is for writing a gift message.
  5. Flip the combined ornament over and attach a ribbon for a bow and twine for a hanging ribbon:)

Cowboy Boots Gift Tag Ornament


Cowboy Boots Gift Tag Ornament-JMR


Approximate size: H 4” X W 2.25”


This Cowboy Boots Design doubles as a gift tag and ornament and is compatible with both 8X12 and 12X12 mats.

You can purchase the Silhouette design file here: https://www.silhouettedesignstore.com/artists/485222


You can purchase the SVG and Cricut compatible file here:https://www.jamieandjenn.com  Coming Soon:)


  1. Cut the design pieces. I used double sided card stock.
  2. (Optional) Flip the combined ornament over and center the white boot shape and attach with glue. This space is for writing a gift message.
  3. Flip the combined boots back over to the front. Glue the two boot shape to the coordinating solid brown combined boot silhouette with a circular hanger.
  4. Glue the single boot shape to the combined boot shape.
  5. Glue the small black shape to the negative space of the single boot.
  6. Finish by adding a ribbon for a bow with a button in the center and attaching twine for a hanging ribbon:)
 

Horseshoe Star Gift Tag Ornament

Horseshoe Star Gift Tag Ornament-JMR


Approximate size: H 5” X W 4.75”


This Horseshoe Star design doubles as a gift tag and ornament and is compatible with both 8X12 and 12X12 mats. 


You can purchase the Silhouette design file here: https://www.silhouettedesignstore.com/artists/485222


You can purchase the SVG and Cricut compatible file here:https://www.jamieandjenn.com  Coming Soon:)


  1. Cut the design pieces. I used double sided card stock.
  2. Glue the dark greenery to the coordinating shape on the ornament base.
  3. Glue the silver ornament shape to the combined ornament base.
  4. Fold the star shape at the score lines making sure that the center of each of the star triangles is a peak. Attach the 3D star to the combined ornament base with foam adhesive squares.
  5. Using pieces of foam adhesive squares, attach the light green greenery piece to the coordinating shape on the combined ornament,
  6. Glue a ribbon bow just above the circular hanger.
  7. (Optional) Flip the combined ornament over and center the white star shape and attach with glue. This space is for writing a gift message.
  8. Flip the combined ornament back over to the front and use twine as a hanging ribbon:)


Cowboy Wreath Gift Tag Ornament


Cowboy Wreath Gift Tag Ornament-JMR

Approximate size: H 4.5” X W 4”


This Cowboy Wreath design doubles as a gift tag and ornament and is compatible with both 8X12 and 12X12 mats.


You can purchase the Silhouette design file here: https://www.silhouettedesignstore.com/artists/485222


You can purchase the SVG and Cricut compatible file here:https://www.jamieandjenn.com  Coming Soon:)


  1. Cut the design pieces. I used double sided card stock.
  2. Glue two of the four green circular wreath together; alternating the leaves.
  3. Repeat for the other two circular wreaths.
  4. (Optional) Flip the ornament base over and center the white circle shape and attach with glue. This space is for writing a gift message.
  5. Flip the ornament base back over to the front. Glue one set of the green wreaths to the front of the ornament base. 
  6. Using pieces of foam adhesive squares, attach the last green wreath combo to the front of the ornament base alternating leaf pattern.
  7. Create a bow with ribbon and attach with hot glue just below the circular hanger. I used a red and brown sharpie marker to create the color of adhesive jewel I wanted. 
  8. Arrange the jewels in threes along the wreath. I finished the ornament with a button on the bow and twine for a hanging ribbon:)


Friday, October 22, 2021

Vampire Gift Tag Ornament


Vampire Gift Tag Ornament-JMRush

Approximate Size: W 3.25” x H 4.5”


This simple to construct design would be perfect to label your goodies for Halloween parties. This design is compatible with both 8X12 and 12X12 mats. 


You can purchase the Silhouette design file here: https://www.silhouettedesignstore.com/artists/485222


1. Cut the design pieces. ( I used double sided card stock)

2. Glue the hair piece to the coordinating shape on the round head piece with eye mouth cut outs. Glue the hands to the coordinating shapes on the tag base. Glue the white collar sleeve piece in place on the combined tag base. Glue the tiny oval to the nose base; aligning at the top.

3. Glue the combined nose to the head piece. Glue the bow tie and buttons to the tag base.

4. Place the combined head over the tag base aligning at the top and sides of the coordinating shape. Using a pencil, mark where the eyes should be places.

5. Remove combined head and place enamel jewels on the pencil marks. (I added a ribbon over the bow tie and adhesive jewels over the buttons.)

6. Attach the combined head with adhesive foam squares.

7. This is what it should look like:)

8. Flip the design over and glue the white body shape into place so that you have a place to write (optional).


Thursday, December 19, 2019

Gnome Gift Tag Ornament


Gnome Gift Tag Ornament-JMRush
Approximate Card size: H 4.75” X W 3”
This Gnome design doubles as a gift tag and ornament and is compatible with both 8X12 and 12X12 mats.

You can purchase the Silhouette design file here: https://www.silhouettedesignstore.com/artists/485222

You can purchase the SVG and Cricut compatible file here: https://www.jamieandjenn.com  Coming Soon:)


  1. Cut design pieces. I used double sided card stock.
  2. Glue the largest Gnome suit piece (black) to the full solid gnome figure base. Glue the small hat brim piece to the hat base. Glue the holly berries to the holly leaf base. 
  3. Glue the small Gnome suit piece to the combined full Gnome figure base; aligning at the bottom center and edges. I curled the edges of the combined holly and glued it to the combined hat piece.Glue the nose to the mustache piece; centering it.
  4. Glue the square buckle into place. Use pieces of foam adhesive squares to attach the combined hat and nose/mustache to the combined head.
  5. Use foam adhesive squares to attach the combined gnome head to the gnome body base. 
  6. I used enamel adhesive jewels to accentuate the holly. Finish by adding a ribbon for a hanger.


Wednesday, December 18, 2019

Cardinal Gift Tag Ornament


Cardinal Gift Tag Ornament- JMRush 
Approximate size: W 5.25” X H 3”

This Cardinal Bird design doubles as a gift tag and ornament and is compatible with both 8X12 and 12X12 mats.

You can purchase the Silhouette design file here: https://www.silhouettedesignstore.com/artists/485222

You can purchase the SVG and Cricut compatible file here: https://www.jamieandjenn.com  Coming Soon:)


  1. Cut design pieces. I used double sided card stock.
  2. Glue the largest bird silhouette(red) to the gift tag base. Glue the long red wing to the brown wing base. Glue the bird face to the bird (yellow) beak.
  3. Glue the combined face and the feet to the coordinating shapes on the combined bird gift tag.Glue the large (light red) body to the combined bird gift tag. Glue the smaller (light red) feathers to last dark red wing piece.
  4. Using foam adhesive squares, attach the combined little wing to the combined long wing.
  5. Using foam adhesive squares, attach the combined wing to the combined bird gift tag base. Loop a ribbon through the center hole for a hanger and tie the ends together. I used an enamel adhesive jewel to accentuate the eye.
  6. Flip the tag over and glue the white full bird silhouette to the back when using this design as a gift tag:)

Gingerbread Man Gift Tag Ornament


Gingerbread Man Gift Tag Ornament- JMRush 
Approximate Tag size: H 4.25” X W 3.25”

This Gingerbread man design doubles as a gift tag and ornament and is compatible with both 8X12 and 12X12 mats. 


You can purchase the Silhouette design file here: https://www.silhouettedesignstore.com/artists/485222

You can purchase the SVG and Cricut compatible file here: https://www.jamieandjenn.com  


  1. Cut design pieces. I used double sided card stock.
  2. Flip the gingerbread man base over and glue the white gingerbread man base to it; centering it. Glue the round gingerbread man head with holes to the coordinating solid head base. 
  3. Flip the combined base over. Glue the small oval nose piece to the coordinating shaped nose piece; aligning at the top center. Glue the candy swirl designs to the round solid candy bases.
  4. Glue the two hand and two foot curvy pieces to the combined base. Glue the combined nose to the combined face.
  5. Use foam adhesive squares to attach the combined head and combined candy pieces to the front of the card base.
  6. I used enamel adhesive jewels to accentuate the eyes and finish with a ribbon:)

Wednesday, November 21, 2018

Winter Raccoon Gift Tag Ornament


Winter Raccoon Gift Tag Ornament-JMR
Approximate size: H 5.25” X W 4”

This design can be used as a gift tag and ornament and is compatible with both 8X12 and 12X12 mats. 
You can purchase the Silhouette design file here: 

You can purchase the SVG and Cricut compatible file here:https://www.jamieandjenn.com  Coming Soon:)

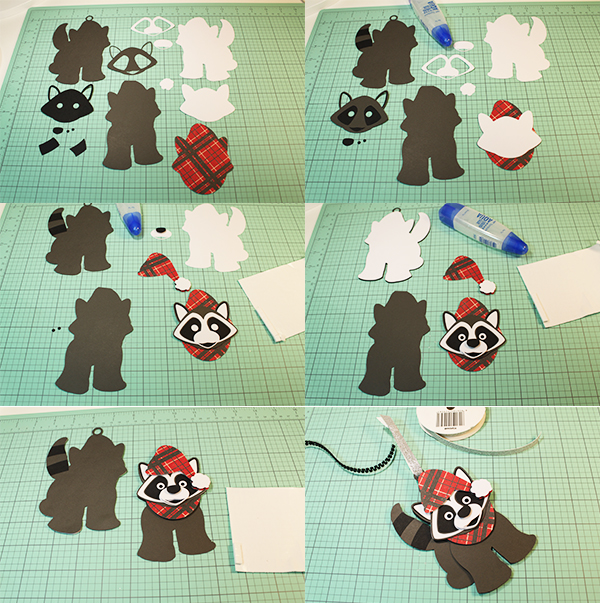
1. Cut design pieces. I used double sided card stock. (The hat piece is missing from the first two images..sorry:)
2. Glue the solid face to the hat scarf piece. Glue the face piece with large eye holes to the coordinating shape with smaller eye holes. Glue the hat tail stripe design pieces to the coordinating shapes on the tail.
3. Attach the nose to the muzzle piece using a foam adhesive square. Use foam adhesive squares to attach the puff ball shape to the hat piece. Glue the combined face piece to the combined scarf/hat piece. Glue the eye outline piece (white) to the combined scarf/hat piece. 
4. Glue the combined muzzle piece to the combined scarf/hat piece. Flip the raccoon tag base over and glue the coordinating shape label (white) to the backside;centering it. Flip it back over. Use a foam adhesive square to attach the muzzle to the combined hat/face pie and glue the tiny eyeballs into place.
5. Use a foam adhesive square to attach the combined hat piece to the combined hat/face piece. Use foam adhesive squares to attach the combined Hat/Face piece to the raccoon body with two legs.
6. Use foam adhesive squares to attach the combined smaller body piece to the larger one. Loop a ribbon through the top circular hole and tie. I used adhesive enamel dots to accentuate the eyes:)

Polar Bear Gift Tag Ornament

Polar Bear Gift Tag Ornament-JMR
Approximate size: H 5.50” X W 3.5”

This design can be used as a gift tag and ornament and is compatible with both 8X12 and 12X12 mats. 

You can purchase the Silhouette design file here: https://www.silhouettedesignstore.com/artists/485222

You can purchase the SVG and Cricut compatible file here:https://www.jamieandjenn.com  Coming Soon:)


  1. Cut design pieces. I used double sided card stock.
  2.  Glue the circular bear face with eye holes to the coordinating solid shape. Glue the nose muzzle piece to it’s solid coordinating shape base piece. Glue the hat design piece to it’s coordinating hat shape piece.
  3. Use foam adhesive squares to attach the two leg bear silhouette to the full bear silhouette shape. Use foam adhesive squares to attach the nose to the combined muzzle piece, The combined muzzle to the combined face, and the hat puff ball to the end of the combined hat.
  4. Glue the head /scarf piece to the combined body as shown.
  5.  Loop a ribbon through the circular hanger ay the top and use foam adhesive squares to attach the combined head to the combined body. 
  6.  Use foam adhesive squares to attach the combined hat to the combined body. I used adhesive jewels to accentuate the eyes:)