Showing posts with label Bunny. Show all posts

Thursday, February 25, 2021

Bunny Boy Girl 3D Stand Up


Bunny Boy Girl 3D Stand Up- JMRush 

Approximate size: W 3.25” X H 5.75” X 2.75”D


This cute Bunny decoration stands independently. This design is compatible with both 8X12 and 12X12 mats. A complete step by step picture tutorial can be found on my blog.

You can purchase the Silhouette design file here: https://www.silhouettedesignstore.com/artists/485222


You can purchase the SVG and Cricut compatible file here: https://www.jamieandjenn.com  Coming Soon:)


1. Cut design pieces. ( I used double sided card stock. This tutorial shows both the boy and girl bunny)

2. Glue the bunny with cutouts to the bunny base with whiskers.

3. Flip the combined bunny over and glue the solid bunny to the combined bunny. Glue the orange carrot to the carrot base.

4. Glue one of the jumpers to the combined bunny base.

5. Flip the combined bunny over ( right side up). Fold the six bunny tummies at the score lines.

6. Apply glue to one side of one of the tummy pieces and attach another tummy piece aligning the edges.

7. It should look like this.


8. Continue glueing tummy pieces until you have three in each group. Two groups.

9. It should look like this.

10. Find the two tummy pieces that are single layer and apply glue to the backside.

11. Attach the combined tummy piece to the combined bunny base aligning at the bottom. Using foam adhesive squares, attach the combined carrot and the bowtie (hair bow for the girl)

12. Flip the combined bunny over and glue the last combined tummy to the backside.

13. The Girl bunny’s collar is attached by pieces of foam adhesive square and the tiny blue dot is glued to the center of the collar.

14. Bunnies:)

Friday, April 12, 2019

Girl Bunny Glasses Bunny Egg Basket


Girl and Boy Bunny Glasses Egg Basket-JMR
Approximate size: W 5.5.” X D 7” X H 6.5”

This basket egg holder holds six eggs and is compatible with both 8X12 and 12X12 mats.

You can purchase the Silhouette design file here: https://www.silhouettedesignstore.com/artists/485222

You can purchase the SVG and Cricut compatible file here: https://www.jamieandjenn.com  Coming Soon:)


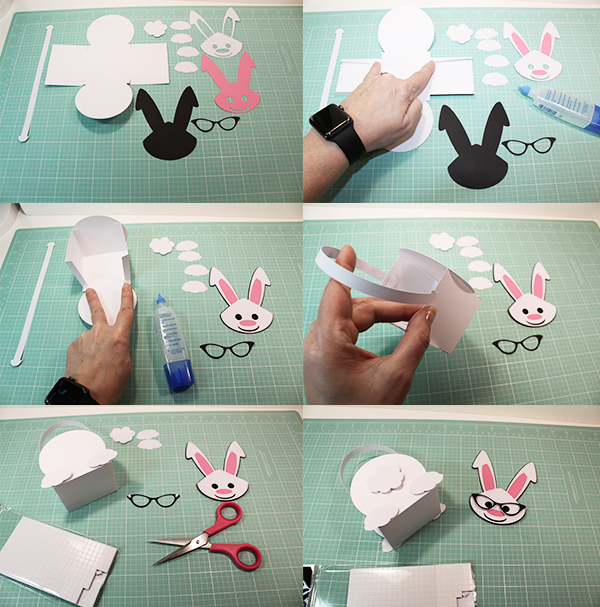
  1. Cut design pieces. I used double sided card stock. (There are two solid black paws and an extra solid white bunny head included that are not shown in this beginning tutorial photo)
  2. Glue the bunny head with eyes and mouth cutouts to the solid black bunny head; centering it. Fold the score lines in the basket base.
  3. Apply glue to the top side tabs and secure to the top panel. Glue the last bunny head (ear, eye, mouth, and nose cutouts) to the combined bunny head.
  4. Repeat for the bottom tabs/panel forming an open box.
  5. Insert the handle into the side slots.
  6. Flip the egg carrier piece over ( pretty side down). Fold the score lines on the egg carrier box.
  7. Glue the corners and secure.
  8. Apply glue to the long tabs and secure the top rectangular shape.

9.   This is what it should look like.
10. Flip the egg carrier over and place it inside the basket base. 
11. Glue the two dome shaped pieces to either side of the combined basket;
      aligning at the sides at the bottom. 
12. Assemble the bunny paws glueing the layers. black on bottom, pink middle,
      and white with cutouts on top. 
13. This is what they should look like:) 
14. Use foam adhesive squares to attach the combined paws and the bunny tail
       to the backside of the combined basket. 
15. Use foam adhesive squares to attach the front paws to the front of the
       combined basket. 
16. Glue the solid white bunny head to the backside of the combined bunny
       head.

17. This is what it will look like (but without the bow)
18. Use foam adhesive squares to attach the combined bunny head to the front of the combined
      basket. 
19. Attach the glasses using pieces of foam adhesive squares or by glueing. Curve the bow/bowtie
      pieces. ( The boy bunny file will only have two pieces.) 
20. Glue the backside of the bow with side tabs. 
21. Girl bunny only: Glue the small bow to the larger bow. 
22. Wrap and glue the small rectangular bow piece in the center of the bow. 
23. Image of the back of the girl bow. 
24. I used enamel adhesive jewels to accentuate the eyes ( and glasses on the girl). Use a foam
      adhesive square to attach the bow:)


Wednesday, April 10, 2019

Marshmallow Bunny Egg Basket


(Marshmallow) Bunny and Chick Egg Basket-JMRush
Approximate size: W 6.” X D 4.25” X H 4.5” Including handle

This basket egg holder holds six eggs and is compatible with both 8X12 and 12X12 mats.

You can purchase the Silhouette design file here: https://www.silhouettedesignstore.com/artists/485222

You can purchase the SVG and Cricut compatible file here:https://www.jamieandjenn.com 


  1. Cut design pieces. I used double sided card stock. There are two sets of bunnies included in this file incase you want to have the basket double sided. I only used one set in the product image. I also used green card stock for the egg holder portion of the basket:) The Bunnies also have arms that are not shown in this tutorial.
  2. Glue the medium bunnies (eyes and nose cut outs) to the larger (black) bunny solid pieces. Fold the basket base. 
  3. Apply glue to the top side tabs and secure to the top fence panel. Glue the last bunny pieces (ear,eye,and nose cutouts) to the combined bunnies.
  4. Repeat for the bottom tabs/panel forming an open box.
  5. Insert the handle into the side slots.
  6. Flip the egg carrier piece over ( pretty side down). Fold the score lines on the egg carrier box.
  7. Glue the corners and secure.
  8. Apply glue to the long tabs and secure the top rectangular shape.
  9. This is what it should look like.
  10. Flip the egg carrier over and place it inside the basket base.
  11. Glue two of the combined bunnies to the long side of the combined basket.
  12. Attach the third bunny with a foam adhesive square.
  13. Glue the long grass piece to the long side of the combined basket aligning at the bottom:)
  14. Repeat for all sides of the basket.
  15. I switched colors of the egg holder portion of the basket to green. Finish with a ribbon:)

Monday, April 8, 2019

Bunny Peek Pocket Card

Bunny Peek Pocket Card -JMRush
Approximate Card size: W 5.50” X H 4.25”
This easy to construct design has an inside pocket that can be used for notes or gift cards and is compatible with both 8X12 and 12X12 mats. 

You can purchase the Silhouette design file here: https://www.silhouettedesignstore.com/artists/485222

You can purchase the SVG and Cricut compatible file here:https://www.jamieandjenn.com 

  1. Cut design pieces. I used double sided card stock.
  2. Fold the card base. Apply glue to the side tabs and fold up toward the card base; creating a pocket.
  3. Apply glue to the backside of the fringed grass. 
  4. Attach to the solid rectangular shape.
  5. Glue the combined grass rectangle to the coordinating shape on the lower section of the card base.
  6. Glue the rabbit shape to the coordinating shape on the upper portion of the car base; aligning at the bottom edge.
  7. Glue the eyes, nose, and insides of the ears to the coordinating shapes of the rabbit shape on the front of the combined card base.
  8. Using foam adhesive squares, attach the double circle muzzle shape to the coordinating shape on the combined rabbit :)


Tuesday, March 27, 2018

Easter Egg Holder


Easter Egg Holder-JMRush
Approximate size: H 4.75” X W 2.5” X D 2.5”

These easy to construct Easter egg holders are compatible with both 8X12 and 12X12 mats.


You can purchase the Silhouette design file here: https://www.silhouettedesignstore.com/artists/485222

You can purchase the SVG and Cricut compatible file here:https://www.jamieandjenn.com  Coming Soon:)


  1. Cut the design pieces. I used double sided card stock.
  2. Glue the animal head with cutouts to the shape at the top of the box base; centering it.
  3. Fold the box base. Glue the feet to the feet bases; centering them.
  4. Flip the box base over. Apply glue to the side tabs and secure the bottom panel; aligning at the edges.
  5. Apply glue to the last tab and tuck under the animal shape;align at the edge.
  6. Image of the backside. Apply glue to the backside of the solid animal shape and secure to the backside of the combined box base; centering it.
  7. Use a foam adhesive square to attach the tail. (and beak of the chick file)
  8. Flip to the front of the combined box. Glue the combined feet to the front. Finish with ribbon:)

  1. Cut the design pieces. I used double sided card stock.
  2. Glue the animal head with cutouts to the coordinating base head shape; centering it. Glue the hooves to the bottom of the feet local base pieces. Fold the box base.
  3. Flip the box base over. Apply glue to the side tabs and secure the bottom panel; aligning at the edges.
  4. Apply glue to the last tab and tuck under the animal shape;align at the edge.
  5. Image of the backside. Apply glue to the backside of the solid animal shape and secure to the backside of the combined box base; centering it.
  6. Use a foam adhesive square to attach the tail, to attach the cut out swirl wool piece to it’s coordinating base, and to the backside of the nose piece.
  7. Flip to the front of the combined box. Use foam adhesive squares to attach the combined wool piece to the combined animal face and the nose to the combined head.
  8. Glue the combined feet to the front and use foam adhesive squares to attach the combined head to the front of the box base.  Finish with ribbon:)

Wednesday, April 12, 2017

Bunny Glasses Basket


Bunny Glasses Basket-JMRush
Approximate Basket Dimensions: W 3” x D 2.50” X H 2.50” (H 5.5” including the handle)

This design is compatible with both 8X12 and 12X12 mats and is perfect for Easter goodies or Birthday party treats.

You can purchase this design here: https://www.silhouettedesignstore.com/artists/485222
Boy Bunny Glasses Basket-JMRush

  1. Cut design pieces. I used double sided card stock.
  2. Glue the bunny’s head with eye/nose/mouth cut outs to the coordinating shape with eye and mouth cut outs.  Apply glue to the side tabs on the top section and secure to the rounded shape on each side.
  3. Repeat for the bottom tabs creating a box. Glue the combined bunny head to it’s coordinating solid shape piece.
  4. Insert the handle into the side slots.
  5. Attach two of the bunny paws to the front bottom sides of the box using foam adhesive squares. Use small pieces of foam adhesive to attach the girl bunny glasses and glue for the boy glasses.
  6. Flip the box over and attach the bunny tail piece and remaining two bunny paws to the backside of the box using a foam adhesive square. Using foam adhesive squares, attach the combined bunny’s head to the front of the box. I finished the bunny with a Ribbon for the girl and a bow tie for the boy. I accentuated the eyes enamel adhesive jewels:)

Tuesday, April 4, 2017

Rabbit Candy Pocket


Rabbit Candy Pocket- JMRush 
Approximate size: W 5” X H 7.5
Approximate Pocket size: W 3” X H 4”

The Rabbit Candy Pocket has a open center section that is perfect for holding snack sized candies for classroom parties, birthday party treats, or for Easter. This file can also hold a standard sized gift card and is compatible with both 8X12 and 12X12 mats.

You can purchase this design here: https://www.silhouettedesignstore.com/artists/485222


1.Cut design pieces. ( I used double sided card stock)
2. Glue the rabbit head with cut outs to it’s matching solid base. Fold the tabs on the Rabbit pocket piece. Apply glue to the tabs. 
3. Fold forward and secure to the upper shape of the pocket.  Glue the inner ear pieces to the coordinating shape on the combined rabbit head.
4. Use foam adhesive squares to attach the pocket piece to the rabbit base with legs; aligning at the bottom and matching up the curves of the shapes.
5. Apply glue to the top section of the combined rabbit body. Center and secure the top of the rabbit; aligning to the coordinating shape of the rabbit’s body.
6. Cut three sections of thread and glue their centers to the combined rabbit head’s nose.
7. Use a foam adhesive square to attach the nose to the combined rabbit’s head nose; covering the thread’s middle sections.

8. Attach the combined head to the combined rabbit base using foam adhesive squares and aligning the edges on each side. I finished with enamel dots to accentuate the eyes, a ribbon, and inserted a gift card and candy carrots in the pocket:)

Tuesday, March 28, 2017

Bunny Hug Candy Pocket


Bunny Hug Candy Pocket- JMRush 
Approximate size: W 4.25” X H 7”
Approximate Pocket size: W 2.5” X H 3.25”

The Bunny Hug Candy Pocket has a open center section that is sized to hold a Ghirardelli chocolate square, snack size candies, or a special message. This file can be used for classroom parties or office treats, and is compatible with both 8X12 and 12X12 mats. 

You can purchase the Silhouette design file here: https://www.silhouettedesignstore.com/artists/485222


1.Cut design pieces. 
2. Fold the tabs on the bunny card base. Apply glue to the tabs. Fold forward and secure to the bunny shape of the card base. 
3. Glue the Bunny head with cut outs to it’s matching solid base. Glue the slightly smaller oval feet to the larger oval feet.
4. Glue the feet with cut outs to their coordinating combined oval feet. Glue the inside of the ears to the coordinating shape on the combined head.
5. Attach the combined bunny head to the card base; using a foam adhesive squares.  
6. Tuck the bunny hands into the slots in the center. Attach foam adhesive squares to the bottom corners of the card base and secure the combined feet to each corner.

7.-8. Attach the heart with a foam adhesive square and place a foam adhesive square on the backside of the rounded tail piece and secure to the bunny’s backside. I finished with a ribbon, enamel dots to accentuate the eyes, and placed a Andes mint chocolate squares in the pocket:)

Monday, March 27, 2017

Stacked Bunny Card


Stacked Bunny Card- JMRush 
Approximate Card size: H 5.50” X W 4.25”

This design is compatible with both 8X12 and 12X12 mats.

You can purchase this design here: https://www.silhouettedesignstore.com/artists/485222


1.Cut design pieces. 
2. Fold the card base. Glue the small white tail to the bunny with eye/nose cut outs and both ears. Glue the small carrots to their coordinating shapes on the grouped carrot solid base. Curve the leaves of both carrot stem pieces.
3. Glue the combined bunny to it’s coordinating solid base. Glue the muzzel piece to the coordinating shape on the bunny face piece; matching up the eye/nose holes.  Glue the two carrot stem pieces together at the bottom and allowing the leaves to be free. 
4. Attach the combined carrot piece to the combined carrot stem piece with a foam adhesive square.
5. Attach the combined bunny head to the bunny silhouette with one ear; using a foam adhesive squares and following the contour of the bunny silhouette.
6. Attach the combined bunny head/body piece to the combined bunny base using foam adhesive squares in the center and glue on the ear and feet.
7.-8. Glue the combined bunny and the combined carrots to the front of the card.  I finished with a ribbon and tucked an enamel dot into the eye recess of the bunny to accentuate the eye :)

Monday, March 6, 2017

Bounce Bunny Gift Tag Card


 Bounce Bunny Gift Tag Card-JMRush
Approximate Card Size: W 3.75” x H 5.25”


This gift tag design opens like a card and is perfect for easter baskets or gift bags. This design is compatible with both 8X12 and 12X12 mats.

You can purchase this design here: https://www.silhouettedesignstore.com/artists/485222


1.Cut design pieces. (I used double sided card stock) 
2. Fold the card base at the score lines. Glue the bunny face with cut outs to it;s coordinating solid base. Glue the smaller,thinner bunny body to the larger bunny body; centering it.
3. Use foam adhesive squares to attach the combined bunny face to the combined bunny body. Glue the tiny nose to the bunny face.
4. Use foam adhesive squares to attach the combined bunny body to the front of the card base. Glue the heart to the coordinating shape on the front of the card.
5. Flip the card over and use a foam adhesive square to attach the fluffy bunny tail to the backside.
6. I finished by adding a ribbon:)