Showing posts with label Treat Box. Show all posts

Wednesday, December 28, 2022

Valentines BirdHouse Treat Box


 Valentines BirdHouse Treat Box-JMR

Approximate size: W 3 x D 1.75 x H 3.5”

Approximate box size: W 3 x D 1.75 x H 2”


This cute bird house treat box opens from the handles on the top. This design is compatible with both 8X12 and 12X12 mats.

You can purchase the Silhouette design file here: https://www.silhouettedesignstore.com/artists/485222


You can purchase the SVG and Cricut compatible file here:https://www.jamieandjenn.com  Coming Soon:)


1.Cut design pieces. ( I used double sided card stock)

2. Flip the birdhouse box over and fold the bird house base at the score lines.

3. Connect the two wing tabs on the bottom.

4. Apply glue to the bottom of the connected wing tabs and fold in the small bottom tab. Hold until secure.

5. Apply glue to the bottom of the birdhouse box and secure the last large square bottom panel; aligning at the edges.

6. Apply glue to the side tab and connect the side panel.

7. Curve the flowers and leaves as you like.

8. Combine the two large petal groups by glueing the middle circle; Larger on bottom and alternating petals. Repeat for the two smaller petals. Glue the smallest circle to the larger one; centering it.

9. Glue the two petal groups together; alternating petals. Glue the leaves to the bottom of the combined flower. Attach a piece of foam adhesive to the bottom.

Attach the combined circles with a piece of foam adhesive square as shown.

10. Attach the combined flower as shown. Push in the two top handle panels.

11. Apply small pieces of foam adhesive square to the backsides of the two triangular roof top pieces and attach to front and backside of the birdhouse box.

12. Finish with a ribbon and I used an adhesive jewel for the center of the flower:)


Monday, October 24, 2022

Vampire Treat Egg Holder

Vampire Treat Egg Holder -JMR


Approximate size: H 5” X W 4.5” X D 2.5”


This easy to construct Frankenstein treat egg holder is compatible with both 8X12 and 12X12 mats and is sized to hold a Kinder Joy chocolate egg. 


 You can purchase the Silhouette design file here: https://www.silhouettedesignstore.com/artists/485222


You can purchase the SVG and Cricut compatible file here:https://www.jamieandjenn.com  Coming Soon:)


  1. Cut the design pieces. I used double sided card stock.
  2. Glue the vampire face to the coordinating shape on the box base. Glue two of the four curve hands to the front of the full vampire shape as shown.
  3. Glue the eyes and collar into place on the box base.
  4. Use pieces of foam adhesive squares to attach the red bow tie and the tiny little oval nose. I used adhesive jewels to accentuate the eyes.
  5. Flip the box base over. Fold the score lines inward. Flip the full silhouette over and glue the ear/neck section and two remaining hands in place.
  6. Apply glue to the two side tabs. Fold the bottom section up to meet the tabs creating a box. Hold until dry. Use pieces of foam adhesive squares to attach the cape collar on the vampire silhouette piece.

7. Apply glue to the small horizontal tab. Tuck under the vampire figure enclosing the box.
8. Apply glue to the backside of the vampire box base and attach the solid full body shape aligning at the edges.
9. This is what it should look like:)
10. Flip the box over to the front and attach the oval red shoes with foam adhesive squares.


Frankenstein Treat Egg Holder


Frankenstein Treat Egg Holder -JMR


Approximate size: H 5” X W 4.75” X D 2.5”


This easy to construct Frankenstein treat egg holder is compatible with both 8X12 and 12X12 mats and is sized to hold a Kinder Joy chocolate egg. 

You can purchase the Silhouette design file here: https://www.silhouettedesignstore.com/artists/485222


You can purchase the SVG and Cricut compatible file here:https://www.jamieandjenn.com  Coming Soon:)


  1. Cut the design pieces. I used double sided card stock.
  2. Glue the Frankenstein eyes with cutouts to the coordinating base solid eye shape; centering it. Glue the small green jaw to the coordinating white jaw with teeth; aligning on the bottom and edges.
  3. Using foam adhesive squares; attach the combined jaw to the coordinating shape on the full Frankenstein face; aligning at the bottom. Use foam adhesive squares to attach two of the hands to the coordinating shapes on the box base. 
  4. Use foam adhesive squares to attach the combined eyes to the combined Frankenstein head. Glue the combined Frankenstein head to the coordinating shape on the box base. Using a piece of foam adhesive square, attach the small part of the tie knot to the tie base.
  5. Glue the green back of the head shape and remaining hands to the full Frankenstein figure. Attach the combined tie to the front of the box base.
  6. Flip the box base over (pretty side down). Fold the score lines. Apply glue to the two side tabs. Fold the bottom section up to meet the tabs creating a box. Hold until dry.


7. Apply glue to the small horizontal tab. Tuck under Frankenstein figure enclosing the box.
8. Apply glue to the back of the box base and attach the combined full figure.
9. This is what it should look like:)
10. Attach the green oval feet with foam adhesive squares.


Friday, October 22, 2021

Black Cat Open Mouth Treat Box

Black Cat Open Mouth Treat Box-JMRush

Approximate Size: W 5” x D 1.25”x H 5.5”

Approximate Box size: W 2.5” x D 1 x H 4” 


This box opens by lifting the character’s head to to expose the opening to the treat box. This simple to construct design would be perfect to hold your goodies for Halloween or birthday parties. This design is compatible with both 8X12 and 12X12 mats.


You can purchase the Silhouette design file here: https://www.silhouettedesignstore.com/artists/485222


1. Cut the design pieces. ( I used double sided card stock)

2. Fold the box and Mouth base at the score lines.

3. Glue the pink mouth piece (with holes) to the coordinating shape on the mouth base;aligning at the inner oval cut out shape.

4. Use pieces of foam adhesive squares to attach the teeth shapes to the coordinating shapes on the combined mouth base.

5.  Glue the two tiny oval white pieces to the coordinating shapes on the eyes. This is what it should look like:)

6. Flip the mouth base top over, like so. Glue the Cat head to the coordinating shape; aligning at the top of the ears.


7. I used an orange marker on the edges of the cat eyes. Glue the cat eyes into place.

8. Place the Cat nose on the cat face to find placement and then remove.

9. Cut thread ( approximately three strands of 4inches).

10. Attach the threads with glue to the area you picked to place the Cat nose. Allow to dry.

11. Using a foam adhesive square, place the Cat nose on top of the threads.

12. I used adhesive jewels to accent the eyes.


13. Apply glue to the small vertical side tab at the left side of the bottom of the box base.

14. Secure the small vertical side tab to the 1 inch (width) rectangles just above. 

15. Apply glue to the very left vertical tab, the horizontal tab, and the side tab on the bottom right and attach the side and bottom of the base…wrapping it crating a box.

16. This is what it should look like:)

17. Tuck the tab into the slot on the top.

18. Flip the box base over and apply glue to the area just outside the oval cut out.


 19. Attach the combined Cat head; centering it around the cut out oval shape and allow to dry.

20. I finished by adding a ribbon and filling with fun sized candies.

Thursday, September 23, 2021

Mummy Candy Keeper

Mummy Candy Keeper-JMRush

Approximate size: W 6 x D .75 x H 4.5”


This design features a character head and hands that covers a shallow bin that is designed to fit regular sized candy bars up to 6 inches long or small treats. This design is compatible with both 8X12 and 12X12 mats.


Inside

Back

1.Cut design pieces. ( I used double sided card stock paper)

2. Fold the keeper base at the score lines. Glue the small hands to the larger design piece hands; centering and lining up at the wrists. Glue the mummy wrap face to the skull shape; centering.

3. Apply glue to the front tabs in the front of the keeper base and attach to the front rectangle shape as shown. Hold until secure.

4. Apply glue to the second back set of tabs and glue to the backside of the keeper forming a box.

5. Your keeper base should look like this:)

6. Flip the skull and hands down over the box. Apply glue to the backside of the combined mummy skull and combined hands and attach to the coordinating shape on the keeper base. 


 7. Apply glue to the backside of the eyes and attach to the coordinating shapes on the combined keeper base.

8. Flip the keeper base over. Apply glue to the script and attach to the backside of the keeper base.

9. I finished this design by adding candy and a ribbon:)

Wednesday, April 29, 2020

Rainbow Heart Basket


Rainbow Heart Basket-JMR

This cute Rainbow Basket is compatible with both 8X12 and 12X12 mats.

You can purchase the Silhouette design file here: https://www.silhouettedesignstore.com/artists/485222

You can purchase the SVG and Cricut compatible file here: https://www.jamieandjenn.com  Coming Soon:)


1.Cut design pieces. (I used double sided card stock)
2. Glue the colored rectangles to the rainbow base as shown. Fold score lines on the basket base.
3. Apply glue to the two top tabs on the basket base and attach to the center box.
4. Repeat for the lower two tabs; creating a box. 
5. Insert the combined rainbow into the slots on either side of the basket base.
6. Using foam adhesive squares, attach the largest heart to one side; aligning at the center of the basket base.
7. Using foam adhesive squares, attach two of the small hearts to either side of the large heart; aligning with the rainbow base.
8. Using foam adhesive squares, attach the middle sized heart. Repeat for the other side:)

Monday, November 25, 2019

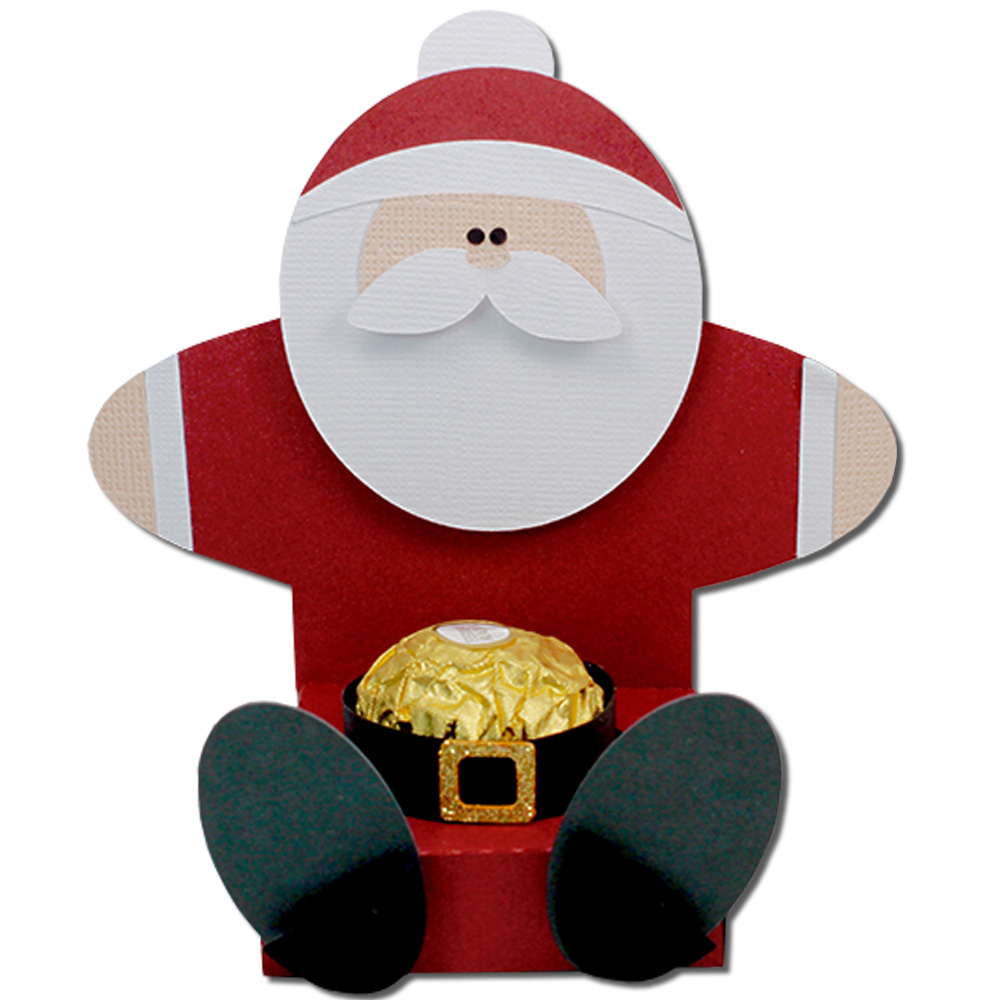
Santa Chocolate Belly Holder


Santa Chocolate Belly Holder-JMRush 
Approximate size: W 4.5 x D 2.25 x H 4.25”

This easy to construct chocolate holder is compatible with both 8X12 and 12X12 mats. A complete step by step picture tutorial can be found on my blog.

You can purchase the Silhouette design file here: https://www.silhouettedesignstore.com/artists/485222

You can purchase the SVG and Cricut compatible file here:https://www.jamieandjenn.com  Coming Soon:)

  1. Cut the design pieces. I used double sided card stock. (There is a solid santa piece in this file that is not shown in this image tutorial. It is used as a backing. Sorry. I forgot to cut this piece)
  2. Flip the box base over. 
  3. Apply glue to the side tabs and secure the bottom panel; aligning at the edges.
  4. Apply glue to the last tab and tuck under the snowman shape;align at the edge.
  5. Image of the backside. Apply glue to the backside of the santa shape (not shown in image) and secure the solid santa to the santa base; centering it.
  6. Flip the combined santa to the front. Glue the belt buckle to the center of the belt. Glue the belt so it forms a circular shape the size of the chocolate. Place the belt around the chocolate.
  7. Use a glue to attach the hat, face, hat brim pieces to the santa head. Use pieces of foam adhesive squares to attach the heels of the shoes to their shoe bases.
  8. Glue the hands and cuffs to the santa box base. Glue the tiny eyes to the combined santa head. Glue the tiny nose to the upper center of the mustache piece. Use a piece of foam adhesive squares to attach the combined mustache to the combined head.
  9. Glue the combined head to the combined santa base. Use foam adhesive squares to attach the feet to the box base:)

Snowman Chocolate Belly Holder


Snowman Chocolate Belly Holder-JMRush 
Approximate size: W 3.5 x D 2.25 x H 4.25”

This easy to construct chocolate holder is compatible with both 8X12 and 12X12 mats.

You can purchase the Silhouette design file here: https://www.silhouettedesignstore.com/artists/485222

You can purchase the SVG and Cricut compatible file here:https://www.jamieandjenn.com  Coming Soon:)


  1. Cut the design pieces. I used double sided card stock.
  2. Flip the box base over. 
  3. Apply glue to the side tabs and secure the bottom panel; aligning at the edges.
  4. Apply glue to the last tab and tuck under the snowman shape;align at the edge.
  5. Image of the backside. 
  6. Apply glue to the backside of the snowman shape (as shown) and secure the solid snowman to the snowman base; centering it.
  7. Flip the combined snowman to the front.
  8. Use a glue to attach the hat, nose, arms, and scarf piece to their coordinating shapes on the combined snowman base.
  9. This is what it should look like:)
  10. Glue the belt buckle to the center of the belt. Glue the heels of the shoes to the shoe bases.
  11. Glue the belt so it form a circular shape the size of the chocolate.
  12. Place the belt around the chocolate. I used small adhesive jewels to accent the eyes.


Wednesday, October 9, 2019

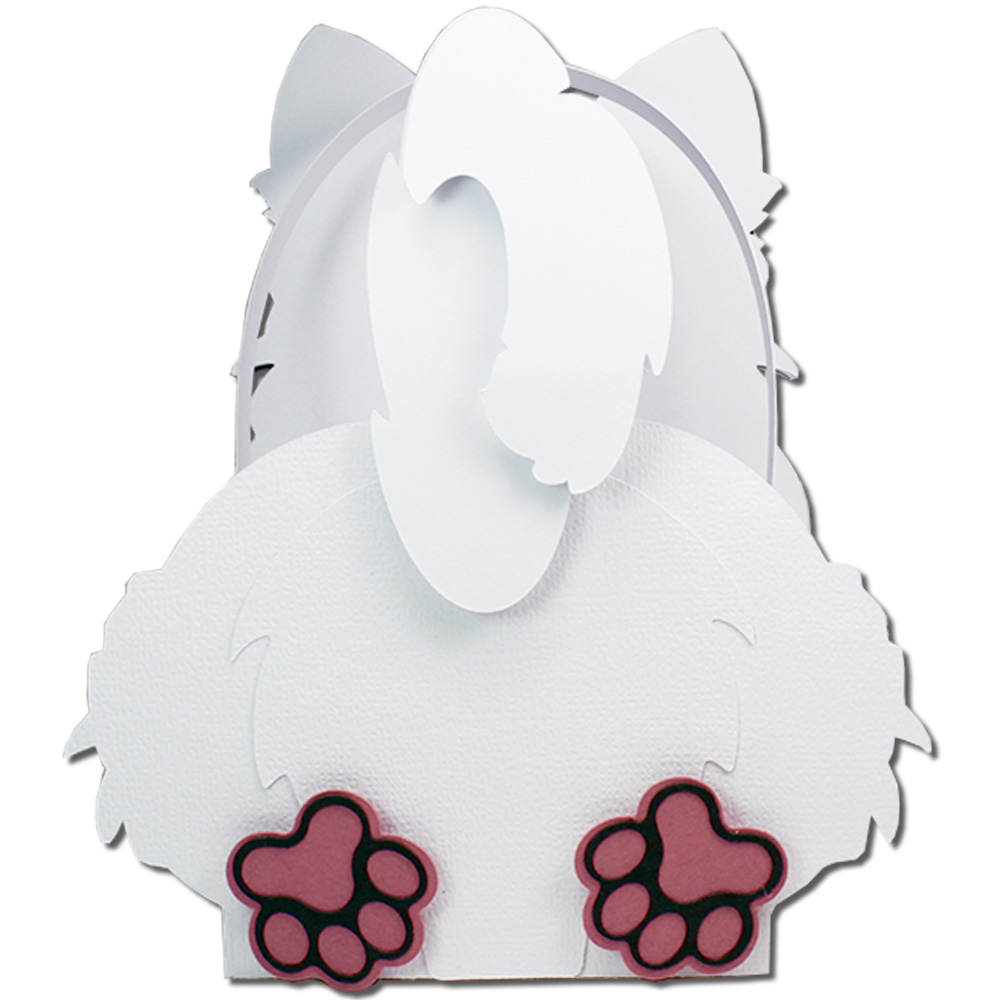
White Long Hair Cat Handle Basket


White Long Hair Cat Handle Basket- JMRush 
Approximate Box size: H 2.25” X W 3” X D 2.25”
Approximate Design size: W 4.5” X H 5.5” including handle

This cute basket design is a perfect container for treats for your favorite feline, a small gift for your veterinarian, or a party favor. This design is compatible with both 8X12 and 12X12 mats.


You can purchase the Silhouette design file here: https://www.silhouettedesignstore.com/artists/485222

You can purchase the SVG and Cricut compatible file here: https://www.jamieandjenn.com  

  1. Cut design pieces. ( I used double sided card stock and glitter card stock of the eyes) (There are two pink noses in this file that is not shown in the tutorial and I adjusted the tail to be larger)
  2. Glue the face piece with openings and a chin to the coordinating black solid cat face. I used a marker to color the outside edges of both large blue eyes. Glue them to the openings in the combined cat face. Glue the smaller solid paws and feet to the larger solid feet and paws.
  3. Glue the fury bottom piece to the coordinating shape on the lower section of the basket base. Glue the other fury chest/head piece to the coordinating shape on the upper section of the basket base.
  4. Glue the combined cat face to the cat face/chest piece. Glue the inner ears to the coordinating shape on the combined cat face. Using foam adhesive squares, attach the smaller tail to the coordinating shape on the larger tail. Glue the small oval white pieces to the cording shapes on the cat’s eyes.
  5. Attach the smallest cat head (with cut outs) to the combined cat face using foam adhesive squares. Glue the nose into place.
  6. Glue the combined cat to the coordinating shape on the basket. Use foam adhesive squares to attach the front paws to the top section of the basket and the back feet and tail to the bottom section.
  7. I used enamel dots to accentuate the eyes.
  8. Flip the combined basket over. Fold the basket base at the score lines.
  9. Apply glue to the top two tabs on the basket base and secure to the Cat shape above.
  10. Apply glue to the bottom two tabs on the basket base and secure to the rounded shape above creating a box.
  11. Image of box completed.
  12. Insert the handle on either side of the basket.
  13. I added a ribbon.
  14. Use three small lengths of thread and apply hot glue to one of the groups of ends. Attach the nose. Repeat for the other side:)
  15. Image of the whiskers glued.
  16. Hot glue the second pink nose on top of the whiskers:)


Wednesday, October 2, 2019

Black Cat Handle Basket


Black Cat Handle Basket- JMRush 
Approximate Box size: H 2.50” X W 3” X D 2.50”
Approximate Design size: W 4.5” X H 5.5” including handle

This cute basket design is a perfect container for treats for your favorite feline, a small gift for your veterinarian, or a Halloween party favor. This design is compatible with both 8X12 and 12X12 mats. 


You can purchase the Silhouette design file here: https://www.silhouettedesignstore.com/artists/485222

You can purchase the SVG and Cricut compatible file here: https://www.jamieandjenn.com  


  1. Cut design pieces. ( I used double sided card stock and glitter card stock of the eyes) 
  2. Glue the fury bottom piece to the coordinating shape on the lower section of the basket base. Glue the other fury chest/head piece to the coordinating shape on the upper section of the basket base. I used a marker to color the outside edges of both large yellow eyes.
  3. Glue the yellow eyes to the coordinating shape on the combined basket. Glue the smaller solid paws and feet to the larger solid feet and paws.
  4. Attach the cat head ( black with cut outs) to the combined basket using foam adhesive squares.
  5. Use a small piece of foam adhesive square to attach the nose. ( Hint- I use a black sharpie to color the edges of the white foam adhesive square so it’s not so noticeable:) Use foam adhesive squares to attach the front paws to the top section of the basket and the back feet and tail to the bottom section.
  6. Flip the combined basket over. Fold the basket base at the score lines.
  7. Apply glue to the top two tabs on the basket base and secure to the rounded shape above.
  8. Apply glue to the bottom two tabs on the basket base and secure to the head shape above creating a box.
  9. Insert the handle on either side of the basket.
  10. Use three small lengths of thread and apply hot glue to one of the groups of ends. Attach underneath the nose. Repeat for the other side:)
  11. I used enamel dots to accentuate the eyes and added a ribbon:)