Showing posts with label Label. Show all posts

Wednesday, November 21, 2018

Winter Raccoon Gift Tag Ornament


Winter Raccoon Gift Tag Ornament-JMR
Approximate size: H 5.25” X W 4”

This design can be used as a gift tag and ornament and is compatible with both 8X12 and 12X12 mats. 
You can purchase the Silhouette design file here: 

You can purchase the SVG and Cricut compatible file here:https://www.jamieandjenn.com  Coming Soon:)
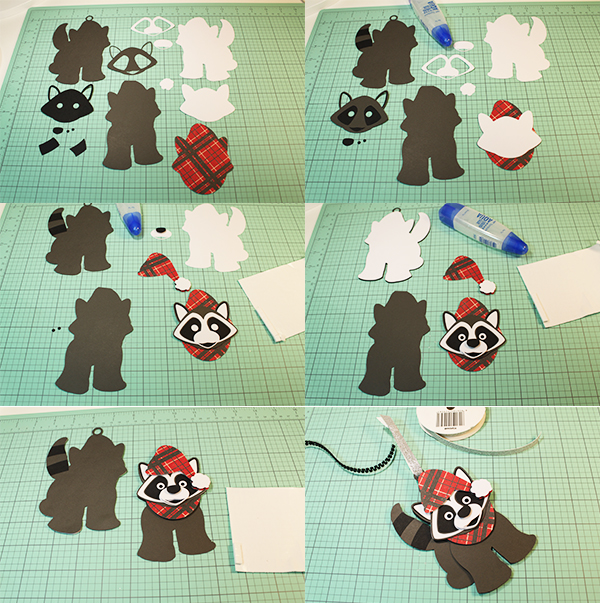
1. Cut design pieces. I used double sided card stock. (The hat piece is missing from the first two images..sorry:)
2. Glue the solid face to the hat scarf piece. Glue the face piece with large eye holes to the coordinating shape with smaller eye holes. Glue the hat tail stripe design pieces to the coordinating shapes on the tail.
3. Attach the nose to the muzzle piece using a foam adhesive square. Use foam adhesive squares to attach the puff ball shape to the hat piece. Glue the combined face piece to the combined scarf/hat piece. Glue the eye outline piece (white) to the combined scarf/hat piece. 
4. Glue the combined muzzle piece to the combined scarf/hat piece. Flip the raccoon tag base over and glue the coordinating shape label (white) to the backside;centering it. Flip it back over. Use a foam adhesive square to attach the muzzle to the combined hat/face pie and glue the tiny eyeballs into place.
5. Use a foam adhesive square to attach the combined hat piece to the combined hat/face piece. Use foam adhesive squares to attach the combined Hat/Face piece to the raccoon body with two legs.
6. Use foam adhesive squares to attach the combined smaller body piece to the larger one. Loop a ribbon through the top circular hole and tie. I used adhesive enamel dots to accentuate the eyes:)

Monday, November 27, 2017

Snowflake Gift Tag Ornament


Snowflake Gift Tag Ornament- JMRush 
Approximate size: H 3.75” X W 3.75”


This design file is compatible with both 8X12 and 12X12 mats and can be used as a gift tag and or an ornament. 

You can purchase this Silhouette design file or SVG bundle here: https://www.silhouettedesignstore.com/artists/485222


You can purchase this Cricut compatible SVG design file here: https://www.jamieandjenn.com

1. Cut design pieces. I used double sided card stock.
2. Glue the snowflake to the Ornament base; centering it.
3. Flip the combined ornament over and glue the white gift tag piece on; centering it.
4. Finish with a ribbon:)

Snowflake Round Gift Tag Ornament


Snowflake Round Gift Tag Ornament- JMRush 
Approximate size: H 3.50” X W 3.25”

This design file is compatible with both 8X12 and 12X12 mats and can be used as a gift tag and or an ornament.

You can purchase this Silhouette design file or SVG bundle here: https://www.silhouettedesignstore.com/artists/485222


You can purchase this Cricut compatible SVG design file here: https://www.jamieandjenn.com

1. Cut design pieces. I used double sided card stock.
2. Attach the snowflake circle to the silver circle using pieces of square foam adhesive. Flip the ornament base over and glue the white gift tag piece on; centering it.
3. Flip the ornament base  back over and glue the combined snowflake on; centering it.
4. Finish with a ribbon:)

Tuesday, November 21, 2017

Dachshund Gift Tag Ornament

Dachshund Gift Tag Ornament- JMRush 
Approximate size: W 4.5” X H 3”

This design file is compatible with both 8X12 and 12X12 mats and can be used as a gift tag and or an ornament.

You can purchase this Silhouette design file or SVG bundle here: https://www.silhouettedesignstore.com/artists/485222

1. Cut design pieces.
2.  Glue the dog silhouette without a mouth to the full dog silhouette (with hat) shape. Glue the smaller ear silhouette to the larger ear silhouette;centering it. Glue the sweater piece to the dog silhouette with a mouth. Glue the hat trim piece to the hat base piece. Attach the puff ball to the combined hat piece using a piece of foam adhesive.
3. Glue the collar piece to the combined sweater dog silhouette. Glue the combined ear to the combined sweater dog silhouette.
4. I used a small enamel dot to accentuate the eye on the combined full dog layer. Use foam adhesive squares to attach the combined sweater dog to the combined full dog silhouette. Glue the tip of the tail to the combined full dog silhouette. I used a small enamel dot to accentuate the nose.
5. Use a foam adhesive square to attach the combined hat to the combined dog. 
6. Flip the combined dog over and glue the white dog silhouette to the back ( When using as a gift tag:)
7. Loop a ribbon through the hanging circle and finish with a bow:)

Monday, November 20, 2017

3D Star Ornament Gift Tag

3D Star Ornament Gift Tag- JMRush 
Approximate size: W 4” X H 4.25”


This design file is compatible with both 8X12 and 12X12 mats and can be used as a gift tag and or an ornament.
You can purchase this Silhouette design file or SVG bundle here: https://www.silhouettedesignstore.com/artists/485222


You can purchase this Cricut compatible SVG design file here: https://www.jamieandjenn.com

1. Cut design pieces. I used double sided card stock. ( This file comes with an additional flat star to be used on the backside when used as a gift tag:)
2. Crease the center line score line on the stars; center creases will be up and stops at the center. Crease the rest of the score lines of the stars. (All of the score lines of the points of the stars fold up.)
3. Use foam adhesive squares to attach the star to the star ornament base.  Repeat for the other star on the backside when used as an ornament replace with the flat star when used as a gift tag:)
4.-5. Finish with a ribbon:)

Monday, March 27, 2017

Wisteria Gift Tag Card


Wisteria Gift Tag Card-JMRush
Approximate Card Size: H 4.75” x W 2.75”

You can purchase this design here: https://www.silhouettedesignstore.com/artists/485222


1. Cut design pieces. I used double sided card stock.
2. Fold the card at the score lines. Glue the large wisteria flower/leaf piece to the front of the gift tag.
3. Glue the stem/leaf piece to the coordination shape on the combined gift tag; centering it. Curve the single flower petals and single leaves.
4. Using foam adhesive squares, attach the largest flower shape to the coordinating shape on the combined gift tag. Glue the leaves into place.
5. Glue the two remaining large flower pieces together ( smaller of the two on top) Glue the center of the two upper curved single flower petals to the top of the last remaining flower section. 
6. Repeat for the two side petals; overlapping slightly.  Attach the combined large flower section to the front of the tag base using foam adhesive squares. 
7. I used foam adhesive squares to attach the final petal to the center of the top layer.
8. Use foam adhesive squares to attach the last combined flower layer to the top of the tag. Finish with a ribbon and a enamel dot:)

Tuesday, March 7, 2017

Tulip Gift Tag Card


Tulip Gift Tag Card-JMRush
Approximate Card Size: H 3” x W 2.75”

This design can be used as an alternative to a bow on a present or gift bag and is compatible with both 8X12 and 12X12 mats. 

You can purchase this design here: https://www.silhouettedesignstore.com/artists/485222


1.Cut design pieces. (I used double sided card stock) 
2. Fold the card base at the score lines. Curve the flower petals and leaf design.
3. Glue the Longest side of the long double petal to the center front of the largest petal grouping.  Fold the gift tag base at the score lines.
4. Glue the Last petal grouping to the center top of the bottom petal of the combined flower petals. Open your card and glue the scalloped piece on the bottom section of the card; centering it. ( Optional piece for writing in case you have a double sided colored card base:)
5. I used foam adhesive squares to attach the lower section of the flower petals to the upper section.
6. Center and glue the leaves to the front of the gift tag base.
7. Use foam adhesive squares to attach the combined tulip to the front of the gift tag base. I looped a ribbon through the top opening of the card to finish:)

Monday, March 6, 2017

Lamb Head Gift Tag


 Lamb Head Gift Tag-JMRush
Approximate Size: H 3.5” x W 2.75”

This gift tag design is perfect for easter baskets or gift bags. This design is compatible with both 8X12 and 12X12 mats.


You can purchase this design here: https://www.silhouettedesignstore.com/artists/485222

1. Cut design pieces. (I used double sided card stock) 
2. Glue the lamb head with eye cutouts to the coordinating solid lamb head shape base. Glue the curvy piece with cut outs to it’s matching solid base shape.
3. Use foam adhesive squares to attach the combined curvy shape to the combined lamb head. glue the small heart nose to the combined lamb head.
4. Use foam adhesive squares to attach the combined lamb head to the gift tag base.

5. I finished by glueing a ribbon to the combined lamb’s head and accentuated the eyes with enamel dots:)

Chick Card


Chick Card-JMRush
Approximate Card Size: W 5.5” x H 4”

This design is compatible with both 8X12 and 12X12 mats.

You can purchase this design here: https://www.silhouettedesignstore.com/artists/485222


1.Cut design pieces. (I used double sided card stock) 
2. Fold the card base at the score lines. Glue the chick body with cut out eyes to it’s coordinating solid base.
3. Use foam adhesive squares to attach the combined combined chick body to the solid chick body with wings. Use a small piece of foam adhesive square to attach the beak to the combined chick.
4. Use foam adhesive squares to attach the combined chick to the front of the card base. I finished by adding a ribbon:)

Egg Gift Tag


Egg Gift Tag-JMRush
Approximate Size: H 3.75” x W 2.25”

This design is compatible with both 8X12 and 12X12 mats.

You can purchase this design here: https://www.silhouettedesignstore.com/artists/485222

1. Cut design pieces. (I used double sided card stock) 
2. Glue the egg with eye cutouts to the coordinating solid egg shape base.
3. Use foam adhesive squares to attach the combined egg to the gift tag base; centering it. Use a small piece of foam adhesive square to attach the beak to the combined egg.

4. I finished by glueing a ribbon bow tie to the combined egg:)

Bounce Bunny Gift Tag Card


 Bounce Bunny Gift Tag Card-JMRush
Approximate Card Size: W 3.75” x H 5.25”


This gift tag design opens like a card and is perfect for easter baskets or gift bags. This design is compatible with both 8X12 and 12X12 mats.

You can purchase this design here: https://www.silhouettedesignstore.com/artists/485222


1.Cut design pieces. (I used double sided card stock) 
2. Fold the card base at the score lines. Glue the bunny face with cut outs to it;s coordinating solid base. Glue the smaller,thinner bunny body to the larger bunny body; centering it.
3. Use foam adhesive squares to attach the combined bunny face to the combined bunny body. Glue the tiny nose to the bunny face.
4. Use foam adhesive squares to attach the combined bunny body to the front of the card base. Glue the heart to the coordinating shape on the front of the card.
5. Flip the card over and use a foam adhesive square to attach the fluffy bunny tail to the backside.
6. I finished by adding a ribbon:)


Wednesday, March 1, 2017

Lily Gift Tag Card


 Lily Gift Tag Card-JMRush
Approximate Size with Lily W 3.75” x H 3.75”
Approximate Card Size: H 3” x W 2.75”

You can purchase this design here: https://www.silhouettedesignstore.com/artists/485222

Written tutorial coming soon:)


1.Cut design pieces. (I used double sided card stock)
2.-3.-4. Curve the leaf pieces as you like. Place the flower petal section with a smaller center underneath the flower petal section with a circular shape. Center and tuck the top layer of petals under the bottom petals to join the flower sections.
5. Curve the Flower stamen combined piece so that all of the oval sections are on top. Curve the flower petals as you like.
6. Glue the stamen section to the center of the combined flower petals.
7. ( Optional piece for writing in case you have a double sided colored card base:)-Open your card and glue the scalloped piece on the bottom section of the card; centering it.
8. Glue the leaves into place on the front of the card.
9. Glue the combined lily to the front of the card.
10. I looped a ribbon through the top opening of the card to finish:)

Hibiscus Gift Tag Card


Hibiscus Gift Tag Card-JMRush
Approximate Size with Hibiscus W 4” x H 3.75”
Approximate Card Size: H 3” x W 2.75”


This design can be used as an alternative to a bow on a present or gift bag and is compatible with both 8X12 and 12X12 mats.
You can purchase this design here: https://www.silhouettedesignstore.com/artists/485222

1.Cut design pieces. (I used double sided card stock) 
2. Fold the card base at the score lines. Curve the flower petals, leaf design, and stamen pieces. 
3. Glue the center rings of the petal sections together. Fold the tabs on the stamen piece out.
4.-5.-6.Glue the very edges of the stamen piece together to make it form a cylindrical shape. Fold the end tabs of the stamen piece out.
7. Group the ends of the stamen piece together.
8. Insert the top of the stamen piece through the bottom of the combined petals.
9. Glue the tabs to the bottom of the combined petal piece. ( It might be easier to use hot glue for this step:)
10. Open your card and glue the scalloped piece on the bottom section of the card; centering it. ( Optional piece for writing in case you have a double sided colored card base:)
11. Glue the leaf piece in the center of the top of the card base.
12. Glue the combined flower to the center of the combined card base. (hot glue might be easier to use:) I looped a ribbon through the top opening of the card to finish:)

Thursday, February 23, 2017

Rose Gift Tag Card


 Rose Gift Tag Card-JMRush
Approximate Size with Rose: W 4” x H 3.25”
Approximate Card Size: W 2.5” x H 2.75”

This design can be used as an alternative to a bow on a present or a gift bag and is compatible with both 8X12 and 12X12 mats.

You can purchase this design here: https://www.silhouettedesignstore.com/artists/485222
1.Cut design pieces. (I used double sided card stock for the flower pieces) - ( I switched the color of the card base from a pattern to a solid white during this tutorial. The pattern was too busy for this project for me:)
2. Fold the card base at the score lines. Curve the flower petals and leaf design. I curved the two larger pieces downward toward the table and the two smaller I curved each individual petal inward toward each petals vertical center forming a circular shape.
3. Glue the two smaller petal sections together and the two larger petal sections together alternating the petals. 
4. I used a foam adhesive square to attach the two flower sections together and dabbed glue along the bottom of the center flower section to attach and curve the shape the bottom section to the top. ( This is where I decided to use a white card base:)
5. Glue the leaf piece in the center of the top of the card base.
6. I used a foam adhesive square to attach the combined flower to the center of the combined card base.
7. ( Optional piece for writing in case you have a double sided colored card base:)-Open your card and glue the scalloped piece on the bottom section of the card; centering it.
8. I looped a ribbon through the top opening of the card to finish:)


Tuesday, January 24, 2017

Ice Skates Gift Tag

Roller Skates Gift Tag


Roller Skates Gift Tag- JMRush 

This design is compatible with both 8X12 and 12X12 mats. 

You can purchase the Silhouette design file here: https://www.silhouettedesignstore.com/artists/485222

  1. Cut Design pieces.
  2. Glue the roller skate shoe shapes to the coordinating shapes on the gift tag base; aligning the holes. Glue the open circle shapes to the solid circle shapes; aligning at the center bottom. Glue the two small stoppers to the two larger ones; centering them. Glue the  two open half circle pieces to their coordinating solid shapes; aligning at the center bottom. Glue the two small circles to their larger solid circle bases. Glue the small oblong circle to it’s coordinating shape; centering it.
  3. Glue the combined circles to the wheels; centering them. Glue the combined oblong circle shape to the center of the combined rounded triangle wheel; aligning at the top.
  4. Glue the combined rounded triangle wheel to the coordinating shape on the gift tag base. Glue the other odd shaped combined wheel to the coordinating shape on the gift card base. Glue one of the combined stoppers to the first roller skate on the left of the gift tag base.
  5. Use foam adhesive squares to attach the other stopper and two combined wheels to the gift tag base.
  6. Flip the combined roller skate over and glue the double roller skate shape on; aligning the holes. Glue the small open circle shape to the coordinating shape on the gift tag base to help reinforce the circular hanger.
  7. Flip the gift tag back over. Cut two strands of approximately 21” of 1/8” ribbon (or smaller). Loop the ribbon through the bottom eyelet of one of the skates. Pull the ribbon so that the ends are even each side. Repeat for the other skate.
  8. Thread one side of the ribbon through each eyelet. (I heat sealed and pinched the ends of the ribbon to make the lacing process easier:)
  9. Repeat with the other side of the ribbon threading the opposite way as before ( under or over the top of the card). Repeat for the other skate.
  10. Tie your both ribbons and add a looped ribbon at the top for a hanger.

Sunday, January 1, 2017

Roller Skates Gift Tag

Roller Skates Gift Tag


Roller Skates Gift Tag- JMRush 

This design is compatible with both 8X12 and 12X12 mats. 

You can purchase the Silhouette design file here: https://www.silhouettedesignstore.com/artists/485222

You can purchase the SVG and Cricut file here:


  1. Cut Design pieces.
  2. Glue the roller skate shoe shapes to the coordinating shapes on the gift tag base; aligning the holes. Glue the open circle shapes to the solid circle shapes; aligning at the center bottom. Glue the two small stoppers to the two larger ones; centering them. Glue the  two open half circle pieces to their coordinating solid shapes; aligning at the center bottom. Glue the two small circles to their larger solid circle bases. Glue the small oblong circle to it’s coordinating shape; centering it.
  3. Glue the combined circles to the wheels; centering them. Glue the combined oblong circle shape to the center of the combined rounded triangle wheel; aligning at the top.
  4. Glue the combined rounded triangle wheel to the coordinating shape on the gift tag base. Glue the other odd shaped combined wheel to the coordinating shape on the gift card base. Glue one of the combined stoppers to the first roller skate on the left of the gift tag base.
  5. Use foam adhesive squares to attach the other stopper and two combined wheels to the gift tag base.
  6. Flip the combined roller skate over and glue the double roller skate shape on; aligning the holes. Glue the small open circle shape to the coordinating shape on the gift tag base to help reinforce the circular hanger.
  7. Flip the gift tag back over. Cut two strands of approximately 21” of 1/8” ribbon (or smaller). Loop the ribbon through the bottom eyelet of one of the skates. Pull the ribbon so that the ends are even each side. Repeat for the other skate.
  8. Thread one side of the ribbon through each eyelet. (I heat sealed and pinched the ends of the ribbon to make the lacing process easier:)
  9. Repeat with the other side of the ribbon threading the opposite way as before ( under or over the top of the card). Repeat for the other skate.
  10. Tie your both ribbons and add a looped ribbon at the top for a hanger.

Friday, December 2, 2016

Acorn Ornament Gift Tag


Acorn Ornament Gift Tag- JMRush 
Approximate size: W 5.25” X H 3”

This design can be used as a gift tag or ornament and is compatible with both 8X12 and 12X12 mats.

You can purchase the Silhouette design file here: https://www.silhouettedesignstore.com/artists/485222

1.Cut design pieces.
2. Glue the acorn top, acorns, and leaves to the acorn grouping silhouette that coordinates with the acorn circular hanger base.
3. Flip the acorn circular hanger base over (pretty side down). Center and glue the other acorn grouping silhouette to the base. (This is optional and is used for writing if you will be using this for a gift tag and not an ornament) Flip this combined piece back over (pretty side up).
4. Attach the combined acorn grouping to the combined base with adhesive foam squares. I finished with a ribbon and enamel dot:)