Showing posts with label kids. Show all posts

Monday, June 26, 2017

T-Rex Dino Box


T-Rex Dino Box - JMRush 
Approximate Box size: H 2.50” X W 3” X D 2.50”
Approximate Design size: H 5.75” X W 5.25”


This cute dinosaur box design is a perfect container for birthday party treats and is compatible with both 8X12 and 12X12 mats. 

You can purchase this Silhouette design file here: https://www.silhouettedesignstore.com/artists/485222


1. Cut design pieces. ( I used double sided card stock)
2. Fold the box base at the score lines. Glue the large dino body shape with cut outs to the large solid dino base.
3. Glue the white dino face to the large combined dino body. Apply glue to the top two tabs on the box base and secure to the square shape above.
4. Apply glue to the bottom two tabs on the box base and secure to the irregular shape below forming a complete box.
5. Glue the last dino body shape with cut outs to the combined dino.
6. Using pieces of foam adhesive squares, attach the dino head, leg, and arm to the coordinating shapes of the combined dino body.
7. Glue the combined dino to the box base matching up the contour of the box and the dinosaur’s foot. Make sure to only apply glue where the dinosaur touches the box.
8. Insert the handle into the side slots on the box.
9. Repeat for the other side.
10. Finish with an enamel jewel to accentuate the eye and a ribbon for a bow tie:)

Bronotosaurus Dino Box


Bronotosaurus Dino Box - JMRush 
Approximate Box size: H 2.50” X W 3” X D 2.50”
Approximate Design size: H 6.75” X W 6.50”

You can purchase this Silhouette design file here: https://www.silhouettedesignstore.com/artists/485222 

1. Cut design pieces. ( I used double sided card stock)
2. Fold the box base at the score lines. Glue the white dino face to the large solid dino body.
3. Apply glue to the top two tabs on the box base and secure to the square shape above.
4. Apply glue to the bottom two tabs on the box base and secure to the irregular shape below forming a complete box.
5. Glue the large dino body shape with cut outs to the combined dino.
6. Using pieces of foam adhesive squares, attach the last dino body shape to the combined dino body.
7. Glue the combined dino to the box base matching up the contour of the box and the dinosaur’s back. Make sure to only apply glue where the dinosaur touches the box.
8. Insert the handle into the side slots on the box.
9. Repeat for the other side.

10. Finish with an enamel jewel to accentuate the eye and a ribbon for a bow tie:)

Wednesday, April 19, 2017

Hippo Card


Hippo Card-JMRush
Approximate Size: W 4.25” X H 4.50”

This design is compatible with both 8X12 and 12X12 mats.

You can purchase this design here: https://www.silhouettedesignstore.com/artists/485222


  1. Cut design pieces. I used double sided card stock.
  2. Glue the full Hippo Head silhouette with an eye/ear/nose holes to the larger solid coordinating Hippo Head silhouette. Fold the card base at the score lines. ( I have the card base upside down in this tutorial - the teeth should be on the top of the card)
  3. Use a foam adhesive squares to attach the oval nose/muzzle piece to the combined Hippo Head.
  4. Use a foam adhesive squares to attach the combined Hippo Head to the front of the card base (with teeth). Glue the ears of the combined Hippo Head to the card base. I finished with adhesive enamel dots to accentuate the eyes and a ribbon:)

Wednesday, April 12, 2017

Chick Glasses Basket


Chick Glasses Basket-JMRush
Approximate Basket Dimensions: W 3” x D 2.50” X H 2.50” (H 5.5” including the handle)

This design is compatible with both 8X12 and 12X12 mats and is perfect for Easter goodies or Birthday party treats. 
You can purchase this design here: https://www.silhouettedesignstore.com/artists/485222

Boy Chick Glasses Basket-JMRush
Chick without glasses.

  1. Cut design pieces. I used double sided card stock. ( The boy chick glasses basket file has a 2 piece optional bow tie, which was not used in this tutorial)
  2. Glue the chick’s head with eye cut outs to it’s solid coordinating shape.  Apply glue to the side tabs on the top section and secure to the rounded shape on each side.
  3. Repeat for the bottom tabs creating a box. Glue the round eyes to the combined chick head; centering each around the holes in the combined chick head.
  4. Insert the handle into the side slots.
  5. Attach the wings to the combined back of the box.
  6. Attach the tail feather piece to the backside of the box using a foam adhesive square.
  7. Use small pieces of foam adhesive to attach the girl lambs glasses and glue for the boy glasses. Glue the beak in to place.
  8. Using foam adhesive squares, attach the combined chick’s head to the front of the box. Attach the feet to the front bottom of the box using foam adhesive squares.  I finished the chick with a Ribbon for the girl and a bow tie for the boy. I accentuated the eyes enamel adhesive jewels:)

Bunny Glasses Basket


Bunny Glasses Basket-JMRush
Approximate Basket Dimensions: W 3” x D 2.50” X H 2.50” (H 5.5” including the handle)

This design is compatible with both 8X12 and 12X12 mats and is perfect for Easter goodies or Birthday party treats.

You can purchase this design here: https://www.silhouettedesignstore.com/artists/485222
Boy Bunny Glasses Basket-JMRush

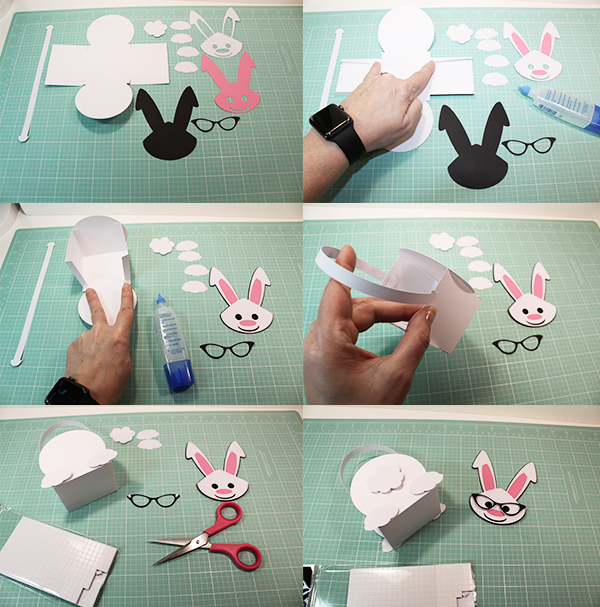
  1. Cut design pieces. I used double sided card stock.
  2. Glue the bunny’s head with eye/nose/mouth cut outs to the coordinating shape with eye and mouth cut outs.  Apply glue to the side tabs on the top section and secure to the rounded shape on each side.
  3. Repeat for the bottom tabs creating a box. Glue the combined bunny head to it’s coordinating solid shape piece.
  4. Insert the handle into the side slots.
  5. Attach two of the bunny paws to the front bottom sides of the box using foam adhesive squares. Use small pieces of foam adhesive to attach the girl bunny glasses and glue for the boy glasses.
  6. Flip the box over and attach the bunny tail piece and remaining two bunny paws to the backside of the box using a foam adhesive square. Using foam adhesive squares, attach the combined bunny’s head to the front of the box. I finished the bunny with a Ribbon for the girl and a bow tie for the boy. I accentuated the eyes enamel adhesive jewels:)

Tuesday, April 4, 2017

Rabbit Candy Pocket


Rabbit Candy Pocket- JMRush 
Approximate size: W 5” X H 7.5
Approximate Pocket size: W 3” X H 4”

The Rabbit Candy Pocket has a open center section that is perfect for holding snack sized candies for classroom parties, birthday party treats, or for Easter. This file can also hold a standard sized gift card and is compatible with both 8X12 and 12X12 mats.

You can purchase this design here: https://www.silhouettedesignstore.com/artists/485222


1.Cut design pieces. ( I used double sided card stock)
2. Glue the rabbit head with cut outs to it’s matching solid base. Fold the tabs on the Rabbit pocket piece. Apply glue to the tabs. 
3. Fold forward and secure to the upper shape of the pocket.  Glue the inner ear pieces to the coordinating shape on the combined rabbit head.
4. Use foam adhesive squares to attach the pocket piece to the rabbit base with legs; aligning at the bottom and matching up the curves of the shapes.
5. Apply glue to the top section of the combined rabbit body. Center and secure the top of the rabbit; aligning to the coordinating shape of the rabbit’s body.
6. Cut three sections of thread and glue their centers to the combined rabbit head’s nose.
7. Use a foam adhesive square to attach the nose to the combined rabbit’s head nose; covering the thread’s middle sections.

8. Attach the combined head to the combined rabbit base using foam adhesive squares and aligning the edges on each side. I finished with enamel dots to accentuate the eyes, a ribbon, and inserted a gift card and candy carrots in the pocket:)

Wednesday, February 15, 2017

Dog Candy Pocket


Dog Candy Pocket- JMRush 
Approximate size: W 5” X H 6.5
Approximate Pocket size: W 3” X H 4”

The Dog Candy Pocket has a open center section that is perfect for holding snack sized candies for classroom parties, birthday party treats, or for Valentine’s Day. This file is compatible with both 8X12 and 12X12 mats.

You can purchase the Silhouette design file here: https://www.silhouettedesignstore.com/artists/485222

You can purchase the SVG and Cricut file here:


1.Cut design pieces. ( I used double sided card stock)
2. Fold the tabs on the dog pocket piece. Apply glue to the tabs. 
3. Fold forward and secure to the upper shape of the pocket. Glue the dog head with cut outs to it’s matching solid base.
4. Curve the tongue ( this is an optional piece ) as you like:) Use foam adhesive squares to attach the coordinating ear shapes to the combined dog head.
5. (optional) Glue the tongue to the combined dog head; centering it and aligning it at the bottom.
6. Use foam adhesive squares to attach the muzzle piece ( centering around the nose shape) and nose to the combined dog head.
7. Use foam adhesive squares to attach the combined dog head to the coordinating shape on the head/back piece; aligning at the bottom. Use foam adhesive squares to attach the pocket piece to the dog base with legs and a tail; centering and aligning at the straight edge of the bottom.
8. Glue the combined dog head to the combined pocket base piece; aligning along the curved edges. I finished with enamel dots to accentuate the eyes, a ribbon, and inserted snack sized Laffy Taffy in the pocket:)