Showing posts with label Werewolf. Show all posts

Monday, October 24, 2022

Werewolf Treat Egg Holder


Werewolf Treat Egg Holder -JMR


Approximate size: H 5” X W 6.25” X D 2.5”


This easy to construct Werewolf treat egg holder is compatible with both 8X12 and 12X12 mats and is sized to hold a Kinder Joy chocolate egg. 


You can purchase the Silhouette design file here: https://www.silhouettedesignstore.com/artists/485222


You can purchase the SVG and Cricut compatible file here:https://www.jamieandjenn.com  Coming Soon:)


  1. Cut the design pieces. I used double sided card stock. (You will have two of the orange t-shirt shapes.
  2. Glue the werewolf eyes with cutouts to the coordinating base solid eye shape; centering it. Flip the box base over and fold score lines.
  3. Glue the combined eyes to the back of the Werewolf face shape so the the combined eyes show through.
  4. Using pieces of foam adhesive squares, attach the top of the werewolf face to the full solid werewolf face shape.  Use glue to attach the mouth section.
  5. Using pieces of foam adhesive squares, attach the nose to the cording shape on the werewolf face. 
  6. Glue the tiny white teeth (2) to the coordinating shape on the combined werewolf head.
7.  Apply glue to the two side tabs. Fold the bottom section up to meet the tabs creating a box. Hold until dry.
 8. Apply glue to the small horizontal tab. Tuck under the werewolf figure enclosing the box.
9. Flip the box base over. Fold the score lines inward.
10. Apply glue to the backside of the werewolf figure and attach the solid full body shape aligning at the edges. 
11. Flip the box base over. Glue one of the orange t-shirt shapes to the front; aligning at the side edges.
12. Using foam adhesive squares, attach the combined werewolf face to the coordinating shape on the front of the box base. 


13. Using pieces of foam adhesive squares, attach the feet and ears to the coordinating shapes on the box base.
14. I used adhesive jewels to accentuate the eyes.
15. Flip box base over. Apply glue to the back of the last orange t-shirt and attach to the back of the box base.
16. Using foam adhesive squares, attach the tail to the back of the box base.
17. This is what it should look like:)


Wednesday, October 26, 2016

Werewolf Hug Treat Box


Werewolf Hug Treat Box-JMRush
Approximate box size: W 3.” x D 2.25 x H .75” 
(W 4.50 X H 4.25” including character)

This treat box features character arms that open to a small treat box. This design is perfect for Halloween parties or for your special trick or treaters. This design is compatible with both 8X12 and 12X12 mats. 

You can purchase the Silhouette design file here: https://www.silhouettedesignstore.com/artists/485222


1.Cut design pieces. (I used double sided card stock for the box base).
2. Fold the box base along score lines. Glue the eye pieces to the coordinating eye base shape. Using pieces of foam adhesive squares, attach the ears to the the coordinating shapes on the box base.
3. Glue the werewolf face to the combined eyes. Using a piece of foam adhesive square, attach the nose to the combined werewolf face.
4. Flip the combined werewolf face over and attach foam adhesive squares to the top and glue along the bottom. Attach to the box base. 
5. Glue the fangs into place. Apply glue to the two top tabs of the box base and secure them to the top (head) panel.
6. Apply glue to the bottom two tabs and secure them to the bottom panel creating a box.
7. Apply glue to the bottom tab of the center narrow strip section. Secure the center narrow strip tab to the backside of the inside of the box.
8. Flip the paw shapes over. Attach a foam adhesive square to the curvy edge and glue along the straight line.
9. Glue the hands to the coordinating shapes on the box base hands; aligning with the edge of the box. The hands tuck into the slots of the center strip:) Finish with a ribbon:)

Tuesday, August 23, 2016

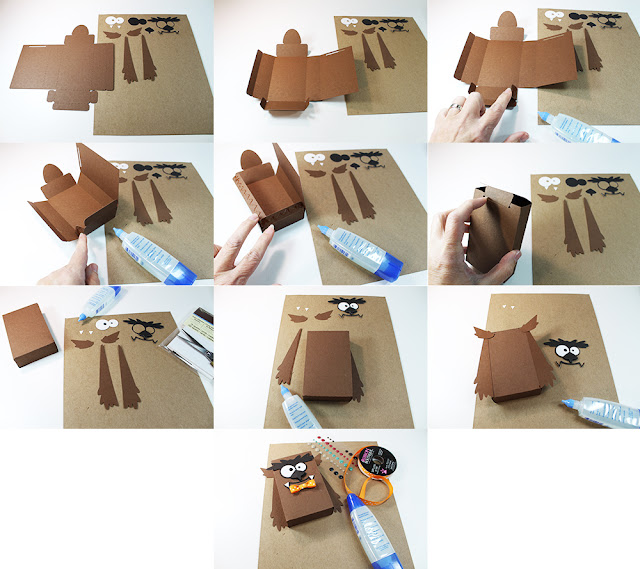
Werewolf Treat Box


Werewolf Treat Box-JMRush
Approximate Box size: W 2.75” X W 1” X H 4.25”

This treat box design has an attached lid and is compatible with both 8X12 and 12X12 mats. 


You can purchase the Silhouette design file here: https://www.silhouettedesignstore.com/artists/485222


  1. Cut design pieces. ( I used double sided card stock)
  2. Flip the box base over like shown (pretty side down). Fold the box base score lines.
  3. Apply glue to the backside of the tab on the bottom right. Attach to the upper panel to the right.
  4. Apply glue to the backside of the tab on the bottom left. Attach to the panel to the left.
  5. Apply glue to the long vertical tab on the left and to the bottom horizontal tab. Attach to the panel to the right. Your box will be complete.
  6. Flip your box over so that the slot is in the back.
  7. Glue the werewolf’s eyes to the coordinating shape solid eye shaped base.
  8. Glue the werewolf’s combined eyes to the back of the werewolf’s outlined face. Glue the arms to the back edge of the box base.
  9. ( Image of the backside) Glue the ears to the back of the box base. 
  10. Glue the combined werewolf face to the front of the box base. I used different sized enamel dots to accentuate the eyes and finished by adding a bow tie. Fill with goodies:)

Monday, October 12, 2015

Werewolf Envelope Pouch

Werewolf Envelope Pouch-JMRush
Finished Pouch Dimensions: 
W 3” x H 5.25”

Fill this cute little werewolf pouch with your favorite candy bar or use it as a  cutlery holder for your Halloween party. The pouch’s super easy construction makes it perfect for classroom or Halloween parties. This design is compatible with 8x12 or 12X12 mats.

  1. Cut the design pieces.
  2. Pre-Fold all score lines.
  3. Apply glue to the tabs of the pouch base on each side.
  4. Secure the tabs to the lower flap of the pouch. 
  5. Apply glue to the front inside edge of each arm pieces(scalloped edge down) and to the bottom backside of each ear.
  6. Secure each arm piece to the back side of the pouch and ears to the top front side of the pouch.
  7. Glue the eye piece to the solid eye piece.
  8. Glue the eye piece to the backside of the face design and glue into place on the pouch. Glue the small triangle teeth into place.
  9. Using a piece of a small foam adhesive, secure the nose piece on top of the face design and TA DA! Your werewolf is ready to be filled with goodies or used as a cutlery holder for your Halloween parties.

Monday, October 5, 2015

Werewolf Slider Hatch Treat Box


Werewolf Slider Hatch Treat Box-JMRush
Finished Box Dimensions (approximate)- W 2” x H 4” x D 7/8”

This cute little Werewolf treat box is perfect for classroom parties. This treat box has a hatch opening and will hold 3-4 “mini” candies. This design is compatible with 8x12 or 12X12 mats.


Also see Frankenstein Slider Hatch Treat Box for more detailed box construction images:)