Showing posts with label Santa. Show all posts

Wednesday, December 16, 2020

Santa Handle Basket


Santa Handle Basket-JMR

Approximate size: W 4.5” x D 3” x H 5.5” (including handle)

Approximate box size: W 2.75” x D 2.25” x H 2.25”

This cute Santa Basket is compatible with both 8X12 and 12X12 mats. A complete step by step picture tutorial can be found on my blog.

You can purchase the Silhouette design file here: https://www.silhouettedesignstore.com/artists/485222


You can purchase the SVG and Cricut compatible file here: https://www.jamieandjenn.com  Coming Soon:)


1.Cut design pieces. (I used double sided card stock)

2. Glue the white santa head to the coordinating beige santa head. Glue the beige hands to the coordinating white hands with ruffles.

3. Glue the combined santa head to the coordinating shape on the basket base. Glue the large hat piece to the coordinating shape on the combined basket base.

4. Using foam adhesive squares, attach the ruffle hat brim to the small hat piece and the black shoe heels to the shoe bases.

5. Glue the tiny black eye circles to the coordinating holes on the combined base. Attach the combined small hat piece to the combined base using foam adhesive squares.

6. Attach the eyebrows using pieces of foam adhesive squares. Attach the puff ball to the hat and  the nose to the mustache using foam adhesive squares.

7. I used adhesive jewels to accentuate the eyes.

8. Flip the base over as shown.


9. Apply glue to the two top tabs on the basket base and attach to the rounded section of the basket.

10. Repeat for the lower two tabs; creating a box.

11. This is what it should look like:)

12. Attach the combined hands to the front using foam adhesive squares.

13. Attach the combined shoes to the back using foam adhesive squares. Glue the belt buckle to the center of the handle.

14. Insert the handle to the slot on either side of the basket.

15. I added a ribbon to the handle:)


Friday, November 20, 2020

Winter Gnome Hug Gift Card Holder


Winter Gnome Hug Gift Card Holder-JMRush

Approximate Card size: 4” x 7.5” 


This card features character arms that open to release a hidden gift card section. This design is compatible with both 8X12 and 12X12 mats. 

You can purchase the Silhouette design file here: https://www.silhouettedesignstore.com/artists/485222


You can purchase the SVG and Cricut compatible file here: https://www.jamieandjenn.com 


1.Cut design pieces. (I used double sided cardstock)

2. Fold the card along score lines. Glue the black belt into place right above the first line of horizontal score lines and center it.

3. Apply glue the bottom of the side tabs on the card base. Secure by folding upward toward the card base. Glue the gold square belt buckle to the center of the belt.

4.Glue the coordinating hat to the hat shape on the white head/beard piece.

5.  Insert gift card. Glue the combined head piece to the card base; aligning the beard along the edges of the top the card base.

6. Glue the hat trim piece to the combined face. Curl the green holly leaves as you like. 


7. Using foam adhesive squares attach the mustache to the combined beard/Head piece. 

8. Using a piece of foam adhesive square, attach the nose to the mustache. Glue the little red holly to the coordinating shape on the holly leaves.

9.Flip the card over. Glue the other red hat to the coordinating shape. Glue the hands into place.

10. Glue the white trim pieces just above the hands on each side. 

11. I finished with enamel jewels to accentuate the holly and a ribbon:)

( I used markers to color the enamel jewels the color I wanted:)

12.  Use a piece of foam adhesive square to attach the combined holly to the hat. 


Wednesday, December 11, 2019

Joy Santa Gnome Card


Joy Santa Gnome Card- JMRush 
Approximate Card size: H 4.25” X W 5.50”

This design is compatible with both 8X12 and 12X12 mats.

You can purchase the Silhouette design files here: https://www.silhouettedesignstore.com/artists/485222

You can purchase the SVG and Cricut compatible file here:https://www.jamieandjenn.com  


  1. Cut design pieces. I used double sided card stock.
  2. Glue the largest Gnome suit piece to the full solid gnome figure. Glue to hat base piece to the gnome head base. Glue the holly berries to the holly base. 
  3. Glue the small Gnome suit piece to the combined full Gnome figure; aligning at the bottom center and edges. Glue the hat brim piece to the combined gnome head piece.
  4. Glue the square buckle into place. Use pieces of foam adhesive squares to attach the nose/mustache to the combined head and the green wreath to the black wreath base.
  5. I curled the edges of the combined holly and used enamel adhesive jewels to accentuate the holly. Glue the combined holly to the hat.
  6. Use foam adhesive squares to attach the combined gnome head to the gnome body base. Glue the lettering to the coordinating shapes on the card base.
  7. Use foam adhesive squares to attach the combined gnome to the front of the card. I used adhesive enamel jewels to decorate the wreath:)

Monday, November 25, 2019

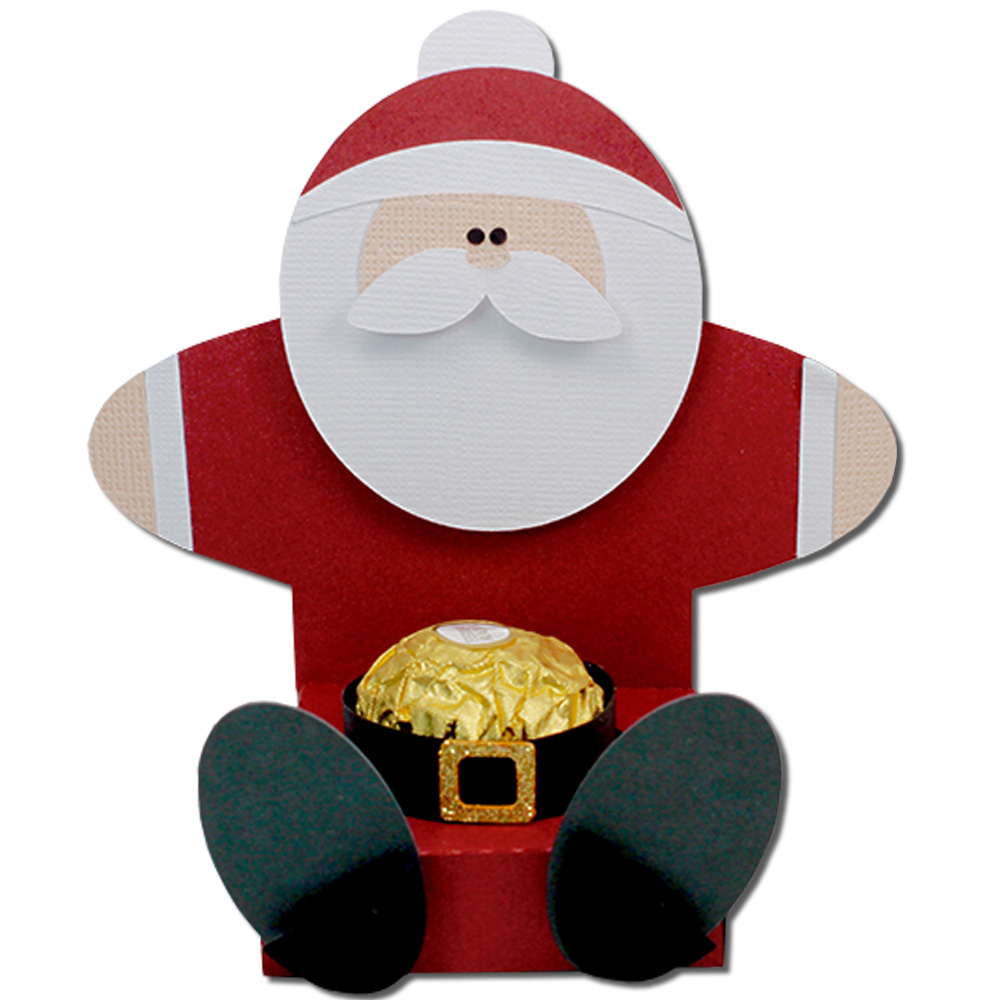
Santa Chocolate Belly Holder


Santa Chocolate Belly Holder-JMRush 
Approximate size: W 4.5 x D 2.25 x H 4.25”

This easy to construct chocolate holder is compatible with both 8X12 and 12X12 mats. A complete step by step picture tutorial can be found on my blog.

You can purchase the Silhouette design file here: https://www.silhouettedesignstore.com/artists/485222

You can purchase the SVG and Cricut compatible file here:https://www.jamieandjenn.com  Coming Soon:)

  1. Cut the design pieces. I used double sided card stock. (There is a solid santa piece in this file that is not shown in this image tutorial. It is used as a backing. Sorry. I forgot to cut this piece)
  2. Flip the box base over. 
  3. Apply glue to the side tabs and secure the bottom panel; aligning at the edges.
  4. Apply glue to the last tab and tuck under the snowman shape;align at the edge.
  5. Image of the backside. Apply glue to the backside of the santa shape (not shown in image) and secure the solid santa to the santa base; centering it.
  6. Flip the combined santa to the front. Glue the belt buckle to the center of the belt. Glue the belt so it forms a circular shape the size of the chocolate. Place the belt around the chocolate.
  7. Use a glue to attach the hat, face, hat brim pieces to the santa head. Use pieces of foam adhesive squares to attach the heels of the shoes to their shoe bases.
  8. Glue the hands and cuffs to the santa box base. Glue the tiny eyes to the combined santa head. Glue the tiny nose to the upper center of the mustache piece. Use a piece of foam adhesive squares to attach the combined mustache to the combined head.
  9. Glue the combined head to the combined santa base. Use foam adhesive squares to attach the feet to the box base:)

Tuesday, December 18, 2018

Mrs Claus Hug Gift Card Holder


Mrs Claus Hug Gift Card Holder-JMR
Approximate Card size: 4” x 6.75”

This card features character arms that open to release a hidden gift card section.This design is compatible with both 8X12 and 12X12 mats.


You can purchase the Silhouette design file here: https://www.silhouettedesignstore.com/artists/485222

You can purchase the SVG and Cricut friendly file here:https://www.jamieandjenn.com Coming Soon:)

1.Cut design pieces. I used double sided card stock.
2. Fold the card along score lines. Apply glue the bottom of the side tabs on the card base. Secure by folding upward toward the card base.
3. Glue the Large white head into place.
4. Glue the face into place. Glue the black belt just above the gift card section.
5. Curve the eyelashes and glue to the coordinating eye shapes on the face. Glue the mouth to the coordinating shape on the face.
6. Curve the 3 little green holly pieces and glue them into place; staggering them. Using pieces of adhesive foam square, attach the glasses. Glue the rectangular belt buckle on to the belt.
7. Using pieces of adhesive foam square, attach the nose. Glue the 3 tiny red berries to the combined holly piece.
8. Glue the hands and cuff pieces to the outside of the hands.
9. Insert gift card.
10. I used ribbon at the bottom to trim the card:).

11. Flip the card over. Glue the smaller hair piece to the coordinating shape on the backside:)

Tuesday, November 13, 2018

Hunter Santa Hug Gift Card Holder


Hunter Santa Hug Gift Card Holder-JMR
Approximate Card size: 4” x 5.25” 

This card features character arms that open to release a hidden gift card section. The Hunter has a hunting vest detail on the inside:) This design is compatible with both 8X12 and 12X12 mats.

You can purchase the Silhouette design file here: https://www.silhouettedesignstore.com/artists/485222

You can purchase the SVG and Cricut compatible file here:https://www.jamieandjenn.com 


1.Cut design pieces. I used double sided card stock.
2. Fold the card along score lines. Glue the stocks of the gun onto the gun base.
3. Apply glue the bottom of the side tabs on the card base. Secure by folding upward toward the card base.
4. Glue the Vest pieces into place. Glue the nose on the mustache piece.
5. Glue the oval Beard base into place; centering it with the card base and matching up with the top of the card base. Glue the pocket trim and button onto the pocket base. Glue the Hat and Gloves trim pieces onto their coordinating base pieces.
6.Glue the combined hat and combined pocket piece into place.
7. Glue the face piece into place. Using an adhesive foam square, attach the nose/mustache piece. 
8. Glue the eyes on to the face and black hat shadow piece to the combined hat.

9. Flip the card over. Glue the rectangle piece and combined mittens to the coordinating shapes on the backside.
10. This is what it should look like:)
11. Insert gift card. I used adhesive dots to accentuate the eyes. You can glue the gun into place or tuck it under the mitten.

12. Tuck the mittens into their slots. I used ribbon at the bottom to trim the card:).

Wednesday, December 13, 2017

Santa Suspenders Gift Card Holder


Santa Suspenders Gift Card Holder- JMRush 
Approximate Card size: H 5.25” X W 4.5”

This is a double sided design that has a gift card pocket on the backside.This design is compatible with both 8X12 and 12X12 mats.

You can purchase the Silhouette design file here: https://www.silhouettedesignstore.com/artists/485222

(Coming Soon )You can purchase the SVG and Cricut file here:https://www.jamieandjenn.com


  1. Cut design pieces. I used double sided card stock.
  2. Glue the large black piece to the card base. Glue the small beige face to the santa head piece; centering at the eyes.
  3. Glue the combined santa head to the coordinating shape on the combined card base. Glue the gold buckle into place. Glue the red belly and bottom (w buttons) to the combined card base.
  4. Glue the mustache and red hat to the coordinating shape on the combined card base. Glue the hands into place and use a small piece of foam adhesive square to attach the nose. Glue the two small black suspenders into place. ( I have the hat puff ball attached in this image…which I changed to the top of the hat)
  5. Flip the combined cad base over. Fold the card base at the score lines. Apply glue to the side tabs on the card base and attach to the middle section. Allow to dry.
  6. Glue the buttons and other set of hands to the backside 
  7. Insert gift card.
  8. Tuck the top section into the pants.
  9. Use small pieces of foam adhesive squares to attach the hat’s puff ball to the top. ( there is a scalloped puff ball or a circle puff ball… which ever your prefer:) I used small adhesive dots to accentuate the eyes:)

Tuesday, November 15, 2016

Santa’s Sleigh Lantern (Flameless)


Santa’s Sleigh Lantern (Flameless)-JMRush
Approximate Lantern size: W 3 x D 3 x H 7” (H 7.75” with Star Hanger)


This Flameless lantern features Santa’s sleigh and reindeer in flight which is wrapped around each of the four sides. A layered transparent frosted effect is created when vellum paper is used. This design is compatible with both 8X12 and 12X12 mats.


You can purchase the Silhouette design file here: https://www.silhouettedesignstore.com/artists/485222

1.Cut design pieces. ( I used double sided card stock and vellum paper)
2.Center and glue the rectangular silhouettes to the open rectangle mat shapes. Glue the jingle bells to the jingle bell solid base shapes.
3. Center and glue the combined rectangular silhouette shapes to the coordinating shapes on the lantern base.
4.Flip the two combined lantern base pieces over ( pretty side down and as shown). Fold the score lines.
5.Apply glue to the front edges (perimeter) of the rectangular star cut out pieces. (There is one star panel that is different. It will be matched up to the lantern base panel with the half moon.) Flip them over and attach them to the lantern base; centering each one. 
6.Center the two lantern body pieces. Apply glue to the backside of the right side tab on the left lantern body piece. Attach to the other lantern piece making sure that the bottoms align (joining the two body pieces). 
7.-8.Glue the Star shaped hangers together. (Make sure the stems of these piece remain separate)
9. Glue one of the stems of the Star hanger combined piece to the inside of the top of the panel with santa on it. (The other stem will be glued inside the lantern later)
10.-11.-12. Apply glue to the top of the side long tab on the very left side. Secure the long side tab to the other side creating a box.


13. Apply glue to the top tab with the circle hanger and secure it to the triangular panel to it’s left side.
14. Image of the tab secured to the panel.
15.-16. Repeat for the next tab. 
17. Apply glue to the remaining unsecured Star hanger stem.
18. Secure it to the opposite side of the lantern top.
19. Continue securing the top tabs until the top is fully enclosed.
20. I sometimes use a long object (pencil eraser end) to help secure the tabs on the inside of the lantern top base.
21. Fold the score lines on the lantern square base. 
22.Apply glue to the top two tabs of the Lantern square base and secure to the inside of the sides.
23. Repeat for the bottom two tabs creating a shallow box.

24. Place a flameless candle inside and the lantern top in it’s base.( Shown is a W 1.5” x H 6.5 color changing flameless candle. I ended up using a 2.75” x H 4” color changing pillar flameless candle in the final product image:). 


25.-26. I finished by stringing a ribbon through the openings in the combined jingle bells and tied the ribbon around the top of the star hanger at the top of the lantern.

Tuesday, November 8, 2016

Santa Hug Treat Box


Santa Hug Treat Box-JMRush
Approximate box size: W 3.” x D 2.25 x H .75”
(W 3” X H 3.75” including character)

This treat box features character arms that open to a small treat box. This design is perfect for Winter classroom parties or for small Christmas goodies.This design is compatible with both 8X12 and 12X12 mats.

You can purchase the Silhouette design file here: https://www.silhouettedesignstore.com/artists/485222


 1.Cut design pieces. (I used double sided card stock for the box base).
2. Glue the large oval beard piece to the coordinating shape on the box base. Fold the score lines on the box base.
3. Glue the smaller half moon piece to the top of the combined box base. Glue the larger half moon piece ( hat trim) just below. Glue the Santa face piece on.
4. Glue the nose to the mustache. Use foam adhesive squares to attach the combined mustache to the combined box base. Glue the eyes on.
5.  Apply glue to the two top tabs of the box base and secure them to the top (head) panel.
6. Apply glue to the bottom two tabs and secure them to the bottom panel creating a box. Glue the open rectangle buckle piece to the solid long rectangle belt piece.
7. Apply glue to the bottom tab of the center narrow strip section. Secure the center narrow strip tab to the backside of the inside of the box.
8. Glue the hands to the coordinating shapes on the box base. Glue the sleeve trim pieces beside the hand pieces. The hands tuck into the slots of the center strip. Glue the combined belt to the front side of the box:)

Tuesday, December 1, 2015

Santa Kissing Momma Lantern (Flameless)


Santa Kissing Momma Lantern (Flameless)-JMRush
Lantern size: W 3 x D 3 x H 7”

This Flameless Santa Kissing Momma Lantern features cut outs and when vellum paper is used, a layered transparent frosted glass effect is created. This design is compatible with both 8X12 and 12X12 mats.
You can purchase the Silhouette file design here: https://www.silhouettedesignstore.com/artists/485222

You can purchase the SVG and Cricut compatible file here:
https://digiplayground.com/Santa-Kissing-Momma-Lantern-20756.html

You may also want to check out: the Christmas Lantern http://jmrushdesigns.blogspot.com/2015/11/christmas-lantern-flameless.html


1.Cut design pieces. ( This picture does not show the lantern base that is included in the file…. I apologize.:)
2. Glue the vellum paper to the back sides of the window panels.
3. Fold all score lines. 
4.Apply glue to the long side tab of the lantern window base and secure to the other lantern window base piece.
5. Apply glue to the window pane pieces and Santa/Momma silhouette  and secure them to the outside of the lantern.
6. Glue the circular hangers together. ( Make sure the stems of this piece remain separate) Glue one of the stems to the inside of the top of the second window panel. 
7. Apply glue to the top tabs of the Lantern square base and secure to the inside of the sides.
8. Repeat for the bottom tabs creating a shallow box.
9. Apply glue to the top tab and to the side long tab on the very left side.
10. Secure the Long side tab to the other side creating a box.
11. Begin to secure the top tabs to the inside of the next angled triangle.  The other Circular hanger stem will be glued to the inside of the opposite side of the lantern. 
12. Finish securing all of the top tabs. 
13. This is what it should look like:)
14.Curve the Mistletoe leaves as you like and glue them onto the top of the lantern along with the mistletoe berries.
15. Place the lantern top in it’s base. Finish with a ribbon and place a flameless candle inside:) I used a adhesive gem on the mistletoe silhouette:)

Monday, November 23, 2015

Santa Gift Tag

Santa Gift Tag-JMRush

This design is compatible with both 8X12 and 12X12 mats.
You can purchase this design here: https://www.silhouettedesignstore.com/artists/485222


Santa Hug Gift Card Holder


Santa Hug Gift Card Holder-JMRush
Approximate Card size: 4” x 5.75”


This card features character arms that open to release a hidden gift card section.This design is compatible with both 8X12 and 12X12 mats.

You can purchase the SVG and Cricut file here:

You can purchase the Silhouette design file here: https://www.silhouettedesignstore.com/artists/485222

1.Cut design pieces. I used double sided red cardstock for the card base:)
2. Fold the card along score lines.
3. Apply glue the bottom of the side tabs on the card base. Secure by folding upward toward the card base.
4.Glue the Oval head piece and the hat sliver on top. Glue on the Santa’s belt and buckle.
5.Glue on Santa’s face.
6. Using foam adhesive squares, place and attach Santa’s mustache. Using glue, attach the eyes and nose.
7. Glue Santa’s hand to the arm wings and then glue on the trim pieces to each hand.
8. Place gift card.
9. Tuck Santa’s hands into the cut slots in the card base.

10. Glue a ribbon in the center of the slots to finish:)