Showing posts with label Snow. Show all posts

Wednesday, November 21, 2018

Winter Raccoon Gift Tag Ornament


Winter Raccoon Gift Tag Ornament-JMR
Approximate size: H 5.25” X W 4”

This design can be used as a gift tag and ornament and is compatible with both 8X12 and 12X12 mats. 
You can purchase the Silhouette design file here: 

You can purchase the SVG and Cricut compatible file here:https://www.jamieandjenn.com  Coming Soon:)
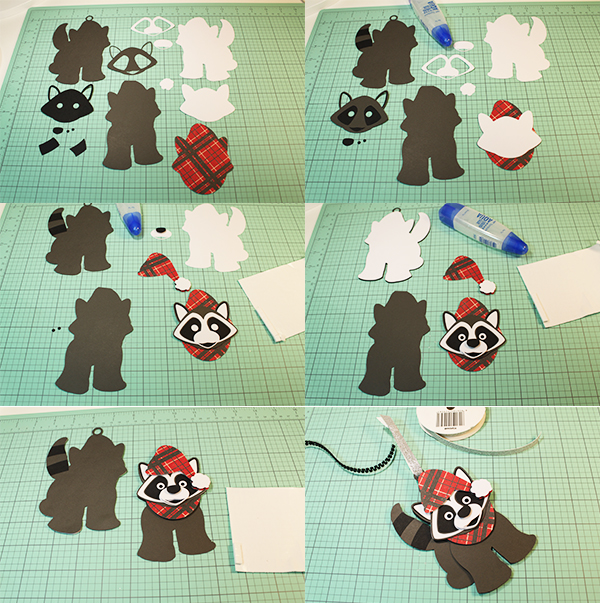
1. Cut design pieces. I used double sided card stock. (The hat piece is missing from the first two images..sorry:)
2. Glue the solid face to the hat scarf piece. Glue the face piece with large eye holes to the coordinating shape with smaller eye holes. Glue the hat tail stripe design pieces to the coordinating shapes on the tail.
3. Attach the nose to the muzzle piece using a foam adhesive square. Use foam adhesive squares to attach the puff ball shape to the hat piece. Glue the combined face piece to the combined scarf/hat piece. Glue the eye outline piece (white) to the combined scarf/hat piece. 
4. Glue the combined muzzle piece to the combined scarf/hat piece. Flip the raccoon tag base over and glue the coordinating shape label (white) to the backside;centering it. Flip it back over. Use a foam adhesive square to attach the muzzle to the combined hat/face pie and glue the tiny eyeballs into place.
5. Use a foam adhesive square to attach the combined hat piece to the combined hat/face piece. Use foam adhesive squares to attach the combined Hat/Face piece to the raccoon body with two legs.
6. Use foam adhesive squares to attach the combined smaller body piece to the larger one. Loop a ribbon through the top circular hole and tie. I used adhesive enamel dots to accentuate the eyes:)

Polar Bear Gift Tag Ornament

Polar Bear Gift Tag Ornament-JMR
Approximate size: H 5.50” X W 3.5”

This design can be used as a gift tag and ornament and is compatible with both 8X12 and 12X12 mats. 

You can purchase the Silhouette design file here: https://www.silhouettedesignstore.com/artists/485222

You can purchase the SVG and Cricut compatible file here:https://www.jamieandjenn.com  Coming Soon:)


  1. Cut design pieces. I used double sided card stock.
  2.  Glue the circular bear face with eye holes to the coordinating solid shape. Glue the nose muzzle piece to it’s solid coordinating shape base piece. Glue the hat design piece to it’s coordinating hat shape piece.
  3. Use foam adhesive squares to attach the two leg bear silhouette to the full bear silhouette shape. Use foam adhesive squares to attach the nose to the combined muzzle piece, The combined muzzle to the combined face, and the hat puff ball to the end of the combined hat.
  4. Glue the head /scarf piece to the combined body as shown.
  5.  Loop a ribbon through the circular hanger ay the top and use foam adhesive squares to attach the combined head to the combined body. 
  6.  Use foam adhesive squares to attach the combined hat to the combined body. I used adhesive jewels to accentuate the eyes:)

Winter Fox Gift Tag Ornament


Winter Fox Gift Tag Ornament-JMR
Approximate size: H 5” X W 3.75”

This design can be used as a gift tag and ornament and is compatible with both 8X12 and 12X12 mats.


You can purchase the Silhouette design file here: https://www.silhouettedesignstore.com/artists/485222

You can purchase the SVG and Cricut compatible file here:https://www.jamieandjenn.com  Coming Soon:)

1. Cut design pieces. I used double sided card stock.
2. Glue the head piece with eye cut outs to the coordinating solid head piece. Glue the head/scarf piece to the coordinating shape on the two legged fox silhouette. Flip the tag base over and glue the coordinating (white) label full fox body to it; centering it.
3. Flip the tag base back over and attach the combined two leg fox silhouette to the base using foam adhesive squares. Glue the small face to the combined fox head. Glue the nose to the combined fox head.
4. Use foam adhesive squares to attach the combined fox head
to the coordinating shape on the fox base. Loop a ribbon through the circular hole at the top and tie. I used adhesive enamel dots to accentuate the eyes:)

Arctic Fox Gift Tag Ornament

Arctic Fox Gift Tag Ornament-JMR
Approximate Card size: W 3.75” X H 5”

This design is compatible with both 8X12 and 12X12 mats.

You can purchase the Silhouette design file here: https://www.silhouettedesignstore.com/artists/485222


You can purchase the SVG and Cricut compatible file here:https://www.jamieandjenn.com  Coming Soon:)


1. Cut design pieces. (I used double sided card stock)
2. Glue the face piece with eye holes to the solid coordinating shape. Glue the the muzzle piece with a cut out mouth to it’s solid base piece. Glue the scarf/head piece to the coordinating shape on the two legged fox silhouette.
3.Loop a ribbon through the hanger circle at the top. Your file will have the hole in a slightly different location… I didn’t like the way it originally was hanging;)
4. Use foam adhesive squares to attach the combined muzzle to the combined head piece. Use a foam adhesive square to attach the nose to the combined head. Use a foam adhesive square to attach the combined two legged fox to the coordinating shape on the tag base. 
5. Use a foam adhesive square to attach the combined head piece to the combined fox tag. I used adhesive enamel dots to accentuate the eyes:)

Monday, November 19, 2018

Christmas Hanging Tea Light Lantern


Christmas Hanging Tea Light Lantern (Flameless)-JMRush
Lantern size: W 2.5 x D 2.5 x H 5”

This Flameless Hanging Tea Light Lantern features cut outs and when vellum paper is used, a layered transparent frosted glass effect is created. This lantern has a secure bottom that allows it to be hung and still allows access to the tea light on/off switch. This design is compatible with both 8X12 and 12X12 mats.


You can purchase the Silhouette design file here: https://www.silhouettedesignstore.com/artists/485222

You can purchase the SVG and Cricut compatible file here:https://www.jamieandjenn.com  Coming Soon:)
Cricut measurements for grouping: w 11.8917

1.Cut design pieces. ( I used double sided card stock and vellum paper)
2. Flip the two lantern base pieces over. Glue the snow window pieces to the coordinating shapes on the bases. Make sure that they align properly on the face down side.
3. Glue the vellum paper to the window panels; centering around each of the cut out sections.
4. Fold all score lines. 
5. Line up the two lantern window pieces. Apply glue to the long side tab of the lantern and secure to the other lantern window base piece.
6. Apply glue to the other long side tab of the lantern window base and secure to the inside of the other lantern window base piece; creating a box. Hold until secure.
7. This is what it should look like:)
8. Apply glue to one top tab and secure the top tab to the inside of the next angled triangle. Repeat for the rest of the top tabs until fully enclosed. Glue the two circular hangers together hold until secure.
9. I use a tool to help secure the tabs from the inside of the lantern.
10. This is what it should look like:)

11. Apply glue to the top two tabs of the Lantern square base and secure to the inside of the sides.
12. Apply glue to the bottom two tabs of the Lantern square base and secure to the inside of the sides; creating a shallow box.
13. Apply a dab of glue to the inside of the lantern tea light base just under the slot. (This will help to secure the tab when it passes through.)
14. Tuck the end tab into the slot creating a circular tube shape. Secure until dry.
15. Place the narrow circular ring piece and square piece over the tube shape you just created.
16.-17. Apply glue to the outside of the tabs on the square side and secure downward to the square piece.
18.-19. Flip this piece over so the circular side is up. Apply glue to the outside of the tabs on the circular side and secure downward to the circular piece. Apply glue to the tops of the ring and tabs and secure the thicker circular ring to the top. This is what it should look like:)
20. Place a flameless tea light candle inside the lantern square base; centering it. Apply glue to the bottom of the square side of the combined 
lantern tea light base. Place inside the lantern square base and secure.

21. Glue the little snowflakes to the window sections of the lantern.
22. Apply glue to the inside edges of this piece and place the lantern window piece inside the box. Secure until dry. 
23. Use a piece of foam adhesive square to attach the two snowflakes together. Smaller one on top. Use a adhesive jewel to accentuate the center.

24. I finished this lantern with a ribbon:)

Tuesday, November 13, 2018

Blue Snow Bird Hug Gift Card Holder


Blue Snow Bird Hug Gift Card Holder-JMR
Approximate Card size: 4” x 5.75” 

This card features character arms that open to release a hidden gift card section. The bird has a tail on the backside:) This design is compatible with both 8X12 and 12X12 mats. 

You can purchase the Silhouette design file here: https://www.silhouettedesignstore.com/artists/485222

You can purchase the SVG and Cricut compatible file here:https://www.jamieandjenn.com 


1.Cut design pieces. I used double sided card stock.( I changed the color of the combined scarf, earmuffs, and the tail piece from the beginning of this tutorial) There are two wing pieces included in your file that are not shown at the beginning of this tutorial.
2. Fold the card along score lines. Apply glue the bottom of the side tabs on the card base. Secure by folding upward toward the card base. Glue the scarf base to the bird head/chest piece.
3. Glue the bird head/chest piece to the coordinating shape on the card base; center and align at the top and edges.
4. Glue the earmuff base and eyes in place.
5. Glue the small black eyeballs into place. I used adhesive dots to accentuate the eyes onto of the black eyeballs. Using foam adhesive squares, attach the earmuffs, beak, feet, and scarf square into place. Insert the gift card. 
6. Flip the card over. Using an adhesive foam square, attach the tail piece. Glue the two wings to their coordinating shapes on the card base. Tuck the wings into their slots. I used ribbon to trim the card:).

Monday, November 27, 2017

Snowflake Gift Tag Ornament


Snowflake Gift Tag Ornament- JMRush 
Approximate size: H 3.75” X W 3.75”


This design file is compatible with both 8X12 and 12X12 mats and can be used as a gift tag and or an ornament. 

You can purchase this Silhouette design file or SVG bundle here: https://www.silhouettedesignstore.com/artists/485222


You can purchase this Cricut compatible SVG design file here: https://www.jamieandjenn.com

1. Cut design pieces. I used double sided card stock.
2. Glue the snowflake to the Ornament base; centering it.
3. Flip the combined ornament over and glue the white gift tag piece on; centering it.
4. Finish with a ribbon:)

Snowflake Round Gift Tag Ornament


Snowflake Round Gift Tag Ornament- JMRush 
Approximate size: H 3.50” X W 3.25”

This design file is compatible with both 8X12 and 12X12 mats and can be used as a gift tag and or an ornament.

You can purchase this Silhouette design file or SVG bundle here: https://www.silhouettedesignstore.com/artists/485222


You can purchase this Cricut compatible SVG design file here: https://www.jamieandjenn.com

1. Cut design pieces. I used double sided card stock.
2. Attach the snowflake circle to the silver circle using pieces of square foam adhesive. Flip the ornament base over and glue the white gift tag piece on; centering it.
3. Flip the ornament base  back over and glue the combined snowflake on; centering it.
4. Finish with a ribbon:)

Thursday, November 16, 2017

Snowflake Tea Light

Snowflake Tea Light-Flameless JMRush 
Approximate size: W 3.25” X H 2.5” X D 3.25”

This file is compatible with both 8X12 and 12X12 mats. 

You can purchase this Silhouette design file or SVG bundle here: https://www.silhouettedesignstore.com/artists/485222

1. Cut design pieces.
2.  Fold each snow flake at the score lines. Fold the tabs of the lantern base.
3.-4. Apply a dab of glue to the inside of the lantern base just under the slot. (This will help to secure the tab when it passes through.) Tuck the end tab into the slot creating a circular tube shape.
5. Place the narrow circular ring pieces over the tube shape you just created (pretty side down).
6. Apply glue to the outside of one of the rows of tabs and secure downward to the narrow ring.
7. Apply glue to the tops of the ring and tabs and secure the thicker circular ring to the top.

8.-9.  Flip the lantern base over. Place tea light inside the ring. Repeat as before; Apply glue to the outside of the tabs and secure downward to the narrow ring. Apply glue to the tops of the ring and tabs and secure the thicker circular ring to the top. Apply glue to one side of the back of one of the snowflakes.
10. Attach the backside of another snowflake and align all edges.
11. Repeat for the last snowflake.
12. It should look like this:)
13. Open the combined snowflake grouping so that the single layer snowflakes are facing you. Apply glue to the inner ring and attach over the flameless candle. ( I used hot glue for this step).
14. I used adhesive jewels at the center of each circle to give it sparkle:)


Ski Squirrel Ornament Gift Tag


Ski Squirrel Ornament Gift Tag- JMRush 
Approximate size: W 5” X H 3.25”

This design is compatible with both 8X12 and 12X12 mats and can be used as a gift tag and or ornament.
You can purchase this Silhouette design file or SVG bundle here: https://www.silhouettedesignstore.com/artists/485222

1. Cut design pieces. I used double sided card stock:)
2.. Glue each ski to the squirrel base piece.
3. Glue the large squirrel piece to the coordinating shape on the combined squirrel base piece. 
4. Glue the small squirrel body piece (with no arms) to the combined squirrel base piece. 
5. Glue the tip of the single ski pole to the combined squirrel base at the coordinating shape. Tuck the single ski pole under the arm of the last squirrel body piece and glue to the combined squirrel base piece.
6. Glue the scarf, nose, and small black ski foot loops to the coordinating shape on the combined squirrel base.
7. Glue the head to the combined squirrel base piece.
8. Flip the combined squirrel over and glue the white gift tag backing (squirrel shaped).
9. I used adhesive enamel dots to accentuate the eye and looped ribbon through the ornament loop at the top.

10.-11. I finished with a bow and a button at the top:)

Wednesday, November 15, 2017

Ice Skates Sled Card


Ice Skates Sled Card- JMRush 
Approximate size: W 4.25” X H 5.5”

This design file is compatible with both 8X12 and 12X12 mats.

You can purchase this Silhouette design file or SVG bundle here: https://www.silhouettedesignstore.com/artists/485222


1. Cut design pieces. ( I used doubled sided card stock)
2.  Fold the card base. Glue the wood plank pieces to the coordinating shapes on the sled base. Glue the ice skates shoes and blades to the coordinating shapes on the ice skates solid bases. Curve the branches of the two wreath pieces.
3. Adjust the smaller wreath to set as you like on top of the larger one. Apply glue to the very inside ring of the bottom wreath and secure the smaller wreath on top. Glue the combined sled to the sled runners; align at the horizontal cross bars.
4. Use a foam adhesive squares to attach the combined sled to the front of the card; centering it. Using a large gauge thread or small width ribbon, tie two bows and cut a three inch piece. Glue the thin small red piece to the center top of the combined sled.
5. Use a foam adhesive squares to attach the combined wreaths to the front of the combined sled. Glue one thread bow to each ice skate and glue the ends of the 3” thread to the backside of each ice skate ( I used hot glue for this).
6. Loop the thread of the ice skates around the center branch of the combined wreath. Glue into place if you like.
7. Finish with a ribbon:)

Tuesday, November 14, 2017

Snowflake Ornament


Snowflake Ornament- JMRush 
Approximate size: W 3.25” X H 3.25” X D 3.25”

This file is compatible with both 8X12 and 12X12 mats. 

You can purchase this Silhouette design file or SVG bundle here: https://www.silhouettedesignstore.com/artists/485222

1. Cut design pieces. ( I used double sided card stock)
2.  Fold each sow flake at the score lines.
3.  Apply glue to one side of the back of one of the snowflakes.
4. Attach the backside of another snowflake and align all edges.
5. Repeat for the other two sets.
6. Apply glue to one side of the back of one of the combined snowflakes.

7. Attach another combined snowflake set; aligning all of the edges on that half. 
8. Open the combined snowflake grouping so that the single layer snowflakes are facing you. Apply glue to both halves and attach the remaining snowflake set; aligning all edges.
9. Image of all snowflakes together.
10. String ribbon through the circle hole at the top of the combined snowflakes and tie at the top. 
11. Attach a ribbon at the top of the snowflake.
12. I used adhesive jewels at the center of each circle to give it sparkle:)


Wednesday, December 21, 2016

Stacked Cardinal Bird Card


Stacked Cardinal Bird Card- JMRush 
Approximate Card size: W 5.50” X H 4.25”


This design is compatible with both 8X12 and 12X12 mats. 


You can purchase the Silhouette design file here: https://www.silhouettedesignstore.com/artists/485222

You can purchase the SVG and Cricut file here:

1. Cut design pieces.
2. Fold the card base. Glue the two claws to the smaller (red) bird silhouette. Glue the bird face (with eye cut out) to the solid bird face with a beak. Glue the pinecone with cut outs to their solid coordinating shape bases.
3. Glue the smaller wing piece (red) to the larger ling wing piece (black). Glue the combined bird silhouette to the larger bird silhouette (black). glue the small (oval with scalloped edge) to the small wing shape.
4. Glue the bird face to the combined bird silhouette. Use a foam adhesive square to attach the small combined wing to the long combined wing.
5. Glue the combined wing to the combined bird silhouette.
6. Curve the pinecones and leaves as you like.
7. Align the tree branch so that it’s edges line up with the edges of the card. Center the leaf shapes (green) underneath the branch as shown. Carefully glue the branch to the leaves without losing their position and not glueing it to the card yet.
8. Place the combined bird silhouette so that it’s claws wrap around the tree branch and apply glue to the backside of the bird body, branch, and center part of the leaves. Use a foam adhesive square on the backside of the bird’s head.
9. Attach the combined bird and combined leaf/branch to the front of the card; making sure that the edges of the branch align with the edges of the card. I used a piece of foam adhesive square to attach the full combined pinecone and glue to attach the half pinecone:)