Showing posts with label Wedding. Show all posts

Wednesday, December 28, 2022

Valentines BirdHouse Treat Box


 Valentines BirdHouse Treat Box-JMR

Approximate size: W 3 x D 1.75 x H 3.5”

Approximate box size: W 3 x D 1.75 x H 2”


This cute bird house treat box opens from the handles on the top. This design is compatible with both 8X12 and 12X12 mats.

You can purchase the Silhouette design file here: https://www.silhouettedesignstore.com/artists/485222


You can purchase the SVG and Cricut compatible file here:https://www.jamieandjenn.com  Coming Soon:)


1.Cut design pieces. ( I used double sided card stock)

2. Flip the birdhouse box over and fold the bird house base at the score lines.

3. Connect the two wing tabs on the bottom.

4. Apply glue to the bottom of the connected wing tabs and fold in the small bottom tab. Hold until secure.

5. Apply glue to the bottom of the birdhouse box and secure the last large square bottom panel; aligning at the edges.

6. Apply glue to the side tab and connect the side panel.

7. Curve the flowers and leaves as you like.

8. Combine the two large petal groups by glueing the middle circle; Larger on bottom and alternating petals. Repeat for the two smaller petals. Glue the smallest circle to the larger one; centering it.

9. Glue the two petal groups together; alternating petals. Glue the leaves to the bottom of the combined flower. Attach a piece of foam adhesive to the bottom.

Attach the combined circles with a piece of foam adhesive square as shown.

10. Attach the combined flower as shown. Push in the two top handle panels.

11. Apply small pieces of foam adhesive square to the backsides of the two triangular roof top pieces and attach to front and backside of the birdhouse box.

12. Finish with a ribbon and I used an adhesive jewel for the center of the flower:)


Thursday, January 16, 2020

Heart Pattern Wrap Box

Heart Pattern Wrap Box-JMR
Box size: W 3.5 x D 3.5 x H 1”

This design is compatible with both 8X12 and 12X12 mats. 

You can purchase the Silhouette design file here: https://www.silhouettedesignstore.com/artists/485222


You can purchase the SVG and Cricut friendly file here:https://www.jamieandjenn.com Coming Soon:)


  1. Cut Design. I used double sided cardstock.
  2. Fold at score lines.
  3. Apply glue to the top tabs and attach to the top panel and secure.
  4. Repeat for the bottom tabs; creating a box. Repeat for the other box.
  5. This is what it should look like:)
  6. Apply glue to the top of the two edge hearts on the wrap piece.
  7. Align the other side of the wrap; aligning the hearts.
  8. This is what it should look like:)
  9. Place the shallow box(lid) over top the deeper one (bottom box). Slide the wrap over the box.

Friday, June 14, 2019

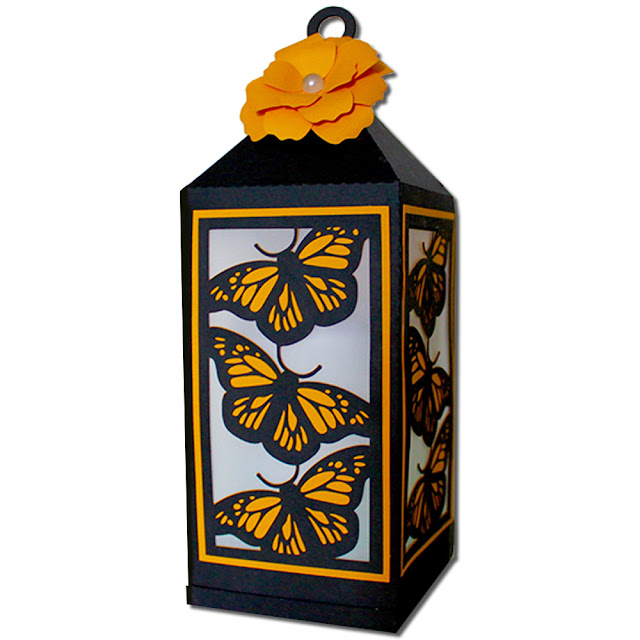
Monarch Lantern


Monarch Lantern (Flameless)-JMRush
Approximate Lantern size: W 3 x D 3 x H 7.75”

This Flameless lantern features a layered transparent frosted effect that is created when vellum paper is used. This design is compatible with both 8X12 and 12X12 mats.

You can purchase the Silhouette design file here: https://www.silhouettedesignstore.com/artists/485222

You can purchase the SVG and Cricut compatible file here: https://www.jamieandjenn.com  Coming Soon:)

To save time, I used the tutorial for the water lily lantern. Same construction process. 

1.Cut design pieces. ( I used double sided card stock and vellum paper)
2.Center and glue the rectangular lily silhouettes (4) to the coordinating rectangle solid lily shapes (4); centering them. Flip the lantern bodies over and glue the solid vellum pieces (4) to the opening in each of the lanterns bodies. Allow to dry.
3. Fold the score lines on the lantern bodies and the square lantern base. Curve the flower petals as you like. 
4. Glue the circular hanger piece to the top of each of the lantern bodies on the peak of the side that has the long side tab.
5. Center the two lantern body pieces. Apply glue to the backside of the right side tab on the left lantern body piece. Attach to the other lantern piece making sure that the bottoms align (joining the two body pieces). Allow to dry.
6. Image of the two lantern bodies glued together.
7. Flip the combined lantern body over ( pretty side up) and glue the combined lily mats to each of the openings on the lantern body; centering them. Allow to dry.
8. Flip the combined lantern body over and apply glue to the last long side tab. Secure the long tab to the other side of the lantern body creating a square box shape.
9. Image of the Lantern body glued together.
10.  Apply glue to one of the top tabs and secure it to the triangular panel to it’s left side.


11. Image of the tab secured to the panel. Repeat for the next tab.
12. Apply glue to the last two tabs and the circular hanger and secure to the inside of the lantern, creating a fully enclosed top. 
(I sometimes use a long object (pencil eraser end) to help secure the tabs on the inside of the lantern top base.)
13. Apply glue to the top two tabs of the Lantern square base and secure to the inside of the sides. Repeat for the bottom two tabs creating a shallow box.
14. Glue the two largest flower petals and two smallest flower petals together; centering them and alternating the petals.
15. Glue the last flower petal to the large petal set;centering and alternating the petals.
16. I used a adhesive jewel for the inside of the flower and attached it to the top of the lantern with a foam adhesive square.
17. Place a flameless candle inside and the lantern top in it’s base. I used a W 2.75” x H 4” color changing pillar flameless candle:).

Wednesday, June 12, 2019

Water Lily Lantern (Flameless)


Water Lily Lantern (Flameless)-JMRush
Approximate Lantern size: W 3 x D 3 x H 7” (H 7.75” with Circular Hanger)

This Flameless lantern features a layered transparent frosted effect that is created when vellum paper is used. This design is compatible with both 8X12 and 12X12 mats. A complete step by step picture tutorial can be found on my blog.

You can purchase the Silhouette design file here: https://www.silhouettedesignstore.com/artists/485222

You can purchase the SVG and Cricut compatible file here: https://www.jamieandjenn.com  Coming Soon:)


1.Cut design pieces. ( I used double sided card stock and vellum paper)
2.Center and glue the rectangular lily silhouettes (4) to the coordinating rectangle solid lily shapes (4); centering them. Flip the lantern bodies over and glue the solid vellum pieces (4) to the opening in each of the lanterns bodies. Allow to dry.
3. Fold the score lines on the lantern bodies and the square lantern base. Curve the flower petals as you like. 
4. Glue the circular hanger piece to the top of each of the lantern bodies on the peak of the side that has the long side tab.
5. Center the two lantern body pieces. Apply glue to the backside of the right side tab on the left lantern body piece. Attach to the other lantern piece making sure that the bottoms align (joining the two body pieces). Allow to dry.
6. Image of the two lantern bodies glued together.
7. Flip the combined lantern body over ( pretty side up) and glue the combined lily mats to each of the openings on the lantern body; centering them. Allow to dry.
8. Flip the combined lantern body over and apply glue to the last long side tab. Secure the long tab to the other side of the lantern body creating a square box shape.
9. Image of the Lantern body glued together.
10.  Apply glue to one of the top tabs and secure it to the triangular panel to it’s left side.

11. Image of the tab secured to the panel. Repeat for the next tab.
12. Apply glue to the last two tabs and the circular hanger and secure to the inside of the lantern, creating a fully enclosed top. 
(I sometimes use a long object (pencil eraser end) to help secure the tabs on the inside of the lantern top base.)
13. Apply glue to the top two tabs of the Lantern square base and secure to the inside of the sides. Repeat for the bottom two tabs creating a shallow box.
14. Glue the two largest flower petals and two smallest flower petals together; centering them and alternating the petals.
15. Glue the last flower petal to the large petal set;centering and alternating the petals.
16. I used a adhesive jewel for the inside of the flower and attached it to the top of the lantern with a foam adhesive square.
17. Place a flameless candle inside and the lantern top in it’s base. I used a W 2.75” x H 4” color changing pillar flameless candle:).


Thursday, May 30, 2019

Spring Flower Tea Light


Spring Flower Tea Light (Flameless)-JMRush
Approximate Dimensions: W 4.5” x D 4.5” X H 2”

This design is compatible with both 8X12 and 12X12 mats and is used with a flameless battery operated tea light candle.


You can purchase the Silhouette design file here: https://www.silhouettedesignstore.com/artists/485222

You can purchase the SVG and Cricut compatible file here: https://www.jamieandjenn.com  Coming Soon:)
  1. Cut design pieces. (I used double sided card stock paper)
  2. Curve the flower petals. Fold the tabs on the flower base.
  3. Tuck the end tab into the slot creating a circular tube shape. Secure with a small dab of glue. 
  4. Image of tab inserted and glued into place.
  5. Place the narrow circular ring pieces over the tube shape you just created.
  6. Apply glue to the outside of one of the rows of tabs and secure to the narrow ring.
  7. Apply glue to the tops of the ring and tabs.
  8. Secure the thicker circular ring to the top.
  9. Place a flameless votive candle inside the tube. Apply glue to the outside of the tabs and secure to the narrow ring.(repeating the steps above) Apply glue to the tops of the ring and tabs. Secure the thicker circular ring to the top.
  10. Curve your flower petals as you like and glue to the top of the lantern base.
  11. Glue the 6 flower petal sections together; Largest on bottom to smallest on top and alternating petals. I did this by applying glue to the backside around the circumference of each flower layer.
  12. Image of the layers being glued together.
  13. Glue the stamen sections together alternating the points and alternating colors. Apply glue to the leaves/lantern base.
  14. Secure the combined flower to the base and glue the stamen combined piece to the center:)

Tuesday, May 29, 2018

50 years Golden

50 years Golden-JMR
Card size: H 5.5” X W 4.25”

This design is compatible with both 8X12 and 12X12 mats and is perfect for those celebrating Fifty years of marriage.  

You can purchase the Silhouette design file here: https://www.silhouettedesignstore.com/artists/485222

You can purchase the SVG and Cricut compatible file here:https://www.jamieandjenn.com  Coming Soon:)


  1. Cut the design pieces. I used double sided card stock. I changed the color of the card base from this tutorial. (There is a white rectangular piece included in this file not shown in the tutorial that is optional and used for inside script)
  2. Fold the card base at the score lines. Glue the smaller circle to the larger one; centering it. ( I used the “0” scrap piece to align the oval shape in the “50”.)
  3. I used foam adhesive squares to attach the combined circles to the front of the card. Glue the word “golden” to the front of the card:) Optional: Glue the white rectangle ( not shown in the tutorial to the inside of the card for a personal message)

Monday, February 12, 2018

Bird House Treat Box


Bird House Treat Box-JMR
Approximate size: W 3 x D 1.75 x H 3.5”
Approximate box size: W 3 x D 1.75 x H 2”

This cute bird house treat box opens from the handles on the top and is apart of the Love Bird baby shower collection. This design is compatible with both 8X12 and 12X12 mats.

You can purchase the Silhouette design file here: https://www.silhouettedesignstore.com/artists/485222

You can purchase the SVG and Cricut compatible file here:https://www.jamieandjenn.com  Coming Soon:)


1.Cut design pieces. ( I used double sided card stock)
2. Fold the bird house base at the score lines. Curve the flowers and leaves as you like.
3. Connect the two wing tabs on the bottom.
4.Fold in the small bottom tab.
5. Apply glue to the side tab and connect the side panel.
6. This is what it should look like:)


7. Apply glue to the bottom tabs and secure the last bottom panel; aligning the sides.
8. This is what it will look like:)
9. Push in the two top handle panels.
10. This is what it will look like:)
11. Apply glue to the backside of one of the flower shapes around the center hole. Attach to the center of one of the brown circles.
12. Apply glue to the backside of the matching flower shape and attach to the combined flower petal; alternating petal pattern.


13. Repeat for the other flower sets. Apply small pieces of foam adhesive square to the backsides of the two triangular roof top pieces.
14.-15. Attach the roof top pieces to the top of wither side; aligning with the coordinating edge of the bird house base. Attach the two smaller combined flowers to the front of the combined bird house base with foam adhesive squares. ( The images are out of order…sorry:)
16.-17-18. Use two foam adhesive squares ( on top of one another) to attach the larger combined flower in the center and slightly higher than the other two flowers. Apply glue to the backside bottom of the leaves and attach them underneath the flowers. The top opens and shuts easily so that you can fill with treats. Finish with a ribbon:)


Also see coordinating Love Birds Baby shower
Invitation, Book plate request cards, Love Birds Egg Card, Bird House Treat Box, and Love
Birds Sticker Sheet:)


Wednesday, February 7, 2018

Birdcage Card


Birdcage Card-JMR
Approximate size: W 3” X H 5 3/8”

This design is compatible with both 8X12 and 12X12 mats. 

You can purchase the Silhouette design file here: https://www.silhouettedesignstore.com/artists/485222

You can purchase the SVG and Cricut compatible file here:https://www.jamieandjenn.com  Coming Soon:)

1.Cut design pieces. (I used doubled sided card stock)
2. Fold the card at the score lines. Use a foam adhesive squares to attach the birdcage with out outs to the front of the card base. Curve the flower petals and leaves as you like.
3. Apply glue to the backside of one of the flower shapes around the center hole. Attach to the center of one of the brown circles.
4. Apply glue to the backside of the matching flower shape and attach to the combined flower petal; alternating petal pattern.
5. Repeat for the other flower sets.
6. Glue the two smaller combined flowers to the front of the combined card base on either side.
7. Use a foam adhesive square to attach the larger combined flower in the center and slightly higher than the other two flowers. Apply glue to the backside bottom of the leaves and attach them underneath the flowers. Finish with a ribbon:)


Wednesday, January 24, 2018

Dahlia Flower Tea Light


Dahlia Flower Tea Light (Flameless)-JMRush
Approximate Dimensions: W 4” x D 4” X H 2”

This design is compatible with both 8X12 and 12X12 mats and is used with a flameless battery operated tea light candle. 

You can purchase the Silhouette design file here: https://www.silhouettedesignstore.com/artists/485222

You can purchase the SVG and Cricut friendly file here:https://www.jamieandjenn.com Coming Soon:)
  1. Cut design pieces. (I used double sided card stock paper) I used a darker red color card stock for the 4 largest petal layers.
  2. Curve the flower petals. Fold the tabs on the flower base.
  3. Tuck the end tab into the slot creating a circular tube shape. Secure with a small dab of glue. Glue the 6 flower petal sections together; Largest on bottom to smallest on top and alternating petals. I did this by applying glue to the backside around the circumference of each flower layer.
  4. Place the narrow circular ring pieces over the tube shape you just created.
  5. Apply glue to the outside of one of the rows of tabs and secure to the narrow ring.
  6. Apply glue to the tops of the ring and tabs.
  7. Secure the thicker circular ring to the top.
9. Place a flameless votive candle inside the tube. Apply glue to the outside of the tabs and secure to the narrow ring.(repeating the steps above)
10. Apply glue to the tops of the ring and tabs. Secure the thicker circular ring to the top.
11. Fold the tabs of one of the two large flower petal piece down. Fold the other large flower’s tabs up.
12. Apply glue to the outside of the tabs on the downward tabs and combine with the other large center combined flower petal securing each of the tabs together.
13. Apply glue to the bottom center of the combined large flower piece and attach to the lantern base piece.
14. Apply glue to the center backside of the combined flower petal grouping and attach to the center of the combined lantern, alternating the petals. Apply light pressure until dry:)

Tuesday, March 7, 2017

Tulip Gift Tag Card


Tulip Gift Tag Card-JMRush
Approximate Card Size: H 3” x W 2.75”

This design can be used as an alternative to a bow on a present or gift bag and is compatible with both 8X12 and 12X12 mats. 

You can purchase this design here: https://www.silhouettedesignstore.com/artists/485222


1.Cut design pieces. (I used double sided card stock) 
2. Fold the card base at the score lines. Curve the flower petals and leaf design.
3. Glue the Longest side of the long double petal to the center front of the largest petal grouping.  Fold the gift tag base at the score lines.
4. Glue the Last petal grouping to the center top of the bottom petal of the combined flower petals. Open your card and glue the scalloped piece on the bottom section of the card; centering it. ( Optional piece for writing in case you have a double sided colored card base:)
5. I used foam adhesive squares to attach the lower section of the flower petals to the upper section.
6. Center and glue the leaves to the front of the gift tag base.
7. Use foam adhesive squares to attach the combined tulip to the front of the gift tag base. I looped a ribbon through the top opening of the card to finish:)

Wednesday, March 1, 2017

Lily Gift Tag Card


 Lily Gift Tag Card-JMRush
Approximate Size with Lily W 3.75” x H 3.75”
Approximate Card Size: H 3” x W 2.75”

You can purchase this design here: https://www.silhouettedesignstore.com/artists/485222

Written tutorial coming soon:)


1.Cut design pieces. (I used double sided card stock)
2.-3.-4. Curve the leaf pieces as you like. Place the flower petal section with a smaller center underneath the flower petal section with a circular shape. Center and tuck the top layer of petals under the bottom petals to join the flower sections.
5. Curve the Flower stamen combined piece so that all of the oval sections are on top. Curve the flower petals as you like.
6. Glue the stamen section to the center of the combined flower petals.
7. ( Optional piece for writing in case you have a double sided colored card base:)-Open your card and glue the scalloped piece on the bottom section of the card; centering it.
8. Glue the leaves into place on the front of the card.
9. Glue the combined lily to the front of the card.
10. I looped a ribbon through the top opening of the card to finish:)