Showing posts with label Table Decor. Show all posts

Thursday, February 25, 2021

Bunny Boy Girl 3D Stand Up


Bunny Boy Girl 3D Stand Up- JMRush 

Approximate size: W 3.25” X H 5.75” X 2.75”D


This cute Bunny decoration stands independently. This design is compatible with both 8X12 and 12X12 mats. A complete step by step picture tutorial can be found on my blog.

You can purchase the Silhouette design file here: https://www.silhouettedesignstore.com/artists/485222


You can purchase the SVG and Cricut compatible file here: https://www.jamieandjenn.com  Coming Soon:)


1. Cut design pieces. ( I used double sided card stock. This tutorial shows both the boy and girl bunny)

2. Glue the bunny with cutouts to the bunny base with whiskers.

3. Flip the combined bunny over and glue the solid bunny to the combined bunny. Glue the orange carrot to the carrot base.

4. Glue one of the jumpers to the combined bunny base.

5. Flip the combined bunny over ( right side up). Fold the six bunny tummies at the score lines.

6. Apply glue to one side of one of the tummy pieces and attach another tummy piece aligning the edges.

7. It should look like this.


8. Continue glueing tummy pieces until you have three in each group. Two groups.

9. It should look like this.

10. Find the two tummy pieces that are single layer and apply glue to the backside.

11. Attach the combined tummy piece to the combined bunny base aligning at the bottom. Using foam adhesive squares, attach the combined carrot and the bowtie (hair bow for the girl)

12. Flip the combined bunny over and glue the last combined tummy to the backside.

13. The Girl bunny’s collar is attached by pieces of foam adhesive square and the tiny blue dot is glued to the center of the collar.

14. Bunnies:)

Thursday, May 30, 2019

Spring Flower Tea Light


Spring Flower Tea Light (Flameless)-JMRush
Approximate Dimensions: W 4.5” x D 4.5” X H 2”

This design is compatible with both 8X12 and 12X12 mats and is used with a flameless battery operated tea light candle.


You can purchase the Silhouette design file here: https://www.silhouettedesignstore.com/artists/485222

You can purchase the SVG and Cricut compatible file here: https://www.jamieandjenn.com  Coming Soon:)
  1. Cut design pieces. (I used double sided card stock paper)
  2. Curve the flower petals. Fold the tabs on the flower base.
  3. Tuck the end tab into the slot creating a circular tube shape. Secure with a small dab of glue. 
  4. Image of tab inserted and glued into place.
  5. Place the narrow circular ring pieces over the tube shape you just created.
  6. Apply glue to the outside of one of the rows of tabs and secure to the narrow ring.
  7. Apply glue to the tops of the ring and tabs.
  8. Secure the thicker circular ring to the top.
  9. Place a flameless votive candle inside the tube. Apply glue to the outside of the tabs and secure to the narrow ring.(repeating the steps above) Apply glue to the tops of the ring and tabs. Secure the thicker circular ring to the top.
  10. Curve your flower petals as you like and glue to the top of the lantern base.
  11. Glue the 6 flower petal sections together; Largest on bottom to smallest on top and alternating petals. I did this by applying glue to the backside around the circumference of each flower layer.
  12. Image of the layers being glued together.
  13. Glue the stamen sections together alternating the points and alternating colors. Apply glue to the leaves/lantern base.
  14. Secure the combined flower to the base and glue the stamen combined piece to the center:)

Thursday, November 16, 2017

Snowflake Tea Light

Snowflake Tea Light-Flameless JMRush 
Approximate size: W 3.25” X H 2.5” X D 3.25”

This file is compatible with both 8X12 and 12X12 mats. 

You can purchase this Silhouette design file or SVG bundle here: https://www.silhouettedesignstore.com/artists/485222

1. Cut design pieces.
2.  Fold each snow flake at the score lines. Fold the tabs of the lantern base.
3.-4. Apply a dab of glue to the inside of the lantern base just under the slot. (This will help to secure the tab when it passes through.) Tuck the end tab into the slot creating a circular tube shape.
5. Place the narrow circular ring pieces over the tube shape you just created (pretty side down).
6. Apply glue to the outside of one of the rows of tabs and secure downward to the narrow ring.
7. Apply glue to the tops of the ring and tabs and secure the thicker circular ring to the top.

8.-9.  Flip the lantern base over. Place tea light inside the ring. Repeat as before; Apply glue to the outside of the tabs and secure downward to the narrow ring. Apply glue to the tops of the ring and tabs and secure the thicker circular ring to the top. Apply glue to one side of the back of one of the snowflakes.
10. Attach the backside of another snowflake and align all edges.
11. Repeat for the last snowflake.
12. It should look like this:)
13. Open the combined snowflake grouping so that the single layer snowflakes are facing you. Apply glue to the inner ring and attach over the flameless candle. ( I used hot glue for this step).
14. I used adhesive jewels at the center of each circle to give it sparkle:)


Wednesday, October 25, 2017

Pumpkin 3D Stand Up


Pumpkin 3D Stand Up- JMRush 
Approximate size: W 2.75” X H 3.5”

This cute pumpkin decoration stands independently. This design is compatible with both 8X12 and 12X12 mats.  
You can purchase this Silhouette design file or SVG bundle here: https://www.silhouettedesignstore.com/artists/485222

1. Cut design pieces. ( I used double sided card stock) 
2. Fold each of the 12 identical pumpkin shapes at the score lines.
3. -5. Apply glue to the backside of one side of the folded identical pumpkin shapes. Line up the back of another identical pumpkin shape and align at the edges. Continue this step until 6 the pumpkin shapes have been joined.
6.-8 Repeat this process for the remaining 6 identical pumpkin shapes ( you will have two groupings) Apply glue to the backside of one of the combined pumpkin shapes and attach to the full pumpkin silhouette with a stem; aligning at the bottom edge:) Repeat this process for the remaining pumpkin shape grouping on the backside of the full pumpkin stem silhouette.

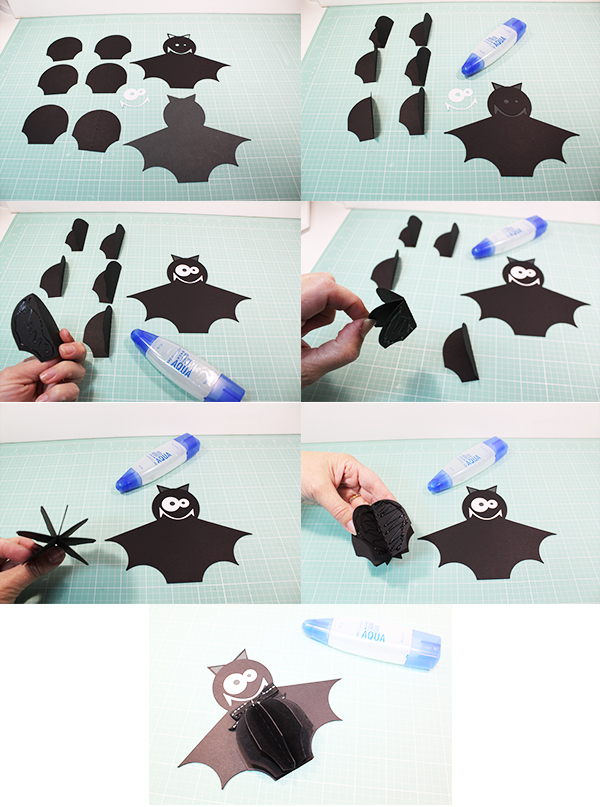
Bat 3D Stand Up


Bat 3D Stand Up- JMRush 
Approximate size: W 6.5” X H 5.25”

This cute bat decoration stands independently. This design is compatible with both 8X12 and 12X12 mats. 
You can purchase this Silhouette design file or SVG bundle here: https://www.silhouettedesignstore.com/artists/485222

1. Cut design pieces. ( I used double sided card stock) 
2. Fold each of the 6 tummy shapes at the score lines. Glue bat piece with a face to the solid bat silhouette base.
3. -5. Glue the eyes and mouth into place. Apply glue to the backside of one side of the folded tummy shapes. Line up the back of another tummy shape and align at the edges. Continue this step until all the tummy shapes have been joined.
6. Apply glue to the backside of the combined tummy shapes. Attach to the combined bat; aligning at the bottom edge:)
7. Finish with a ribbon and adhesive enamel dots to accentuate the eyes:)

Ghost 3D Stand Up


Ghost 3D Stand Up- JMRush 
Approximate size: W 3.25” X H 5”

This cute ghost decoration stands independently. This design is compatible with both 8X12 and 12X12 mats.
You can purchase this Silhouette design file or SVG bundle here: https://www.silhouettedesignstore.com/artists/485222

1. Cut design pieces. ( I used double sided card stock) 
2. Fold each of the 6 tummy shapes at the score lines. Glue ghost piece with a face to the solid ghost silhouette base.
3. -5. Apply glue to the backside of one side of the folded tummy shapes. Line up the back of another tummy shape and align at the edges. Continue this step until all the tummy shapes have been joined.
6. Apply glue to the backside of the combined tummy shapes. Attach to the combined ghost; aligning at the bottom edge:)

Vampire 3D Stand Up


Vampire 3D Stand Up- JMRush 
Approximate size: W 3” X H 5.5”

This cute vampire decoration stands independently. This design is compatible with both 8X12 and 12X12 mats.
You can purchase this Silhouette design file or SVG bundle here: https://www.silhouettedesignstore.com/artists/485222


1. Cut design pieces. ( I used double sided card stock) 
2. Fold each of the 6 tummy shapes at the score lines ( notice that there are 2 with a foot shape on one side) Glue the face to the vampire silhouette base; aligning at the ears. Glue the large collar just underneath the face on the vampire silhouette.
3. -6. Apply glue to the backside of one side of the folded tummy shapes. Line up the back of another tummy shape and align at the edges. Continue this step until all the tummy shapes have been joined; making sure that the right foot tummy shape is on the right and the left foot shape is on the left.
7. Using small pieces of foam adhesive square, attach the bowtie to the combined vampire.
8. Make sure the right foot of the joined tummy shape is on the right and the left foot is on the left then apply glue to the backside. Attach to the combined vampire; aligning at the feet and the bottom edge.
9. This is what he should look like:)
10. I used ribbon to make a slightly smaller bow tie and attached it with glue:)

Monday, April 24, 2017

Iris Tea Light (Flameless)


Iris Tea Light (Flameless)-JMRush
Approximate Dimensions: W 5” x D 5” X H 3.75”

This design is compatible with both 8X12 and 12X12 mats and when vellum paper is used, an opaque lantern effect is created. 

You can purchase the Silhouette design file here: https://www.silhouettedesignstore.com/artists/485222


  1. Cut design pieces. (I used double sided card stock and vellum paper)
  2. Match up the petal outline shapes with the coordinating vellum shape. Glue the coordinating vellum piece to the front of the outline flower. ( You can also cut out another outline flower piece if you would like each side of the vellum flower to have the outline detail:)
  3. Fold the tabs of the tea light base ( long narrow strip with tabs). Tuck the end tab into the slot creating a circular tube shape. Apply a small dab of glue on the tab to hold in place. Apply a small dab of glue on the tab to hold in place.    
  4. Place the two narrow circular ring pieces over the tube shape you just created. One toward the top and one toward the bottom.
  5. Apply glue to the outside of one of the rows of tabs and secure to the narrow ring.
  6. Image of step completed.
  7. Repeat for the other set of tabs and circular ring. Image of step completed.
  8. Apply glue to the tops of the ring and tabs on one side. Secure the thicker circular ring to the top.
  9. Image of this step completed.
  10. Flip the combined tube over. Place a flameless votive candle inside the tube. Apply glue to the tops of the ring and tabs. Secure the thicker circular ring to the top.
  11. Curve the combined flower and leaves as you like. (I curved two of the leaves up and two down. I curved one set of the flower petals down and flipped the other set on it’s backside and then curved the petals up toward the center.)
  12. Apply glue to the backside of the leaves at the points where they make contact with the tea light base and attach to the tea light base.
  13. Apply glue to the bottom of the flower petals curved downward and secure to the tea light base.
  14. Apply glue to the bottom of the flower petals curved upward and secure to the tea light base:)


Thursday, November 3, 2016

Poinsettia Tea Light (Flameless)


Poinsettia Tea Light (Flameless)-JMRush
Approximate Dimensions: W 8” x D 7” X H 2”

This design is compatible with both 8X12 and 12X12 mats and when vellum paper is used, an opaque lantern effect is created. 

You can purchase the Silhouette design file here: https://www.silhouettedesignstore.com/artists/485222


  1. Cut design pieces. (I used double sided card stock and vellum paper)
  2. Match up the petal outline shapes with the coordinating vellum shapes. (You may need to rotate the matched sets to get them to align as they are irregular shapes)
  3. Glue the coordinating vellum pieces to the backside of the outline flowers. (I did not glue the inside vein designs of the petals).
  4. Repeat for all of the flower combinations.
  5. Fold the tabs of the tea light base ( long narrow strip with tabs) and curve the flower petals as you like. Fold the score lines in the leaf piece.
  6. Tuck the end tab into the slot creating a circular tube shape. I applied a small dab of glue on the tab to hold in place.
  7. Image of the tab in the slot.
  8. Place the narrow circular ring pieces over the tube shape you just created.
  9. Apply glue to the outside of one of the rows of tabs and secure to the narrow ring. Repeat for the other set of tabs and circular ring.
  10. Image of the tabs secured.
  11. Apply glue to the tops of the ring and tabs. 
  12. Secure the thicker circular ring to the top.
  13. Image of this step completed.
  14. Place a flameless votive candle inside the tube. Apply glue to the tops of the ring and tabs. Secure the thicker circular ring to the top.
  15. Apply glue to the center ring on the backside of the leaf piece. Center and secure to the tea light base.
  16. Fold the tabs of the combined flower petal pieces. One set folds up and the other down. Apply glue to the tabs that are folded up.
  17. Place the other large combined flower petal piece to this piece and align the tabs together. ( petals will be staggered) Secure each of the tabs together. This will create a space in between the flower sections.
  18. Glue the centers of the three smaller combined flower petals together. Largest on bottom and smallest on top and alternating the petals.
  19. This is what it should look like. I used enamel adhesive dots to decorate the center flower piece.
  20. Glue the set of three combined flower petals to the set of two larger combined flower petals; alternating the petals. Apply glue to the bottom center of the combined flower piece and attach to the tea light base piece. ( I used hot glue for this)
  21. Push down the center of the combined flower piece so that the tea light flame is showing.
  22. Glue the flower center in the center of your creation:)

Tuesday, August 23, 2016

Pumpkin Lantern (Flameless)


Pumpkin Lantern (Flameless)-JMRush
Approximate size: W 4.50” X D 4.50” X H 7”

When vellum paper is used, an opaque lantern effect is created on this five sided lantern. This design is compatible with both 8X12 and 12X12 mats.

You can purchase the Silhouette design file here: https://www.silhouettedesignstore.com/artists/485222


1.Cut design pieces. ( I used double sided card stock)
2. Flip lantern pieces over ( pretty side down). Fold score line up. Align the lantern pieces so that the upper tabs are on the upper right side. Apply glue to the backside of the long side tabs and secure the three lantern pieces together.
3. Apply glue to the very edges of the rectangular vellum pieces. Align over each open window of the lantern panels. Secure.
4. Glue the two stem leaf pieces together on the central stem part only and making sure that the half circle shapes at the bottom and leaves are still separate.
5. Glue the two small stem designs to each side of the combined stem/leaf piece. Curl the leaves as you like.
6. Apply glue to the top right side tab of the third panel top and attach to the inside of the next triangular top to the right. Repeat for the next tab.
7. Repeat for the next tab on the fourth panel.
8. Repeat for the tab on the first panel.
9. Repeat for the last two tabs which encloses the top of your lantern.
10. This is what it should look like.
11. Apply glue to the long side tab on the last panel and attach to the panel to the left, creating a enclosed pentagon box shape.
12. Apply glue to the inside of the leaf/stem small tabs and secure to the top of the lantern. Hold until secure.
13. Fold the score lines on the lantern base.
14. Apply glue to the small tabs on the lantern base and secure to the inside of the rectangular shape to the left. 
15. Repeat for all tabs.
16. This is what it should look like.
17. Place a flameless candle in the center of the lantern base. (I used a 3” W x 4” H flameless color changing candle) The lantern top is placed over the top. I finished with a ribbon.


Wednesday, July 27, 2016

Carousel Lantern


Carousel Lantern-JMRush
Approximate size: W 4.50” X D 4.50” X H 7”


This five sided lantern file has a carousel horse design on each side and when vellum paper is used, an opaque lantern effect is created. This design is compatible with both 8X12 and 12X12 mats.

You can purchase the Silhouette design file here: https://www.silhouettedesignstore.com/artists/485222


1.Cut design pieces. ( I used double sided card stock)
2. Flip lantern pieces over ( pretty side down). Apply glue to the very edges of the rectangular vellum pieces. Align over each carousel horse window on the lantern. Secure. 
3. Fold score line up.
4. Align the lantern pieces so that the upper tabs are on the upper right side. Apply glue to the backside of the long side tabs and secure the three lantern pieces together.
5. Image of the long side tab attached to the other lantern sections. (The single lantern’s long side tab will not be glued yet)
6. Glue the backside of the flag portion of the one of the two flag pieces. Do not glue the pole/stem portions together.
7. Image of the flag glued together.
8. Glue one side of the pole/stem combined piece to the center top of the third carousel horse window. Allow to dry and make sure the other side of the pole/stem piece is free).
9. -10. Apply glue to the top right side tab of the first carousel horse top and attach to the inside of the next triangular top to the right. Repeat for the next tab.
11. Apply glue to the top of the pole/stem piece and secure to the inside of the lantern.
12. Apply glue to the top tab on the second to the last carousel horse window from the right and attach to the triangular top of the next panel to the right.
13. Apply glue to the long side tab on the last carousel window panel and attach to the carousel window panel to the left, creating a enclosed pentagon box shape.
14. Apply glue to the last two top tabs and secure to the insides of the lantern top.
15. Image of the finished inside.
16. Fold the score lines of the lantern base.
17. Apply glue to the small tabs and secure to the insides of the rectangle to the left.
18. I used a 3” W x 4” H flameless color changing candle, which is placed in the center of the lantern base. The lantern top is placed over the top. I finished with a ribbon and enamel jewels in the center of each scallop:)

Wednesday, July 13, 2016

Blue Ulysses Butterfly Tea Light Lantern (Flameless)


Blue Ulysses Butterfly Tea Light Lantern (Flameless)-JMRush
Approximate Dimensions: W 4” x D 4” X H 2.5”


This design is compatible with both 8X12 and 12X12 mats and when vellum paper is used, an opaque lantern effect is created.

You can purchase this design here: https://www.silhouettedesignstore.com/artists/485222


  1. Cut design pieces. (I used double sided card stock and vellum paper)
  2. Glue each outline butterfly piece to the coordinating butterfly base. ( There will be an extra outlined butterfly.) Fold the score lines in the lantern base piece.
  3. Glue the other outline butterfly to the back of the combined coordinating butterfly shape ( so there is a outlined butterfly on the front and on the back). Apply a dab of glue to the inside of the lantern base just under the slot. (This will help to secure the tab when it passes through.) Tuck the end tab into the slot creating a circular tube shape.
  4. Place the one of the narrow circular ring pieces over the tube shape you just created. Apply glue to the outside of one of the rows of tabs and secure downward to the narrow ring.
  5. Apply glue to the tops of the ring and tabs and secure the thicker circular ring to the top.
  6. Flip the lantern base so that the rings are on the bottom. Apply hot glue to inside of the lantern base so that you can secure the flameless tea light inside the tube. ( It may be easier to work form the bottom:) Place the tea light inside and secure.
  7. Fit the second narrow ring around the other side of the tube. Apply glue to the outside of the tabs and secure to the narrow ring.
  8. Fold the tabs in the center of the combined butterfly (with a hole in the center) down and the tabs in the circular piece with tabs up. Apply glue to the tops of the ring and tabs and secure the thicker circular tab ring to the top. (tabs facing upward)
  9. Apply glue to the insides of the upward tabs.
  10. Secure the tabs of the combined butterfly with a hole in the center and tabs to the tabs on the lantern base. (butterfly tabs go on the inside).
  11. Allow to dry.
  12. Curve the three layered butterfly and apply glue along the bottom vertical center line.
  13. Secure to the center of the combined butterfly lantern base and combine the antennas and tail sections. Allow to dry:)