Friday, December 30, 2016

Digiplayground


Attention SVG and Cricut users:)

Did you know you can purchase my files in SVG and Cricut friendly formats at digiplayground.com? They are having a sale and my December Kit of the month deal is about to expire. Get yours while it's available:)http://digiplayground.com/Jennifer-Rush/


Also, you can follow digiplayground on Instagram and Facebook so you are sure not to miss out on sales and promotions:)
http://digiplayground.com/blog/promotional-gifts-and-freebies-of-the-week/
https://www.facebook.com/groups/digiplayground/
https://www.instagram.com/digiplayground/


Wednesday, December 21, 2016

Stacked Cardinal Bird Card


Stacked Cardinal Bird Card- JMRush 
Approximate Card size: W 5.50” X H 4.25”


This design is compatible with both 8X12 and 12X12 mats. 


You can purchase the Silhouette design file here: https://www.silhouettedesignstore.com/artists/485222

You can purchase the SVG and Cricut file here:

1. Cut design pieces.
2. Fold the card base. Glue the two claws to the smaller (red) bird silhouette. Glue the bird face (with eye cut out) to the solid bird face with a beak. Glue the pinecone with cut outs to their solid coordinating shape bases.
3. Glue the smaller wing piece (red) to the larger ling wing piece (black). Glue the combined bird silhouette to the larger bird silhouette (black). glue the small (oval with scalloped edge) to the small wing shape.
4. Glue the bird face to the combined bird silhouette. Use a foam adhesive square to attach the small combined wing to the long combined wing.
5. Glue the combined wing to the combined bird silhouette.
6. Curve the pinecones and leaves as you like.
7. Align the tree branch so that it’s edges line up with the edges of the card. Center the leaf shapes (green) underneath the branch as shown. Carefully glue the branch to the leaves without losing their position and not glueing it to the card yet.
8. Place the combined bird silhouette so that it’s claws wrap around the tree branch and apply glue to the backside of the bird body, branch, and center part of the leaves. Use a foam adhesive square on the backside of the bird’s head.
9. Attach the combined bird and combined leaf/branch to the front of the card; making sure that the edges of the branch align with the edges of the card. I used a piece of foam adhesive square to attach the full combined pinecone and glue to attach the half pinecone:)

Monday, December 19, 2016

Candy Cane Gift Tag Ornament

Candy Cane Gift Tag Ornament- JMRush 
Approximate Tag size: H 4.25” X W 2”

You can purchase the Silhouette design file here: https://www.silhouettedesignstore.com/artists/485222

  1. Cut design pieces.
  2. Glue the candy cane with cut outs to the candy cane ornament base (lager piece with circular hanger); centering it.
  3. Glue the smaller piece with a circular hanger to the backside of the combined piece; centering it. (This piece is optional and is meant for a writing space if design is used for a gift tag) Finish with a ribbon and a enamel dot:)

Deer Track Ornament Gift Tag


Deer (Reindeer) Track Ornament Gift Tag- JMRush 
Approximate Tag size: H 4” X W 2.5”


This design can be used as a gift tag or ornament and is compatible with both 8X12 and 12X12 mats. 

You can purchase the Silhouette design file here: https://www.silhouettedesignstore.com/artists/485222

  1. Cut design pieces.
  2. Use foam adhesive squares to attach the animal track piece to the ornament base (lager piece with circular hanger); centering it.
  3. Glue the smaller piece with a circular hanger to the backside of the combined piece; centering it. (This piece is optional and is meant for a writing space if design is used for a gift tag) Finish with a ribbon and a enamel dot:)

Compass Gift Tag Ornament


Compass Gift Tag Ornament- JMRush 
Approximate Tag size: H 4” X W 3.25”

This design has a moveable direction needle when a brad is used, can be used as a gift tag or ornament, and is compatible with both 8X12 and 12X12 mats. 

You can purchase the Silhouette design file here: https://www.silhouettedesignstore.com/artists/485222


  1. Cut design pieces. You will need a brad for this project.
  2. Center and glue the two compass cut out pieces together. Glue the two open circle pieces together ( smaller on top). Glue the two small circles together ( smaller on top). Glue the single needle to the double needle piece.
  3. Glue the small circular hanger piece to the combined compass cut out piece. Insert the brad through the hole on the combined needle piece. Flip the ornament base ( solid with a circular hanger) over and glue the solid circle shape to it; centering it. Flip back over ( pretty side up)
  4. Insert the bottom of the brad through the center hole of the combined compass cut out piece and fold tabs. Apply glue around the edges of the backside of the combined compass cut out piece and glue to the top side of the ornament base; centering it. 
  5. Use pieces of foam adhesive squares to attach the combined open circles and the small combined circles to the front of the combined compass. Finish with a ribbon:)

Wednesday, December 14, 2016

Poinsettia Lantern (Flameless)


Poinsettia Lantern (Flameless)-JMRush
Approximate Lantern size: W 3 x D 3 x H 7” (H 7.75” with Hanger)

This Flameless lantern features a 3D poinsettia flower. A transparent frosted effect is created when vellum paper is used. This design is compatible with both 8X12 and 12X12 mats.

You can purchase the Silhouette design file here: https://www.silhouettedesignstore.com/artists/485222


1.Cut design pieces. ( I used double sided card stock and vellum paper) ( There is a small flower center shape that is optional in this file. I used an enamel dot in the center of the flower instead)
2. Match up the petal outline shapes with the coordinating vellum shapes. (You may need to rotate the matched sets to get them to align as they are irregular shapes. Glue the coordinating vellum pieces to the backside of the outline flowers. (I did not glue the inside vein designs of the petals).
3.-4.Glue the circular shaped hangers together. (Make sure the stems of this piece remain separate)
5. -6.Apply glue to the backside of the 3 open rectangle mats and the one rectangular mat with a flower shape. Center and secure to the front of each window on the two lantern body pieces. Place the flower rectangular mat on the first lantern body window ( Do not apply glue to the backside of the flower or petals)
7. Flip the two combined lantern body pieces over ( pretty side down and as shown). Glue the edges of the rectangular vellum piece, center, and secure to each open window.
8. Fold the score lines on the two lantern bodies and the lantern square base.
9. Glue one of the stems of the circular hanger combined piece to the inside of the top of the second panel. (The other stem will be glued inside the lantern later)
10. Center the two lantern body pieces. Apply glue to the backside of the right side tab on the left lantern body piece. Attach to the other lantern piece making sure that the bottoms align (joining the two body pieces). 
11. -12-13. Apply glue to the side long tab on the right side of the right lantern body piece. Secure the long side tab to the other side creating a box.
14. Apply glue to the top tab with the circle hanger and secure it to the triangular panel to it’s left side.
15. Image of the top tab secured to the triangular panel.


16.-17. Repeat for the next tab.
18. Apply glue to the remaining unsecured circular hanger stem. Secure it to the opposite side of the lantern top.
19. Continue securing the top tabs until the top is fully enclosed. ( I applied glue to the last two top tabs at the same time and secured them)
20. Curve your combined flowers and leaves as you like. Glue the centers of the two larger combined flower petal pieces together; staggering the flower petals. Glue the centers of the three smaller combined flower petals together. Largest on bottom and smallest on top and alternating the petals. This is what it should look like. I used enamel adhesive dots to decorate the center of the combined flower piece.
21. Apply glue to the inside ring (front side) of the leaves. 
22. Secure the bottom of the combined flower to the inside ring of the leaves. 
23. Use a foam adhesive square to attach the combined flower/leaf piece  to the coordinating shape on the combined lantern body. Apply glue to the top two tabs of the Lantern square base and secure to the inside of the sides.
24. Repeat for the bottom two tabs creating a shallow box.
25. Place a flameless candle inside and the lantern top in it’s base.
26. I finished with a ribbon on the circular hanger at the top of the lantern:)


Tuesday, December 13, 2016

Stacked Christmas Cat Card


Stacked Christmas Cat Card- JMRush 
Approximate Card size: H 5.50” X W 4.25”

This design is compatible with both 8X12 and 12X12 mats. 

You can purchase the Silhouette design file here: https://www.silhouettedesignstore.com/artists/485222


1. Cut design pieces.
2. Fold the card base. Glue the largest cat silhouette (with tail) to the cat silhouette (solid with hat and scarf). Glue the oval head shape without ears to the solid cat head without a pom pom. Glue the center white chest section to the front two leg section; aligning the coordinating shapes at the top right. Glue the small rounded muzzle pieces to the muzzle base ( that has a coordinating shape plus a long vertical line). Glue the small triangular face markings to either side of the cat head with ear and eye cut outs.
3. Glue the Nose to the combined muzzle piece. Glue the solid head with a pom pom on the right side to the solid cat head piece with a hat and scarf. Glue the combined cat head with ear/eye openings to the combined solid cat head piece.
4. Glue the combined cat head to the combined cat head hat /scarf piece. Use pieces of foam adhesive squares to attach the cat silhouette without a tail to the combined cat silhouette base.
5. Glue the last two triangular markings to the combined cat silhouette. One on the first layer and one on the second layer; matching the coordinating contours. Attach the combined muzzle/nose piece to the combined cat head with a foam adhesive square in the lower center and glue on the narrow top strip (backside).
6. Image of the muzzle/nose piece being secured to the combined cat head.
7. Use foam adhesive squares to attach the combined front legs to the combined cat silhouette. Use foam adhesive squares to attach the combined head to the combined cat silhouette.
8. Glue the combined cat silhouette to the front of the card. I used adhesive enamel dots to accentuate the eyes:)


Monday, December 12, 2016

Winter Trees Ornament Gift Tag

Winter Trees Ornament Gift Tag- JMRush 
Approximate Card size: H 6.50” X W 4.”

This design is compatible with both 8X12 and 12X12 mats and can be used as a gift tag or ornament. 

You can purchase the Silhouette design file here: https://www.silhouettedesignstore.com/artists/485222


  1. Cut design pieces. ( I used a reflective blue paper for the tree silhouette background)
  2. Glue the fullest tree silhouette to the solid rectangle. Flip the ornament base ( with a circular hanger) over and glue the solid coordinating shape to it; centering it. Curve the pine needles as you like.
  3. Flip the ornament base back over and glue the coordinating shape that has a open rectangle to the front; centering it. Glue the next fullest tree silhouette to the combined tree silhouette panels.
  4. Glue the smallest tree silhouette to the combined tree silhouette panels.
  5. Use foam adhesive squares to attached the combined tree silhouette panels to the ornament base.
  6. Glue two of the pine needles together at the top. Repeat for the other set.
  7. Glue the pine needle sets to the combined tree silhouette panel at the top corners. 
  8. Finish with a ribbon and a enamel dot:)

Friday, December 9, 2016

Coffered Christmas Wreath Door Card


Coffered Christmas Wreath Door Card- JMRush 
Approximate Card size: H 5.50” X W 4.25”

This design is compatible with both 8X12 and 12X12 mats.

You can purchase the Silhouette design file here: https://www.silhouettedesignstore.com/artists/485222

You can purchase the SVG and Cricut file here:


1. Cut design pieces.
2. Fold the card base at the score lines. Attach the door with larger openings to the door with smaller openings using pieces of foam adhesive squares. Glue the small circle knob to the larger one; centering it. Glue the door handle panel with a key hole to the solid door handle panel.
3. Use foam adhesive squares to attach the combined open rectangle doors to the solid rectangle door. Use foam adhesive squares to attach the four small rectangles inside each of the openings in the openings of the combined door; centering them.
4. Use a piece foam adhesive to attach the combined door knob to the combined door handle panel. Glue the combined door knob/panel to the combined door. Curve your wreath circles as you like. Glue the inside rings of the two large wreath pieces together and the two smaller wreaths together making sure that the leaves alternate and that the leaves stay free from glue.
5. Glue the two combined wreath sections together; alternating leaves. Attach the combined wreath to the combined door with glue where it aligns with the center strip of the combined door. 
6. Glue the combined door to the front of the card and finish with a ribbon:)


Christmas Bulb Window Card


Christmas Bulb Window Card- JMRush 
Approximate Card size: H 5.50” X W 4.25”

This design is compatible with both 8X12 and 12X12 mats.

You can purchase the Silhouette design file here: https://www.silhouettedesignstore.com/artists/485222


1. Cut design pieces. (I used vellum paper for the inside window piece and reflective paper for the inside full circle shape of the ornaments)
2. Fold the card base at the score lines. Glue solid rectangle to the back of the full window piece; centering it around the window openings. Glue the smaller solid circles to the larger ornament bases. Fold the leaves in half(ish)…making sure that the leaves alternate.
3. Glue the circle pieces with cuts in them to the combined ornament pieces.  Apply glue the the backside of the combined window and attach the solid full window shape (shown in black).
4. Use pieces of foam adhesive squares to attach the smaller window to the font of the combined window; aligning the rectangle openings.
5. Glue the backside of two of the folded leaves to the front of the combined window; one of wither side of the window- staying inside the the window box area.
6. Glue the backside of the third folded leaf piece in the center of the other two.
7. Using foam adhesive squares, attach the three combined ornaments to the inside of the leaves.
8. Glue the inside center bases of the top layer of leaves to the combined ornaments; leaving the leaves free.
9. Apply glue to the backside side edges of the window box piece ( where my fingers are pointing) and use two foam adhesive squares in beside each glue point.
10. Flip the window box piece back over and secure to the combined window; securing the edges until they dry.
11. Use foam adhesive squares to attach the combined window to the card base.
12. Finish with a ribbon:)

Saturday, December 3, 2016

Winter Birdhouse Card


Winter Birdhouse Card- JMRush 
Approximate Card size: H 5.50” X W 4.25”


This design is compatible with both 8X12 and 12X12 mats. 

You can purchase the Silhouette design file here: https://www.silhouettedesignstore.com/artists/485222


1. Cut design pieces. (Be careful not to scrap the little circles that are grouped with two of the groupings:)
2. Fold the card base at the score lines. Glue the pinecone cut out pieces to their coordinating pinecone solid bases.  Glue the small circle to the larger one; centering it. Flip the smaller birdhouse group (with cut outs) over ( pretty side down).  Attach pieces of foam adhesive squares to it and to the triangular roof shaped birdhouse top.
3. Flip the smaller birdhouse back over and attach it to the larger one; centering it. Flip the smaller triangular roof piece back over and attach it to the larger one; aligning at the top and the outside edges. Flip this combined triangular roof piece over ( pretty side down) and attach foam adhesive squares. Flip the combined circle piece over and attach a piece of foam adhesive square to it.
4. Flip the combined triangular roof piece over and attach it to the combined base piece. Flip the combined birdhouse piece over and attach it to the combined base. Flip the combined circle piece over and attach it to the front of the combined birdhouse. Curve the pine needles and combined pinecones as you like. Glue two of the pine needle sets to the top of the combined birdhouse. Flip the combined pinecones over (pretty side down) and attach a foam adhesive square to each one. 
5. Flip the combined pinecones back over and attach to the combined birdhouse.
6. Glue the other two sets of pine needles to the combined birdhouse. I finished with a ribbon and enamel dots. Glue the birdhouse to the front of the card base:)

Friday, December 2, 2016

Acorn Ornament Gift Tag


Acorn Ornament Gift Tag- JMRush 
Approximate size: W 5.25” X H 3”

This design can be used as a gift tag or ornament and is compatible with both 8X12 and 12X12 mats.

You can purchase the Silhouette design file here: https://www.silhouettedesignstore.com/artists/485222

1.Cut design pieces.
2. Glue the acorn top, acorns, and leaves to the acorn grouping silhouette that coordinates with the acorn circular hanger base.
3. Flip the acorn circular hanger base over (pretty side down). Center and glue the other acorn grouping silhouette to the base. (This is optional and is used for writing if you will be using this for a gift tag and not an ornament) Flip this combined piece back over (pretty side up).
4. Attach the combined acorn grouping to the combined base with adhesive foam squares. I finished with a ribbon and enamel dot:)

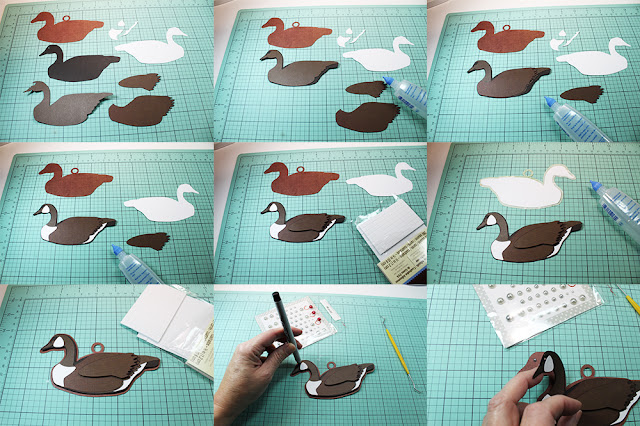
Goose Ornament Gift Tag


Goose Ornament Gift Tag- JMRush 
Approximate size: W 5.5” X H 3”

This design can be used as a gift tag or ornament and is compatible with both 8X12 and 12X12 mats.

You can purchase the Silhouette design file here: https://www.silhouettedesignstore.com/artists/485222

1.Cut design pieces. 
2. Glue the goose silhouette with eye and beak cut outs to the goose silhouette with a circle eye cut out.
3.Glue the headless breast /wing piece to the combined goose.
4. Glue the small cheek, breast, and tail markings to the combined goose.
5. Use foam adhesive squares to attach the wing to the combined goose.
6. Flip the Goose base (with circular hanger) over ( pretty side down). Center and glue the solid goose silhouette to the base. (This is optional and is used for writing if you will be using this for a gift tag and not an ornament) Flip this combined piece back over ( pretty side up).
7. Attach the combined goose to the front of the combined goose base with pieces foam adhesive squares. Do not peel the backing off of the adhesive on the head portion of the goose yet.
8.-9. I used a fine tipped marker to make a mark through the eye hole from the top section to the back. I placed a small enamel dot for the eye on the bottom section. I removed the backing from the adhesive on the goose head and secured the head to the base.


Thursday, December 1, 2016

Winter Birdhouse Ornament Gift Tag


Winter Birdhouse Ornament Gift Tag- JMRush 
Approximate size: W 4.5” X H 5.75”


This design can be used as a gift tag or ornament and is compatible with both 8X12 and 12X12 mats. 

You can purchase the Silhouette design file here: https://www.silhouettedesignstore.com/artists/485222


1. Cut design pieces. (Be careful not to scrap the little circles that are grouped with two of the groupings:)
2. Flip the Base piece (with a circular hanger) over ( pretty side down). Center and glue the solid birdhouse shape to the base. (This is optional and is used for writing if you will be using this for a gift tag and not an ornament) Flip this combined piece back over ( pretty side up).  Glue the pinecone cut out pieces to their coordinating pinecone solid bases.  Glue the small circle to the larger one; centering it. Flip the smaller birdhouse group (with cut outs) over ( pretty side down).  Attach pieces of foam adhesive squares to it and to the triangular roof shaped birdhouse top.
3. Flip the smaller birdhouse back over and attach it to the larger one; centering it. Flip the smaller triangular roof piece back over and attach it to the larger one; aligning at the top and the outside edges. Flip this combined triangular roof piece over ( pretty side down) and attach foam adhesive squares. Flip the combined circle piece over and attach a piece of foam adhesive square to it.
4. Flip the combined triangular roof piece over and attach it to the combined base piece. Flip the combined birdhouse piece over and attach it to the combined base. Flip the combined circle piece over and attach it to the front of the combined birdhouse. Curve the pine needles and combined pinecones as you like. Glue two of the pine needle sets to the top of the combined birdhouse. Flip the combined pinecones over (pretty side down) and attach a foam adhesive square to each one. 
5. Flip the combined pinecones back over and attach to the combined birdhouse.
6. Glue the other two sets of pine needles to the combined birdhouse. I finished with a ribbon and enamel dots:)