Showing posts with label Monster. Show all posts

Monday, October 24, 2022

Frankenstein Treat Egg Holder


Frankenstein Treat Egg Holder -JMR


Approximate size: H 5” X W 4.75” X D 2.5”


This easy to construct Frankenstein treat egg holder is compatible with both 8X12 and 12X12 mats and is sized to hold a Kinder Joy chocolate egg. 

You can purchase the Silhouette design file here: https://www.silhouettedesignstore.com/artists/485222


You can purchase the SVG and Cricut compatible file here:https://www.jamieandjenn.com  Coming Soon:)


  1. Cut the design pieces. I used double sided card stock.
  2. Glue the Frankenstein eyes with cutouts to the coordinating base solid eye shape; centering it. Glue the small green jaw to the coordinating white jaw with teeth; aligning on the bottom and edges.
  3. Using foam adhesive squares; attach the combined jaw to the coordinating shape on the full Frankenstein face; aligning at the bottom. Use foam adhesive squares to attach two of the hands to the coordinating shapes on the box base. 
  4. Use foam adhesive squares to attach the combined eyes to the combined Frankenstein head. Glue the combined Frankenstein head to the coordinating shape on the box base. Using a piece of foam adhesive square, attach the small part of the tie knot to the tie base.
  5. Glue the green back of the head shape and remaining hands to the full Frankenstein figure. Attach the combined tie to the front of the box base.
  6. Flip the box base over (pretty side down). Fold the score lines. Apply glue to the two side tabs. Fold the bottom section up to meet the tabs creating a box. Hold until dry.


7. Apply glue to the small horizontal tab. Tuck under Frankenstein figure enclosing the box.
8. Apply glue to the back of the box base and attach the combined full figure.
9. This is what it should look like:)
10. Attach the green oval feet with foam adhesive squares.


Tuesday, October 18, 2022

Alien Treat Egg Holder


Alien Treat Egg Holder -JMR


Approximate size: H 5” X W 2.5” X D 2.5”


This easy to construct alien treat egg holder is compatible with both 8X12 and 12X12 mats and is sized to hold a Kinder Joy chocolate egg. 


You can purchase the Silhouette design file here: https://www.silhouettedesignstore.com/artists/485222


You can purchase the SVG and Cricut compatible file here:https://www.jamieandjenn.com

  Coming Soon:)


  1. Cut the design pieces. I used double sided card stock.
  2. Glue the alien eyes with cutouts to the coordinating base solid eye shape; centering it. Glue the Green half alien face with cut outs to the white half alien face with cute outs and teeth; centering and aligning at the top.
  3. Ignore this image- This image shows the box base and full figure flipped over. Do NOT glue the full figure to the box base at this point. I discovered during assembly that it is easier to glue it onto the back after assembly. This tutorial shows it glued into place. My mistake. 
  4. Using foam adhesive squares, attach the full alien head to the cording shape on the front of the box base.
  5. Glue the combined eyes and pink inside of the mouth into place.
  6. Using pieces of foam adhesive squares, attach the hands, combined half face, and antennas to the coordinating shapes on the box base.
  7. This is what it should look like:)
  8. Flip the box base over. Fold the score lines inward.


  1. Apply glue to the two side tabs. Fold the bottom section up to meet the tabs creating a box. Hold until dry.
  2. Apply glue to the small horizontal tab. Tuck under the alien figure enclosing the box.
  3. Image of tucking the tab.
  4. Image of tucking the tab.
  5. Match up the full figure to the backside of the box base making sure the top matches. Apply glue and attach to the back of the box base.
  6. This is what it should look like:)


Tuesday, October 1, 2019

Frankenstein Handle Basket


Frankenstein Handle Basket- JMRush 
Approximate Box size: H 2.50” X W 3” X D 2.50”
Approximate Design size: W 5” X H 5.5” including handle

This cute basket design is a perfect container for Halloween party favors. This design is compatible with both 8X12 and 12X12 mats.


You can purchase the Silhouette design file here: https://www.silhouettedesignstore.com/artists/485222

You can purchase the SVG and Cricut compatible file here: https://www.jamieandjenn.com


  1. Cut design pieces. ( I used double sided card stock) 
  2. Glue the rounded bottom (black) piece to the coordinating shape on the lower section of the basket base. Glue the eyes (white) to the coordinating eye shape (black).
  3. Attach the combined eye shapes to rectangle head shape with foam adhesive squares. Glue the scar, mouth, bow tie, and bolt shapes to the combined head shape.
  4. Attach the head to the coordinating shape on the upper section of the basket.
  5. Use a small piece of foam adhesive to attach the small silver bolt tops to the coordinating shape on the head.
  6. Flip the combined basket over. Fold the basket base at the score lines. Apply glue to the top two tabs on the basket base and secure to the rounded shape above.
  7. Apply glue to the bottom two tabs on the basket base and secure to the head shape above creating a box.
  8. Using foam adhesive squares, attach the hands to the front of the basket. I used a ribbon on top of the bow tie. I used enamel dots to accentuate the eyes.
  9. Use foam adhesive squares to attach the feet on the back of the basket.
  10. Insert the handle on either side of the basket:)

Wednesday, October 25, 2017

Frankenstein Open Mouth Treat Box


Frankenstein Open Mouth Treat Box-JMRush
Approximate Size: W 3.75” x D 1.25”x H 4.25”
Approximate Box size: W 2.5” x D 1 x H 4” 

This box opens by lifting the character’s head to to expose the opening to the treat box. This simple to construct design would be perfect to hold your goodies for Halloween parties. This design is compatible with both 8X12 and 12X12 mats. 

You can purchase this Silhouette design file or SVG bundle here: https://www.silhouettedesignstore.com/artists/485222


1. Cut the design pieces. ( I used double sided card stock)
2. Glue the green Frankenstein head with eye cut outs to it’s coordinating solid base on the flip piece (long shape with a cut out oval and screws on either side);aligning with at the edges and at the eye holes. Fold the score lines on the box base.
3.-4 Apply glue to the two small vertical side tabs at the bottom of the box base. Secure the two small vertical side tabs to the 1 inch (width) rectangles just above them. 
5. Apply glue to the very left corner of the horizontal tab just below the two side tabs that you just glued. ( My finger is pointing to the section in the photo:) Secure this corner to the vertical tab to the left.
6. Apply glue to the topside of the vertical and horizontal panel. Secure the final panel creating a complete box.
7.-8. Flip the long flip piece over ( so the backside is showing). Apply glue to the entire piece and attach the white piece with an oval cut out to it’s matching shape and the white piece with teeth to it’s coordinating shape. 
9. Apply glue to the backside of the green rectangle with teeth cut outs and attach to the coordinating shape on the combined flip piece. Glue the silver screws to each side at the coordinating shapes on the combined flip piece.
10. Secure the tab on the box base by tucking the tab on the inside of the box and feeding it through the slot. (Apply glue to the underside of the tab and secure to the box if you wish)
11.-12. Flip the box base over and glue the combined flip piece; aligning the oval cut outs in the middle.
13.-14. Close the combined flip piece. Glue the scar and long rectangle eyebrow piece into place. Use small pieces of foam adhesive square to attach the small long oval screw head pieces to each side. Fill with candy:)


Tuesday, October 18, 2016

Witch Hug Treat Box

Witch Hug Treat Box-JMRush

Approximate box size: W 3.25” x D 2.25 x H .75” 
(W 5.5 X H 6.25” including character)

This treat box features character arms that open to a small treat box. This design is perfect for Halloween parties or for your special trick or treaters. This design is compatible with both 8X12 and 12X12 mats.

You can purchase the Silhouette design file here: https://www.silhouettedesignstore.com/artists/485222

1.Cut design pieces. (I used double sided card stock for the box base).
2. Use foam adhesive squares to attach the hat to the witch head base. Apply glue to the bottom section.
3. Glue the box base to the bottom section of the combined witch head base; aligning with the hat and ears.
4. Glue the eyes to the backside of the witch face piece.
5. Glue the combined witch face to the combined box base; aligning with the face shape and hat of the combined box base. Glue the collar underneath; aligning with the collar of the combined box base.
6. Use a piece of foam square adhesive to attach the nose. I used enamel dots to accentuate the eyes.
7. I glued a ribbon to the hat.
8. Fold the box base along score lines.
9. Apply glue to the two top tabs and secure them to the top (head) panel.
10. Apply glue to the bottom two tabs and secure them to the bottom panel creating a box.
11. Apply glue to the bottom tab of the center narrow strip section. Secure the center narrow strip tab to the backside of the inside of the box.
12. Glue the hands and sleeve strips to the coordinating shapes on the box base hands. The hands tuck into the slots of the center strip:)


Friday, October 14, 2016

Frankenstein and Frankenstein Bride Hug Treat Box

Frankenstein and Frankenstein Bride Hug Treat Box-JMRush
Approximate box size: W 3.25” x D 2.25 x H .75” 
(W 3.75 X H 4.75” including character)

This treat box features character arms that open to a small treat box. This design is perfect for Halloween parties or for your special trick or treaters. This design is compatible with both 8X12 and 12X12 mats.

You can purchase the Silhouette design file here: https://www.silhouettedesignstore.com/artists/485222

1.Cut design pieces. (I used double sided card stock for the box base).
2. Fold the box base along score lines. Glue the Eyes to the Eye Base piece.
3. Glue the large screw pieces to the coordinating shapes on the box base. Apply glue to the two top tabs and secure them to the top (head) panel.
4. Apply glue to the bottom two tabs and secure them to the bottom panel creating a box.
5. -6. Apply glue to the bottom tab of the center narrow strip section. Secure the center narrow strip tab to the backside of the inside of the box.
7. For the Frankenstein Bride only: Glue the small rectangle piece to the larger rectangle piece; centering and aligning at the top of the large rectangle piece. Glue the curvy hair strips into place.
8. Using foam adhesive squares, attach the combined eye piece to the larger rectangle piece. Glue the mouth into place. For Frankenstein only: 
Glue the scar piece to the top center of the combined rectangle piece.
9. Using foam adhesive squares, attach the combined head to the box base. I used enamel dots to accentuate the eyes and added a ribbon. The hands tuck into the slots on the narrow strip in the center. I used pieces of foam adhesive squares to attach the long oval screw head pieces to the coordinating shapes on the combined frankenstein heads:)


Monday, August 29, 2016

Monster Pocket Card 2


Monster Pocket Card 2-JMRush
Approximate Card size: W 5.50” X H 4.25”

This design has an inside pocket that can be used for notes or gift cards and is compatible with both 8X12 and 12X12 mats.

You can purchase the Silhouette design file here: https://www.silhouettedesignstore.com/artists/485222


  1. Cut design pieces. ( I used double sided card stock)
  2. Glue the teeth and two front panels into place. Glue the eyes to the solid eye base.
  3. Flip the card base over. Fold the score lines on the card base. Apply glue to the back of the side tabs. Secure to the upper rectangular panel forming a pocket.
  4. Insert note or gift card.
  5. Attach the eyes with pieces of foam adhesive squares. I used different sized small enamel dots to accentuate the eyes:)

Sunday, August 28, 2016

Dracula Pocket Card


Dracula Pocket Card-JMRush
Approximate Card size: W 5.50” X H 4.25”

This design has an inside pocket that can be used for notes or gift cards and is compatible with both 8X12 and 12X12 mats. 

You can purchase the Silhouette design file here: https://www.silhouettedesignstore.com/artists/485222


  1. Cut design pieces. ( I used double sided card stock)
  2. Glue the solid large head panel and the top panel into place. Glue the face to the solid face base.
  3. Flip the card base over. Fold the score lines on the card base. Apply glue to the back of the side tabs. Secure to the upper rectangular panel forming a pocket. Glue the eyes and teeth to the combined face base.
  4. Insert note or gift card.
  5. Using pieces of foam adhesive squares, attach the combined face base and bow tie. I used different sized small enamel dots to accentuate the eyes and finished with a ribbon bow tie:)


Monster Pocket Card 1


Monster Pocket Card 1-JMRush
Approximate Card size: W 5.50” X H 4.25”


This design has an inside pocket that can be used for notes or gift cards and is compatible with both 8X12 and 12X12 mats.


You can purchase the Silhouette design file here: https://www.silhouettedesignstore.com/artists/485222


  1. Cut design pieces. ( I used double sided card stock)
  2. Glue the teeth and two front panels into place. Glue the eyes to the solid eye base.
  3. Flip the card base over. Fold the score lines on the card base. Apply glue to the back of the side tabs. Secure to the upper rectangular panel forming a pocket.
  4. Insert note or gift card.
  5. Attach the eyes with  pieces of foam adhesive squares. I used different sized small enamel dots to accentuate the eyes:)

Tuesday, August 23, 2016

Werewolf Treat Box


Werewolf Treat Box-JMRush
Approximate Box size: W 2.75” X W 1” X H 4.25”

This treat box design has an attached lid and is compatible with both 8X12 and 12X12 mats. 


You can purchase the Silhouette design file here: https://www.silhouettedesignstore.com/artists/485222


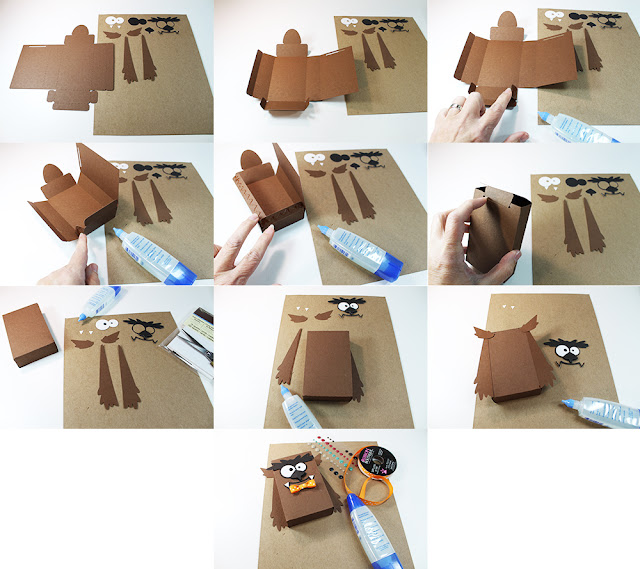
  1. Cut design pieces. ( I used double sided card stock)
  2. Flip the box base over like shown (pretty side down). Fold the box base score lines.
  3. Apply glue to the backside of the tab on the bottom right. Attach to the upper panel to the right.
  4. Apply glue to the backside of the tab on the bottom left. Attach to the panel to the left.
  5. Apply glue to the long vertical tab on the left and to the bottom horizontal tab. Attach to the panel to the right. Your box will be complete.
  6. Flip your box over so that the slot is in the back.
  7. Glue the werewolf’s eyes to the coordinating shape solid eye shaped base.
  8. Glue the werewolf’s combined eyes to the back of the werewolf’s outlined face. Glue the arms to the back edge of the box base.
  9. ( Image of the backside) Glue the ears to the back of the box base. 
  10. Glue the combined werewolf face to the front of the box base. I used different sized enamel dots to accentuate the eyes and finished by adding a bow tie. Fill with goodies:)

Frankenstein Treat Box


Frankenstein Treat Box-JMRush
Approximate Box size: W 2.75” X W 1” X H 4.25”


This treat box design has an attached lid and is compatible with both 8X12 and 12X12 mats. 


You can purchase the Silhouette design file here: https://www.silhouettedesignstore.com/artists/485222


  1. Cut design pieces. ( I used double sided card stock)
  2. Flip the box base over like shown (pretty side down). Fold the box base score lines.
  3. Apply glue to the backside of the tab on the bottom right. Attach to the upper panel to the right.
  4. Apply glue to the backside of the tab on the bottom left. Attach to the panel to the left.
  5. Apply glue to the long vertical tab on the left and to the bottom horizontal tab. Attach to the panel to the right. Your box will be complete.
  6. Flip your box over so that the slot is in the back.
  7. Glue Frankenstein’s eyes to the coordinating shape solid eye shaped base. Glue the screw shapes to the screw vertical long base.
  8. Glue Frankenstein’s combined eyes to the front of the box base. Glue the smile and scar into place. Glue the screw heads on to the combined screw base.
  9. Glue the combined screws to the back of the box base. I used enamel dots to accentuate the eyes. Fill with goodies:)

Monday, August 22, 2016

Vampire Treat Box


Vampire Treat Box-JMRush
Approximate Box size: W 2.75” X W 1” X H 4.25”
This treat box design has an attached lid and is compatible with both 8X12 and 12X12 mats.

You can purchase the Silhouette design file here: https://www.silhouettedesignstore.com/artists/485222


  1. Cut design pieces. ( I used double sided card stock)
  2. Flip the box base over like shown (pretty side down). Fold the box base score lines.
  3. Apply glue to the backside of the tab on the bottom right. Attach to the upper panel to the right.
  4. Apply glue to the backside of the tab on the bottom left. Attach to the panel to the left.
  5. Apply glue to the long vertical tab on the left and to the bottom horizontal tab. Attach to the panel to the right. Your box will be complete.
  6. Flip your box over so that the slot is in the back. Attach the bow tie with a piece of foam adhesive square.
  7. Glue the vampire’s face to the front of the box.
  8. Glue the vampire’s eyes and teeth inside the coordinating shape on the box base.
  9. Tuck the tab into the slot in the back. 
  10. Glue the wings on either side of the backside of the box.
  11. This is what it should look like.
  12. I used enamel dots to accentuate the eyes and finished with a ribbon bow tie. Fill with goodies:)

Monday, October 5, 2015

Monster Slider Hatch Treat Box


Monster Slider Hatch Treat Box-JMRush
Finished Box Dimensions (approximate)- W 2” x H 4” x D 7/8”

This cute little Monster treat box is perfect for classroom parties. This treat box has a hatch opening and will hold 3-4 “mini” candies. This design is compatible with 8x12 or 12X12 mats.


Also: see Frankenstein Slider Hatch Treat Box tutorial for more detailed instruction images.

1. Cut the design pieces.
2. Pre-fold all score lines.
3.Place the tab of the face piece through the slot of the inside wing piece on each side. Make sure that the tab is on the outside of the wing piece. ( you will need to bend the pointed tab a bit to get it into the slot)
4. Apply glue to the lower wings.
 5. Secure the lower wings and lower box section together.
 6. Glue the upper section’s wings to the box base (careful not to glue the tabs. They must remain     free in order for the hatch to open properly.)
 7. Apply a small tab of glue to the top inside to secure it (make sure your hatch will still open properly).
 8. Secure the teeth into place with glue.
 9. Apply glue to the bottom and top of the black eye piece and secure it into place.
 10. Secure the white eye piece into place and glue the stitches and mouth piece into place.
 11. Glue the arms onto the sides and fold the score lines on each hand so that the monster's fingers touch your surface. Yay! Your monster is complete!