Showing posts with label Party. Show all posts

Monday, October 24, 2022

Frankenstein Treat Egg Holder


Frankenstein Treat Egg Holder -JMR


Approximate size: H 5” X W 4.75” X D 2.5”


This easy to construct Frankenstein treat egg holder is compatible with both 8X12 and 12X12 mats and is sized to hold a Kinder Joy chocolate egg. 

You can purchase the Silhouette design file here: https://www.silhouettedesignstore.com/artists/485222


You can purchase the SVG and Cricut compatible file here:https://www.jamieandjenn.com  Coming Soon:)


  1. Cut the design pieces. I used double sided card stock.
  2. Glue the Frankenstein eyes with cutouts to the coordinating base solid eye shape; centering it. Glue the small green jaw to the coordinating white jaw with teeth; aligning on the bottom and edges.
  3. Using foam adhesive squares; attach the combined jaw to the coordinating shape on the full Frankenstein face; aligning at the bottom. Use foam adhesive squares to attach two of the hands to the coordinating shapes on the box base. 
  4. Use foam adhesive squares to attach the combined eyes to the combined Frankenstein head. Glue the combined Frankenstein head to the coordinating shape on the box base. Using a piece of foam adhesive square, attach the small part of the tie knot to the tie base.
  5. Glue the green back of the head shape and remaining hands to the full Frankenstein figure. Attach the combined tie to the front of the box base.
  6. Flip the box base over (pretty side down). Fold the score lines. Apply glue to the two side tabs. Fold the bottom section up to meet the tabs creating a box. Hold until dry.


7. Apply glue to the small horizontal tab. Tuck under Frankenstein figure enclosing the box.
8. Apply glue to the back of the box base and attach the combined full figure.
9. This is what it should look like:)
10. Attach the green oval feet with foam adhesive squares.


Tuesday, October 18, 2022

Alien Treat Egg Holder


Alien Treat Egg Holder -JMR


Approximate size: H 5” X W 2.5” X D 2.5”


This easy to construct alien treat egg holder is compatible with both 8X12 and 12X12 mats and is sized to hold a Kinder Joy chocolate egg. 


You can purchase the Silhouette design file here: https://www.silhouettedesignstore.com/artists/485222


You can purchase the SVG and Cricut compatible file here:https://www.jamieandjenn.com

  Coming Soon:)


  1. Cut the design pieces. I used double sided card stock.
  2. Glue the alien eyes with cutouts to the coordinating base solid eye shape; centering it. Glue the Green half alien face with cut outs to the white half alien face with cute outs and teeth; centering and aligning at the top.
  3. Ignore this image- This image shows the box base and full figure flipped over. Do NOT glue the full figure to the box base at this point. I discovered during assembly that it is easier to glue it onto the back after assembly. This tutorial shows it glued into place. My mistake. 
  4. Using foam adhesive squares, attach the full alien head to the cording shape on the front of the box base.
  5. Glue the combined eyes and pink inside of the mouth into place.
  6. Using pieces of foam adhesive squares, attach the hands, combined half face, and antennas to the coordinating shapes on the box base.
  7. This is what it should look like:)
  8. Flip the box base over. Fold the score lines inward.


  1. Apply glue to the two side tabs. Fold the bottom section up to meet the tabs creating a box. Hold until dry.
  2. Apply glue to the small horizontal tab. Tuck under the alien figure enclosing the box.
  3. Image of tucking the tab.
  4. Image of tucking the tab.
  5. Match up the full figure to the backside of the box base making sure the top matches. Apply glue and attach to the back of the box base.
  6. This is what it should look like:)


Thursday, June 30, 2022

Campfire Smores


This file comes with the design shown. The design can be sized to fit your needs and is compatible with the 8x12 and 12x12 mats. Perfect for creating cards, layouts, shirts, totes, wood signs, wall art, vinyl, and more!


Tuesday, October 1, 2019

Yellow Cat Handle Basket


Yellow Cat Handle Basket- JMRush 
Approximate Box size: H 2.50” X W 3” X D 2.50”
Approximate Design size: W 3.75” X H 5.5” including handle

This cute basket design is a perfect container for treats for your favorite feline or a small gift for your veterinarian. This design is compatible with both 8X12 and 12X12 mats.


You can purchase the Silhouette design file here: https://www.silhouettedesignstore.com/artists/485222


You can purchase the SVG and Cricut compatible file here: https://www.jamieandjenn.com 

  1. Cut design pieces. ( I used double sided card stock) 
  2. Glue the fury bottom piece to the coordinating shape on the lower section of the basket base. Glue the other fury chest piece to the coordinating shape on the upper section of the basket base. Glue the cat head shape with cut outs to the solid black cat head shape. Glue the smaller solid paws and feet to the larger solid feet and paws.
  3. Glue the small rounded muzzle pieces to the muzzle base ( that has a coordinating shape plus a long vertical line). Glue the small triangular face markings to either side of the combined cat head. Glue the inner ear pieces to the combined cat head. Glue the collar and collar tag to the combined cat head. Glue the feet pieces that  have cutouts to the combined feet.
  4. Glue the combined muzzle piece to the combined cat head. Use a small piece of foam adhesive square to attach the nose.
  5. Use foam adhesive squares to attach the combined head to the coordinating shape on the basket base. use foam adhesive squares to attach the front paws to the basket.
  6. Flip the combined basket over. Fold the basket base at the score lines. Apply glue to the top two tabs on the basket base and secure to the rounded shape above.
  7. Apply glue to the bottom two tabs on the basket base and secure to the head shape above creating a box.
  8. Use foam adhesive squares to attach the feet and the tail to the back of the basket.
  9. Insert the handle on either side of the basket.
  10. I used enamel dots to accentuate the eyes and added a ribbon.
  11. Use three small lengths of thread and apply hot glue to one of the groups of ends. Attach underneath the nose. Repeat for the other side:)


Frankenstein Handle Basket


Frankenstein Handle Basket- JMRush 
Approximate Box size: H 2.50” X W 3” X D 2.50”
Approximate Design size: W 5” X H 5.5” including handle

This cute basket design is a perfect container for Halloween party favors. This design is compatible with both 8X12 and 12X12 mats.


You can purchase the Silhouette design file here: https://www.silhouettedesignstore.com/artists/485222

You can purchase the SVG and Cricut compatible file here: https://www.jamieandjenn.com


  1. Cut design pieces. ( I used double sided card stock) 
  2. Glue the rounded bottom (black) piece to the coordinating shape on the lower section of the basket base. Glue the eyes (white) to the coordinating eye shape (black).
  3. Attach the combined eye shapes to rectangle head shape with foam adhesive squares. Glue the scar, mouth, bow tie, and bolt shapes to the combined head shape.
  4. Attach the head to the coordinating shape on the upper section of the basket.
  5. Use a small piece of foam adhesive to attach the small silver bolt tops to the coordinating shape on the head.
  6. Flip the combined basket over. Fold the basket base at the score lines. Apply glue to the top two tabs on the basket base and secure to the rounded shape above.
  7. Apply glue to the bottom two tabs on the basket base and secure to the head shape above creating a box.
  8. Using foam adhesive squares, attach the hands to the front of the basket. I used a ribbon on top of the bow tie. I used enamel dots to accentuate the eyes.
  9. Use foam adhesive squares to attach the feet on the back of the basket.
  10. Insert the handle on either side of the basket:)

Monday, April 2, 2018

Peony Flower


Peony Flower-JMRush
Approximate size: H 1.50” X W 3” X D 3.50”

This design is compatible with both 8X12 and 12X12 mats.

You can purchase the Silhouette design file here: https://www.silhouettedesignstore.com/artists/485222

You can purchase the SVG and Cricut compatible file here:https://www.jamieandjenn.com  Coming Soon:)

  1. Cut the design pieces. I used double sided card stock.
  2. Curve pieces as you like.
  3. Apply glue to the backside center of the middle row of flowers and attach to the center of the slightly larger flowers to the left; centering them and alternating the petals. Glue the backside center of the smaller stamen section to the center of the larger one. Apply glue to the backside center of the smaller 4 petal flower section and attach to the larger 4 petal section; centering and alternating petals.
  4. Apply glue to the backside center of the second to the largest combined flower section and attach it to the center of the largest combined flower section; alternating petals. Apply glue to the back center of the combined stamen and attach to the combined 4 petal section.
  5. Apply glue to the back center of the combined 4 petal/stamen piece and attach to the center of the smaller combined flower grouping.
  6. Apply glue to the back center of the combined 4 petal/stamen flower groping and attach to the center of the larger combined flower grouping; centering and alternating petals.
  7. Use a foam adhesive square to attach the leaves.
  8. Adjust the flower petals as you like:)


Tuesday, March 27, 2018

Easter Egg Holder


Easter Egg Holder-JMRush
Approximate size: H 4.75” X W 2.5” X D 2.5”

These easy to construct Easter egg holders are compatible with both 8X12 and 12X12 mats.


You can purchase the Silhouette design file here: https://www.silhouettedesignstore.com/artists/485222

You can purchase the SVG and Cricut compatible file here:https://www.jamieandjenn.com  Coming Soon:)


  1. Cut the design pieces. I used double sided card stock.
  2. Glue the animal head with cutouts to the shape at the top of the box base; centering it.
  3. Fold the box base. Glue the feet to the feet bases; centering them.
  4. Flip the box base over. Apply glue to the side tabs and secure the bottom panel; aligning at the edges.
  5. Apply glue to the last tab and tuck under the animal shape;align at the edge.
  6. Image of the backside. Apply glue to the backside of the solid animal shape and secure to the backside of the combined box base; centering it.
  7. Use a foam adhesive square to attach the tail. (and beak of the chick file)
  8. Flip to the front of the combined box. Glue the combined feet to the front. Finish with ribbon:)

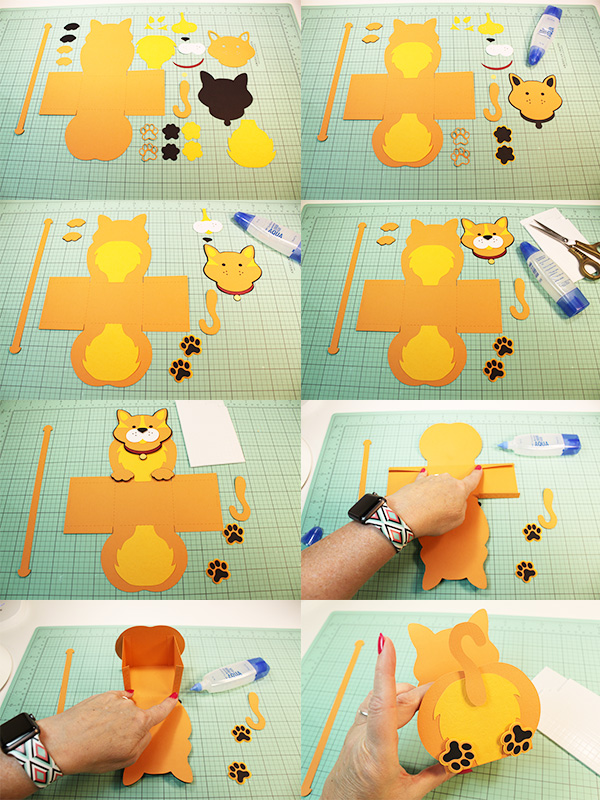
  1. Cut the design pieces. I used double sided card stock.
  2. Glue the animal head with cutouts to the coordinating base head shape; centering it. Glue the hooves to the bottom of the feet local base pieces. Fold the box base.
  3. Flip the box base over. Apply glue to the side tabs and secure the bottom panel; aligning at the edges.
  4. Apply glue to the last tab and tuck under the animal shape;align at the edge.
  5. Image of the backside. Apply glue to the backside of the solid animal shape and secure to the backside of the combined box base; centering it.
  6. Use a foam adhesive square to attach the tail, to attach the cut out swirl wool piece to it’s coordinating base, and to the backside of the nose piece.
  7. Flip to the front of the combined box. Use foam adhesive squares to attach the combined wool piece to the combined animal face and the nose to the combined head.
  8. Glue the combined feet to the front and use foam adhesive squares to attach the combined head to the front of the box base.  Finish with ribbon:)

Wednesday, March 21, 2018

Stitched Bird Baby Advice Book


Stitched Bird Baby Advice Book-JMRush
Approximate size: H 4.50” X W 6.75”

This cute baby advice book includes a front and back book cover and bird shaped newborn advice cards that coordinate with the love bird nest baby shower collection. The book covers can be joined with small book rings or ribbon. This file is compatible with both 8X12 and 12X12 mats.

You can purchase the Silhouette design file here: https://www.silhouettedesignstore.com/artists/485222

You can purchase the SVG and Cricut friendly file here:https://www.jamieandjenn.com Coming Soon:)


  1. Cut the design pieces. (You will need to cut the (beige) bird design with two holes multiple times as they are the advice cards.)
  2. Glue the Bird design with stitch marks to the top of the coordinating solid bird silhouette;centering it. Glue the stitched wing to it’s coordinating solid wing base; centering it. Glue one of the bird advice cards (two holes) to the backside of the other solid bird;centering it.
  3. Apply glue to the backside of the combined wing just on the rounded side. Apply an adhesive square to the other side and attach to the combined stitched bird; aligning at the feather tips. 
  4. You can insert the book rings, ribbon, or twine into the back combined cover.
  5. Use one of the bird advice cards and glue the backside of the combined stitched bird to it; centering it. Place the remaining bird advice cards on the book rings.
  6. This is what it should look like:)
  7. I finished by placing an adhesive dot for the eye and a ribbon.
  8. The book rings can easily be opened to pass out the advice cards and reinserted once the cards are collected:)

Tuesday, March 13, 2018

Love Birds Nest Cupcake Toppers


 Love Birds Nest Cupcake Toppers-JMRush
Approximate size Birds: H 3" X W 2.25”
Approximate size Birdcage: H 2.50" X W 1.50”
Approximate size Egg: H 2.50 X W 1.75”
Approximate size Egg Nest: H 1.50 X W 2.50”
Approximate size Flower Group: H 2.25 X W 2.25”
Approximate size Single Flower: H 2.25 X W 2.25”

These Print and Cut Cupcake Toppers have a backing that is sized for a toothpick to be inserted in the back and are compatible with both 8X12 and 12X12 mats.

You can purchase the Silhouette design file here: https://www.silhouettedesignstore.com/artists/485222

You can purchase the SVG and Cricut compatible file here:https://www.jamieandjenn.com  Coming Soon:)
  1. Print the colored design and then cut the design. Cut the single colored base pieces.
  2. Insert toothpicks into the single colored base pieces as shown.
  3. Apply glue to the backside of one the base piece. Attach the coordinating shape aligning at the edges until secure.
  4. Repeat for the remain pieces.
  5. Image of the backside of a completed cupcake topper.
  6. Finish with ribbon if you like:)


Wednesday, January 24, 2018

Dahlia Flower Tea Light


Dahlia Flower Tea Light (Flameless)-JMRush
Approximate Dimensions: W 4” x D 4” X H 2”

This design is compatible with both 8X12 and 12X12 mats and is used with a flameless battery operated tea light candle. 

You can purchase the Silhouette design file here: https://www.silhouettedesignstore.com/artists/485222

You can purchase the SVG and Cricut friendly file here:https://www.jamieandjenn.com Coming Soon:)
  1. Cut design pieces. (I used double sided card stock paper) I used a darker red color card stock for the 4 largest petal layers.
  2. Curve the flower petals. Fold the tabs on the flower base.
  3. Tuck the end tab into the slot creating a circular tube shape. Secure with a small dab of glue. Glue the 6 flower petal sections together; Largest on bottom to smallest on top and alternating petals. I did this by applying glue to the backside around the circumference of each flower layer.
  4. Place the narrow circular ring pieces over the tube shape you just created.
  5. Apply glue to the outside of one of the rows of tabs and secure to the narrow ring.
  6. Apply glue to the tops of the ring and tabs.
  7. Secure the thicker circular ring to the top.
9. Place a flameless votive candle inside the tube. Apply glue to the outside of the tabs and secure to the narrow ring.(repeating the steps above)
10. Apply glue to the tops of the ring and tabs. Secure the thicker circular ring to the top.
11. Fold the tabs of one of the two large flower petal piece down. Fold the other large flower’s tabs up.
12. Apply glue to the outside of the tabs on the downward tabs and combine with the other large center combined flower petal securing each of the tabs together.
13. Apply glue to the bottom center of the combined large flower piece and attach to the lantern base piece.
14. Apply glue to the center backside of the combined flower petal grouping and attach to the center of the combined lantern, alternating the petals. Apply light pressure until dry:)

Wednesday, November 1, 2017

Llama Treat Box


 Llama Treat Box- JMRush 
Approximate size: W 3.25” X H 7.75” X D 3.50”
Approximate box size: W 2” X H 2.25” X D 3.25”

This cute Llama treat box can be used to hold small party favor treats and is compatible with both 8X12 and 12X12 mats. 

You can purchase this Silhouette design file or SVG bundle here: https://www.silhouettedesignstore.com/artists/485222


You can purchase this Cricut compatible SVG design file here: https://www.jamieandjenn.com


1. Cut design pieces. ( I used double sided card stock) This file contains a tail piece that is not shown in the tutorial. 
2.  Fold the box base. Glue the solid llama silhouette to the larger llama silhouette; centering it and aligning at the bottom. Glue the long llama face/neck silhouette to the larger llama face/neck; centering it and aligning at the bottom. Glue the backside to the larger backside piece. Glue the party hat (pink) piece to the solid party hat piece (Gold).
3.  Apply glue to the two tabs I’m pointing to on the box base. Attach to the panel directly above and directly below. Glue the small black hooves to the combined llama and combined llama backside. Glue the nose/mouth piece to the muzzle. 
4. Glue the pink harness piece to the combined muzzle. Apply glue to the tabs where the glue bottle and my finger are pointing ( I need another set of hands sometimes;) and secure tucking the side tab into the inside of the box you just created.
5. Image of the side tab being secured into the inside of the box.
6. Use foam adhesive squares to attach the combined muzzle and top notch hair piece to the combined long face/neck llama. Glue the eye lashes into place.


7. Use foam adhesive squares to attach the combined long face/neck piece to the larger combined llama silhouette. Glue the tips of the ears of the combined face/neck to the combined larger llama silhouette. Attach the combined party hat to the combined llama with glue.
8. Apply glue to the narrow side of the box. Attach to the backside of the llama combined backside; aligning just above the center opening in between the llamas legs and centering it. Allow to dry.
9. Apply glue to the other narrow side of the box. Attach to the backside of the llama combined font side; aligning just above the center opening in between the llamas legs and centering it. 
10. You may want to flip your llama over to make sure you have the box aligned properly. Allow to dry. Attach the tail with a foam adhesive square on the backside.
11. Finish by filling your llama with goodies and with a ribbon on his neck:)