Showing posts with label Paper Piecing. Show all posts

Thursday, April 16, 2020

Rainbow Heart Clouds


Rainbow Heart Clouds-JMR

This cute Rainbow is a sizable and is compatible with both 8X12 and 12X12 mats. 
You can purchase the Silhouette design file here: https://www.silhouettedesignstore.com/artists/485222

You can purchase the SVG and Cricut compatible file here: https://www.jamieandjenn.com  Coming Soon:)


1.Cut design pieces. (I used double sided card stock)
2. Glue the colored curves to the rainbow base.
3. Using foam adhesive squares, attach the largest hearts to either side aligning with the rainbow base.
4. Using foam adhesive squares, attach two of the small hearts to either side of the large heart; aligning with the rainbow base.
5. Using foam adhesive squares, attach the middle sized heart to the center aligning with the rainbow base:)


Wednesday, November 21, 2018

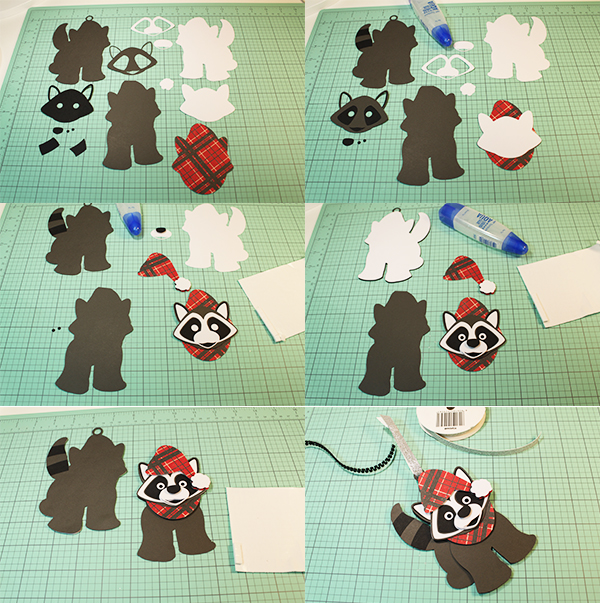
Winter Raccoon Gift Tag Ornament


Winter Raccoon Gift Tag Ornament-JMR
Approximate size: H 5.25” X W 4”

This design can be used as a gift tag and ornament and is compatible with both 8X12 and 12X12 mats. 
You can purchase the Silhouette design file here: 

You can purchase the SVG and Cricut compatible file here:https://www.jamieandjenn.com  Coming Soon:)

1. Cut design pieces. I used double sided card stock. (The hat piece is missing from the first two images..sorry:)
2. Glue the solid face to the hat scarf piece. Glue the face piece with large eye holes to the coordinating shape with smaller eye holes. Glue the hat tail stripe design pieces to the coordinating shapes on the tail.
3. Attach the nose to the muzzle piece using a foam adhesive square. Use foam adhesive squares to attach the puff ball shape to the hat piece. Glue the combined face piece to the combined scarf/hat piece. Glue the eye outline piece (white) to the combined scarf/hat piece. 
4. Glue the combined muzzle piece to the combined scarf/hat piece. Flip the raccoon tag base over and glue the coordinating shape label (white) to the backside;centering it. Flip it back over. Use a foam adhesive square to attach the muzzle to the combined hat/face pie and glue the tiny eyeballs into place.
5. Use a foam adhesive square to attach the combined hat piece to the combined hat/face piece. Use foam adhesive squares to attach the combined Hat/Face piece to the raccoon body with two legs.
6. Use foam adhesive squares to attach the combined smaller body piece to the larger one. Loop a ribbon through the top circular hole and tie. I used adhesive enamel dots to accentuate the eyes:)

Monday, April 17, 2017

Summer Beach Flower


Summer Beach Flower-JMRush
This design is compatible with both 8X12 and 12X12 mats.


You can purchase this design here: https://www.silhouettedesignstore.com/artists/485222

You can purchase the SVG and Cricut file here:


  1. Cut design pieces. I used double sided card stock.
  2. Glue the smaller flower shape to the larger one centering it. Curve the leaf shape as you like. Glue the open circle to it;s coordinating solid shape.
  3. Curve the combined flower petals. Glue the combined circle to the center of the combined flower. Use a foam adhesive square to attach the combined flower to the leaf shape. I finished by adding an adhesive jewel to the center:)

Thursday, April 21, 2016

Baseball Treat Box Two Ways


Baseball Treat Box Two Ways-JMRush
Approximate Box size: W 3” X D 2.5” X H 2.5” (H 5.5” with Handle)

This Treat box features a Baseball Bat shaped handle, a print and cut baseball design, and a paper piecing baseball. This file is compatible with both 8X12 and 12X12 mats. 


1. Cut design pieces.
2. Fold the score lines on the box base.
3.  Apply glue to the bottom of the top two tabs. Secure to the circular shape just above the tabs.
4. Apply glue to the tabs just below.  Secure to the circular shape just below the tabs.
5. You now have a box shape. Glue the baseball bat shape to the bat shaped handle. Use a foam adhesive square to attach the print and cut baseball or the paper piecing baseball to each side.
6. Insert the handle tab through the top slot on the side of the box. Repeat for the other side.
7.-8. Finish with a ribbon and fill with goodies:)


How to use the print and cut feature:)


Paper Piecing Baseball:)