Wednesday, October 25, 2017

Pumpkin 3D Stand Up


Pumpkin 3D Stand Up- JMRush 
Approximate size: W 2.75” X H 3.5”

This cute pumpkin decoration stands independently. This design is compatible with both 8X12 and 12X12 mats.  
You can purchase this Silhouette design file or SVG bundle here: https://www.silhouettedesignstore.com/artists/485222

1. Cut design pieces. ( I used double sided card stock) 
2. Fold each of the 12 identical pumpkin shapes at the score lines.
3. -5. Apply glue to the backside of one side of the folded identical pumpkin shapes. Line up the back of another identical pumpkin shape and align at the edges. Continue this step until 6 the pumpkin shapes have been joined.
6.-8 Repeat this process for the remaining 6 identical pumpkin shapes ( you will have two groupings) Apply glue to the backside of one of the combined pumpkin shapes and attach to the full pumpkin silhouette with a stem; aligning at the bottom edge:) Repeat this process for the remaining pumpkin shape grouping on the backside of the full pumpkin stem silhouette.

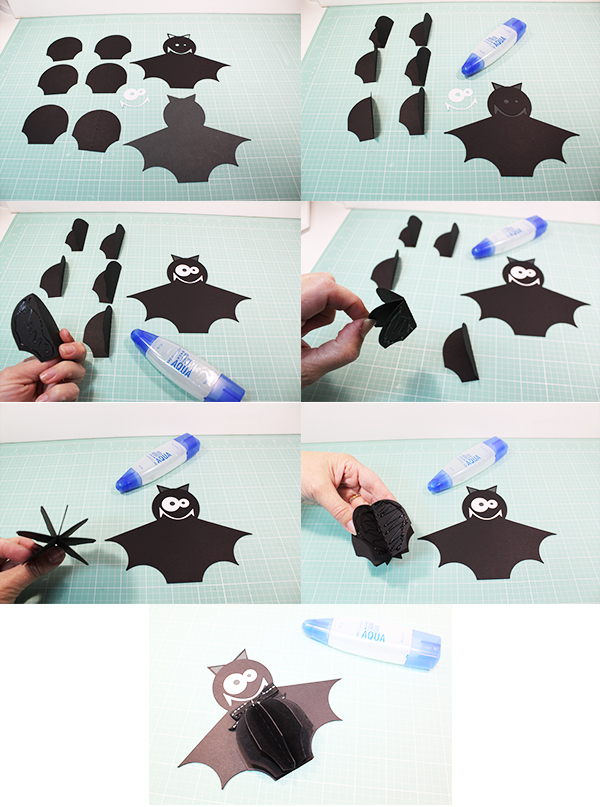
Bat 3D Stand Up


Bat 3D Stand Up- JMRush 
Approximate size: W 6.5” X H 5.25”

This cute bat decoration stands independently. This design is compatible with both 8X12 and 12X12 mats. 
You can purchase this Silhouette design file or SVG bundle here: https://www.silhouettedesignstore.com/artists/485222

1. Cut design pieces. ( I used double sided card stock) 
2. Fold each of the 6 tummy shapes at the score lines. Glue bat piece with a face to the solid bat silhouette base.
3. -5. Glue the eyes and mouth into place. Apply glue to the backside of one side of the folded tummy shapes. Line up the back of another tummy shape and align at the edges. Continue this step until all the tummy shapes have been joined.
6. Apply glue to the backside of the combined tummy shapes. Attach to the combined bat; aligning at the bottom edge:)
7. Finish with a ribbon and adhesive enamel dots to accentuate the eyes:)

Frankenstein Open Mouth Treat Box


Frankenstein Open Mouth Treat Box-JMRush
Approximate Size: W 3.75” x D 1.25”x H 4.25”
Approximate Box size: W 2.5” x D 1 x H 4” 

This box opens by lifting the character’s head to to expose the opening to the treat box. This simple to construct design would be perfect to hold your goodies for Halloween parties. This design is compatible with both 8X12 and 12X12 mats. 

You can purchase this Silhouette design file or SVG bundle here: https://www.silhouettedesignstore.com/artists/485222


1. Cut the design pieces. ( I used double sided card stock)
2. Glue the green Frankenstein head with eye cut outs to it’s coordinating solid base on the flip piece (long shape with a cut out oval and screws on either side);aligning with at the edges and at the eye holes. Fold the score lines on the box base.
3.-4 Apply glue to the two small vertical side tabs at the bottom of the box base. Secure the two small vertical side tabs to the 1 inch (width) rectangles just above them. 
5. Apply glue to the very left corner of the horizontal tab just below the two side tabs that you just glued. ( My finger is pointing to the section in the photo:) Secure this corner to the vertical tab to the left.
6. Apply glue to the topside of the vertical and horizontal panel. Secure the final panel creating a complete box.
7.-8. Flip the long flip piece over ( so the backside is showing). Apply glue to the entire piece and attach the white piece with an oval cut out to it’s matching shape and the white piece with teeth to it’s coordinating shape. 
9. Apply glue to the backside of the green rectangle with teeth cut outs and attach to the coordinating shape on the combined flip piece. Glue the silver screws to each side at the coordinating shapes on the combined flip piece.
10. Secure the tab on the box base by tucking the tab on the inside of the box and feeding it through the slot. (Apply glue to the underside of the tab and secure to the box if you wish)
11.-12. Flip the box base over and glue the combined flip piece; aligning the oval cut outs in the middle.
13.-14. Close the combined flip piece. Glue the scar and long rectangle eyebrow piece into place. Use small pieces of foam adhesive square to attach the small long oval screw head pieces to each side. Fill with candy:)


Ghost 3D Stand Up


Ghost 3D Stand Up- JMRush 
Approximate size: W 3.25” X H 5”

This cute ghost decoration stands independently. This design is compatible with both 8X12 and 12X12 mats.
You can purchase this Silhouette design file or SVG bundle here: https://www.silhouettedesignstore.com/artists/485222

1. Cut design pieces. ( I used double sided card stock) 
2. Fold each of the 6 tummy shapes at the score lines. Glue ghost piece with a face to the solid ghost silhouette base.
3. -5. Apply glue to the backside of one side of the folded tummy shapes. Line up the back of another tummy shape and align at the edges. Continue this step until all the tummy shapes have been joined.
6. Apply glue to the backside of the combined tummy shapes. Attach to the combined ghost; aligning at the bottom edge:)

Vampire 3D Stand Up


Vampire 3D Stand Up- JMRush 
Approximate size: W 3” X H 5.5”

This cute vampire decoration stands independently. This design is compatible with both 8X12 and 12X12 mats.
You can purchase this Silhouette design file or SVG bundle here: https://www.silhouettedesignstore.com/artists/485222


1. Cut design pieces. ( I used double sided card stock) 
2. Fold each of the 6 tummy shapes at the score lines ( notice that there are 2 with a foot shape on one side) Glue the face to the vampire silhouette base; aligning at the ears. Glue the large collar just underneath the face on the vampire silhouette.
3. -6. Apply glue to the backside of one side of the folded tummy shapes. Line up the back of another tummy shape and align at the edges. Continue this step until all the tummy shapes have been joined; making sure that the right foot tummy shape is on the right and the left foot shape is on the left.
7. Using small pieces of foam adhesive square, attach the bowtie to the combined vampire.
8. Make sure the right foot of the joined tummy shape is on the right and the left foot is on the left then apply glue to the backside. Attach to the combined vampire; aligning at the feet and the bottom edge.
9. This is what he should look like:)
10. I used ribbon to make a slightly smaller bow tie and attached it with glue:)