Tuesday, November 27, 2018

Polar Bear Basket


Polar Bear Basket-JMR
Approximate Box size: H 2.50” X W 3” X D 2.50”
Approximate Design size: H 5.75” X W 4.5” including handle

This basket design is a perfect container for candies or small party favors. This design is compatible with both 8X12 and 12X12 mats.

You can purchase the Silhouette design file here: https://www.silhouettedesignstore.com/artists/485222

You can purchase the SVG and Cricut compatible file here:https://www.jamieandjenn.com  Coming Soon:)


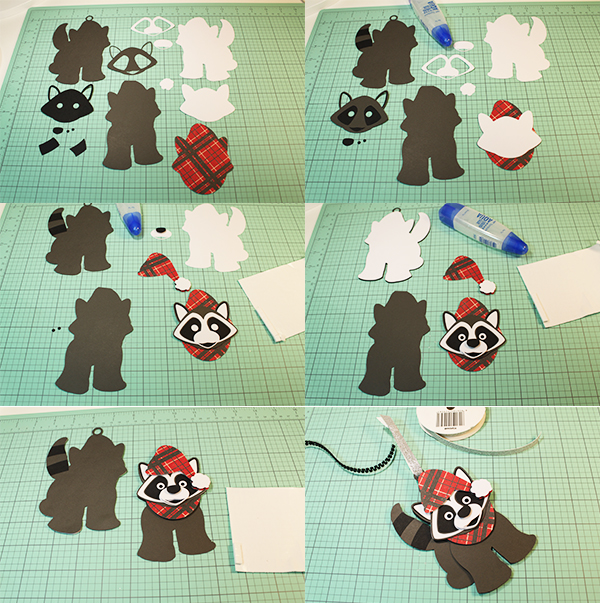
1. Cut design pieces. ( I used double sided card stock) 
2. Flip the basket base over. Fold the basket base at the score lines. Glue the feet (with cut outs) to the solid feet bases.  Glue the two mittens to the coordinating shape of the full mitten pieces.
3.  Apply glue to the two top tabs of the box base and secure them to the top (head) panel. Apply glue to the bottom two tabs and secure them to the bottom panel creating a box.
4. Using foam adhesive squares, attach the combined feet and the tail to the back side of the basket.
5. Glue the large hat piece to the backside of the front of the basket; pretty side facing forward.
6. Using pieces of foam adhesive squares; attach the hat brim piece to the front of the basket.
7. Attach the nose to the oval muzzle and then attach the combined muzzle to the front of the basket using foam adhesive squares.
8. Apply glue to the outer edges (left and right) of the backside of the scarf piece and glue to the front of the basket (covering part of the combined muzzle). Glue the eyes into place.


9. I used adhesive jewels to accentuate the eyes. Using foam adhesive squares; attach the combined mittens and the poof ball to the hat.
10. Insert the handle into the slots on each side of the basket.

11. Finish with a ribbon:)

Monday, November 26, 2018

Christmas Tree Hanging Tea Light Lantern

Christmas Tree Hanging Tea Light Lantern (Flameless)-JMRush
Lantern size: W 2.5 x D 2.5 x H 5”


This Flameless Hanging Tea Light Lantern features cut outs and when vellum paper is used, a layered transparent frosted glass effect is created. This lantern has a secure bottom that allows it to be hung and still allows access to the tea light on/off switch. This design is compatible with both 8X12 and 12X12 mats. A complete step by step picture tutorial can be found on my blog:https://jmrushdesigns.blogspot.com/2017/11/hanging-tea-light-lantern.html


You can purchase the Silhouette design file here: https://www.silhouettedesignstore.com/artists/485222

You can purchase the SVG and Cricut compatible file here:https://www.jamieandjenn.com  Coming Soon:)

Merry Card


Merry Card-JMR
Approximate Card size: 4.25” x 5.5” 

This design is compatible with both 8X12 and 12X12 mats.

You can purchase the Silhouette design file here: https://www.silhouettedesignstore.com/artists/485222

You can purchase the SVG and Cricut compatible file here:https://www.jamieandjenn.com  Coming Soon:)


1.Cut design pieces. I used Double sided card stock.
2. Fold the card along score lines. Fold the leaves at the score marks. Glue the small “Merry” font to the larger “Merry” font; centering it.
3.- 5. Apply glue the bottom of the rounded end of the leaves and attach to the merry/leaf base. Glue the large round holly with cut out to the holly base. 
6. Attach the smaller round holly pieces to the holly base with foam adhesive squares.
7. Glue the combined holly to the Merry/leaf combined base. Using pieces of adhesive foam square, attach the combined merry to the coordinating shape on the merry/leaf base.
8. Finish with a ribbon:)

Wednesday, November 21, 2018

Black Friday 2018 Sale @ jamieandjenn.com :)

Winter Raccoon Gift Tag Ornament


Winter Raccoon Gift Tag Ornament-JMR
Approximate size: H 5.25” X W 4”

This design can be used as a gift tag and ornament and is compatible with both 8X12 and 12X12 mats. 
You can purchase the Silhouette design file here: 

You can purchase the SVG and Cricut compatible file here:https://www.jamieandjenn.com  Coming Soon:)

1. Cut design pieces. I used double sided card stock. (The hat piece is missing from the first two images..sorry:)
2. Glue the solid face to the hat scarf piece. Glue the face piece with large eye holes to the coordinating shape with smaller eye holes. Glue the hat tail stripe design pieces to the coordinating shapes on the tail.
3. Attach the nose to the muzzle piece using a foam adhesive square. Use foam adhesive squares to attach the puff ball shape to the hat piece. Glue the combined face piece to the combined scarf/hat piece. Glue the eye outline piece (white) to the combined scarf/hat piece. 
4. Glue the combined muzzle piece to the combined scarf/hat piece. Flip the raccoon tag base over and glue the coordinating shape label (white) to the backside;centering it. Flip it back over. Use a foam adhesive square to attach the muzzle to the combined hat/face pie and glue the tiny eyeballs into place.
5. Use a foam adhesive square to attach the combined hat piece to the combined hat/face piece. Use foam adhesive squares to attach the combined Hat/Face piece to the raccoon body with two legs.
6. Use foam adhesive squares to attach the combined smaller body piece to the larger one. Loop a ribbon through the top circular hole and tie. I used adhesive enamel dots to accentuate the eyes:)

Polar Bear Gift Tag Ornament

Polar Bear Gift Tag Ornament-JMR
Approximate size: H 5.50” X W 3.5”

This design can be used as a gift tag and ornament and is compatible with both 8X12 and 12X12 mats. 

You can purchase the Silhouette design file here: https://www.silhouettedesignstore.com/artists/485222

You can purchase the SVG and Cricut compatible file here:https://www.jamieandjenn.com  Coming Soon:)


  1. Cut design pieces. I used double sided card stock.
  2.  Glue the circular bear face with eye holes to the coordinating solid shape. Glue the nose muzzle piece to it’s solid coordinating shape base piece. Glue the hat design piece to it’s coordinating hat shape piece.
  3. Use foam adhesive squares to attach the two leg bear silhouette to the full bear silhouette shape. Use foam adhesive squares to attach the nose to the combined muzzle piece, The combined muzzle to the combined face, and the hat puff ball to the end of the combined hat.
  4. Glue the head /scarf piece to the combined body as shown.
  5.  Loop a ribbon through the circular hanger ay the top and use foam adhesive squares to attach the combined head to the combined body. 
  6.  Use foam adhesive squares to attach the combined hat to the combined body. I used adhesive jewels to accentuate the eyes:)

Winter Fox Gift Tag Ornament


Winter Fox Gift Tag Ornament-JMR
Approximate size: H 5” X W 3.75”

This design can be used as a gift tag and ornament and is compatible with both 8X12 and 12X12 mats.


You can purchase the Silhouette design file here: https://www.silhouettedesignstore.com/artists/485222

You can purchase the SVG and Cricut compatible file here:https://www.jamieandjenn.com  Coming Soon:)

1. Cut design pieces. I used double sided card stock.
2. Glue the head piece with eye cut outs to the coordinating solid head piece. Glue the head/scarf piece to the coordinating shape on the two legged fox silhouette. Flip the tag base over and glue the coordinating (white) label full fox body to it; centering it.
3. Flip the tag base back over and attach the combined two leg fox silhouette to the base using foam adhesive squares. Glue the small face to the combined fox head. Glue the nose to the combined fox head.
4. Use foam adhesive squares to attach the combined fox head
to the coordinating shape on the fox base. Loop a ribbon through the circular hole at the top and tie. I used adhesive enamel dots to accentuate the eyes:)