Showing posts with label Window. Show all posts

Friday, December 9, 2016

Christmas Bulb Window Card


Christmas Bulb Window Card- JMRush 
Approximate Card size: H 5.50” X W 4.25”

This design is compatible with both 8X12 and 12X12 mats.

You can purchase the Silhouette design file here: https://www.silhouettedesignstore.com/artists/485222


1. Cut design pieces. (I used vellum paper for the inside window piece and reflective paper for the inside full circle shape of the ornaments)
2. Fold the card base at the score lines. Glue solid rectangle to the back of the full window piece; centering it around the window openings. Glue the smaller solid circles to the larger ornament bases. Fold the leaves in half(ish)…making sure that the leaves alternate.
3. Glue the circle pieces with cuts in them to the combined ornament pieces.  Apply glue the the backside of the combined window and attach the solid full window shape (shown in black).
4. Use pieces of foam adhesive squares to attach the smaller window to the font of the combined window; aligning the rectangle openings.
5. Glue the backside of two of the folded leaves to the front of the combined window; one of wither side of the window- staying inside the the window box area.
6. Glue the backside of the third folded leaf piece in the center of the other two.
7. Using foam adhesive squares, attach the three combined ornaments to the inside of the leaves.
8. Glue the inside center bases of the top layer of leaves to the combined ornaments; leaving the leaves free.
9. Apply glue to the backside side edges of the window box piece ( where my fingers are pointing) and use two foam adhesive squares in beside each glue point.
10. Flip the window box piece back over and secure to the combined window; securing the edges until they dry.
11. Use foam adhesive squares to attach the combined window to the card base.
12. Finish with a ribbon:)

Monday, March 14, 2016

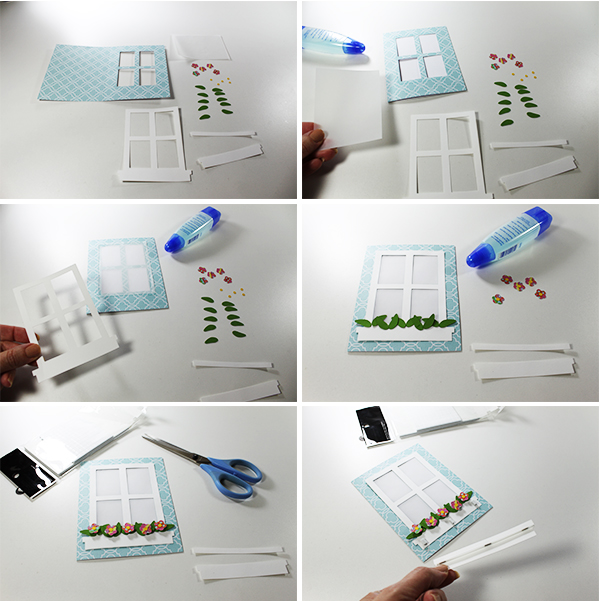
Spring Flower Box Window Card

Spring Flower Box Window Card-JMRush
Approximate Card size: H 5.50” X W 4.25”


This design is compatible with both 8X12 and 12X12 mats. This card uses an optional vellum piece in the window to create a glass effect. 
1. Cut design pieces.
2. Fold the card base. Glue the square vellum piece to the front of the window cut out of the front of the card base (aligning it close to the top of the cut outs).
3. Glue the window on top of the vellum piece.
4. Glue the leaves in the flower box section of the window.
5. Use pieces of foam adhesive squares to attach the flowers to the leaves.
6. Use pieces of foam adhesive squares to attach the planter box and then again for the ledge of the planters box. Finish with enamel adhesive dots in the center of each flower:)

Friday, December 18, 2015

Christmas Lightbulb Window Picture Frame


Christmas Lightbulb Window Picture Frame - JMRush  Frame Dimensions: W5” x H 6.25”


This Christmas themed frame features a fold out stand and is sized for four “exchange” or “mini” sized (1.75 x 2.5”) pictures. Black thread is needed for the wire look of this design. 


  1. Cut design pieces.
  2. Separate the kickstand.
  3. Apply glue to the front of the kickstand piece. Center and attach the solid frame piece making sure that the kickstand does not get glued down.
  4. Apply glue down the center line going across the backside of the window piece. Apply glue to the very center line going up and down the backside of the window piece. ( Your glue should be in a cross shape). Make sure that the edges on the left and right do not get glued down so that you can insert photos:). Glue the very top and very bottom of the backside horizontally. Center and secure to the front of the combined frame pieces.
  5. You can insert photos on either side:)
  6. Using foam adhesive squares, center and attach the window box piece to the front bottom of the frame. Using foam squares again, attach the window box trim piece.
  7. Glue the lightbulbs to their solid bases.
  8. Glue the small plug in detail to the lightbulbs.
  9. Layout the lightbulbs as you like.
  10. Using black sewing thread, weave around the lightbulbs as you glue them into place. ( I changed the color of the frame..sorry. The beige frame was just not working for me;)