Showing posts with label Thank You. Show all posts

Tuesday, October 1, 2019

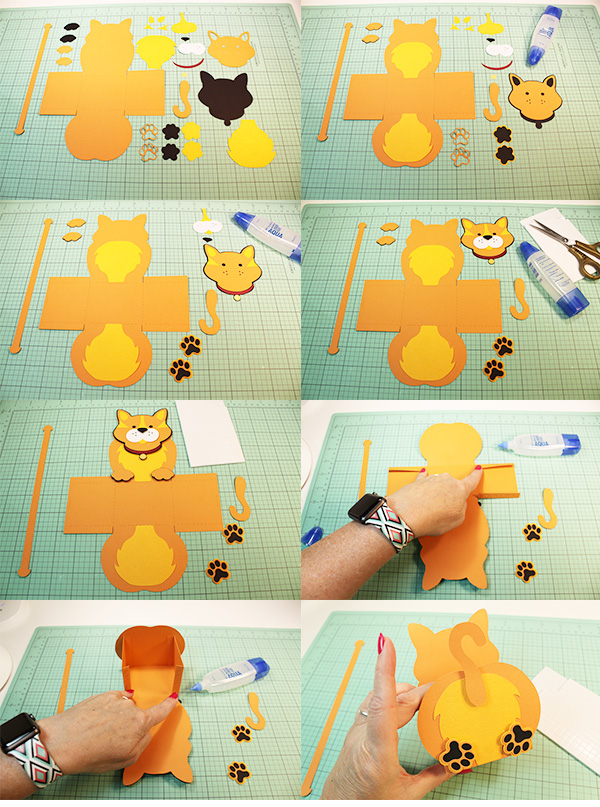
Yellow Cat Handle Basket


Yellow Cat Handle Basket- JMRush 
Approximate Box size: H 2.50” X W 3” X D 2.50”
Approximate Design size: W 3.75” X H 5.5” including handle

This cute basket design is a perfect container for treats for your favorite feline or a small gift for your veterinarian. This design is compatible with both 8X12 and 12X12 mats.


You can purchase the Silhouette design file here: https://www.silhouettedesignstore.com/artists/485222


You can purchase the SVG and Cricut compatible file here: https://www.jamieandjenn.com 

  1. Cut design pieces. ( I used double sided card stock) 
  2. Glue the fury bottom piece to the coordinating shape on the lower section of the basket base. Glue the other fury chest piece to the coordinating shape on the upper section of the basket base. Glue the cat head shape with cut outs to the solid black cat head shape. Glue the smaller solid paws and feet to the larger solid feet and paws.
  3. Glue the small rounded muzzle pieces to the muzzle base ( that has a coordinating shape plus a long vertical line). Glue the small triangular face markings to either side of the combined cat head. Glue the inner ear pieces to the combined cat head. Glue the collar and collar tag to the combined cat head. Glue the feet pieces that  have cutouts to the combined feet.
  4. Glue the combined muzzle piece to the combined cat head. Use a small piece of foam adhesive square to attach the nose.
  5. Use foam adhesive squares to attach the combined head to the coordinating shape on the basket base. use foam adhesive squares to attach the front paws to the basket.
  6. Flip the combined basket over. Fold the basket base at the score lines. Apply glue to the top two tabs on the basket base and secure to the rounded shape above.
  7. Apply glue to the bottom two tabs on the basket base and secure to the head shape above creating a box.
  8. Use foam adhesive squares to attach the feet and the tail to the back of the basket.
  9. Insert the handle on either side of the basket.
  10. I used enamel dots to accentuate the eyes and added a ribbon.
  11. Use three small lengths of thread and apply hot glue to one of the groups of ends. Attach underneath the nose. Repeat for the other side:)


Tuesday, February 5, 2019

Schnauzer Double Sticky Note Holder

Schnauzer Double Sticky Note Holder-JMR
Approximate size: W 4” X H 3.5” X D 1”

This Sticky Note holder features a pen holder on the side and holds two standard sized stack of sticky notes; one on the inside and the other in the pocket in the back of the design. This design file is compatible with both 8X12 and 12X12 mats. 

You can purchase the Silhouette design file here: https://www.silhouettedesignstore.com/artists/485222

You can purchase the SVG and Cricut compatible file here:https://www.jamieandjenn.com 


1.Cut design pieces. I used double sided card stock.
2. Flip the base over as shown (pretty side down). Fold at the score lines at the pen holder section. Top and bottom sections fold in and the center section folds out.
3. Fold the bottom score line back. Fold the side tab score lines toward the back.
4. I flipped the base over on this image so that you can see the folds on the bottom section. Apply glue to the small tabs on either side and glue downward; creating a pocket. Hold until dry on each side.
5. This is what the backside will look like:)
6. Turning the base over- Insert the back of a sticky note stack inside the slot provided.
7. Insert the second sticky note stack into the backside pocket.
8. Center the square panel on the front of the base. You may need to turn this piece to make sure it has proper spacing all edges. Glue the red collar piece to the solid dog base.

9. Glue the small round dog tag to the combined dog base at it’s coordinating spot;centering it. Glue the dog face with eye cutouts to the combined dog base;centering it.
10. Curve the small dog tongue as you like. Using foam adhesive squares, attach the small white muzzle to the larger gray muzzle;centering it. Glue the tongue under the white muzzle by sliding it underneath. Use a piece of foam adhesive square to attach the nose to the combined muzzle.
11. Use pieces of foam adhesive squares to attach the combined muzzle to the combined dog base and the ears to their coordinating shapes on the combined dog base. Glue the eyebrow to the combined dog; aligning the edges with the coordinating shapes on the combined dog base. 
12. I used adhesive jewels to accent the eyes. Insert a pen and finish with a ribbon:)

Friday, April 28, 2017

Rose Pocket Gift Car


Rose Pocket Gift Card-JMRush
Approximate Size: W 7.25” X H 3.75”

This design has a sliding compartment that is sized to hold American paper currency or most gift cards and is compatible with both 8X12 and 12X12 mats. 

You can purchase the Silhouette design file here: https://www.silhouettedesignstore.com/artists/485222

  1. Cut design pieces.
  2. Fold the score lines on the two card bases.  (There is a enlarged photo below to assist in folding the card bases. Green lines fold down. Red folds up. The lower card base if turned so that the point is pointing up instead of down.) Glue the detailed flower to it’s coordinating shape solid base. Curve the leaves as you like.
  3. Apply glue to the side tabs on the lower card base and fold the top section to them.
  4. Apply glue to the side tabs on the upper card base and secure to the upper rectangular panel.
  5. Apply glue to the lower section on either side ( where my fingers are pointing) and attach to the lower section. 
  6. Apply glue to the top section of the upper card base and secure the triangular piece to it; aligning at the top of the card. Glue the center point of the leaves together.
  7. Use a foam adhesive square to attach the combined leaves to the center of the top combined card base.
  8. Insert cash or a gift card. Attach the combined flower with a foam adhesive square. Insert the top card base into the lower card base:)


Tuesday, January 24, 2017

Roller Skate Card


Roller Skate Card- JMRush 
Approximate Card size: W 4.75” X H 4.25”

This design is compatible with both 8X12 and 12X12 mats.

You can purchase the Silhouette design file here: https://www.silhouettedesignstore.com/artists/485222

You can purchase the SVG and Cricut file here:


  1. Cut Design pieces. (I used double sided card stock) - (I added extra circular details to the wheels while constructing this tutorial. They would probably be easier to add to the wheels before attaching the combined wheel to the card base:)
  2. Glue the roller skate shape with holes to the coordinating shape on the front of the card base. Glue the open circle shapes to the solid circle shapes; aligning at the center bottom. Glue the small stopper to the larger one; centering it.
  3. Attach the combined wheels and stopper to the coordinating shapes on the front of the card base using foam adhesive squares.
  4. Fold the combined card. Open it so that the inside of the card is showing. Glue the solid shoe shape to the inside of the card.
  5. Flip the card back over so that the front is showing. Using approximately 22” of 1/8” ribbon (or smaller) loop the ribbon through the bottom eyelet of the combined card. Pull the ribbon so that the ends are even each side. (I heat sealed and pinched the ends of the ribbon to make the lacing process easier:)
  6. Thread one side of the ribbon through each eyelet. 
  7. Repeat with the other side of the ribbon threading the opposite way as before ( under or over the top of the card)
  8. Tie your ribbon.
  9. Glue the small solid circles to the larger solid circles; centering them.
  10. Glue the combined circles to the center of the open circles on the combined wheels:)

Tuesday, December 13, 2016

Stacked Christmas Cat Card


Stacked Christmas Cat Card- JMRush 
Approximate Card size: H 5.50” X W 4.25”

This design is compatible with both 8X12 and 12X12 mats. 

You can purchase the Silhouette design file here: https://www.silhouettedesignstore.com/artists/485222


1. Cut design pieces.
2. Fold the card base. Glue the largest cat silhouette (with tail) to the cat silhouette (solid with hat and scarf). Glue the oval head shape without ears to the solid cat head without a pom pom. Glue the center white chest section to the front two leg section; aligning the coordinating shapes at the top right. Glue the small rounded muzzle pieces to the muzzle base ( that has a coordinating shape plus a long vertical line). Glue the small triangular face markings to either side of the cat head with ear and eye cut outs.
3. Glue the Nose to the combined muzzle piece. Glue the solid head with a pom pom on the right side to the solid cat head piece with a hat and scarf. Glue the combined cat head with ear/eye openings to the combined solid cat head piece.
4. Glue the combined cat head to the combined cat head hat /scarf piece. Use pieces of foam adhesive squares to attach the cat silhouette without a tail to the combined cat silhouette base.
5. Glue the last two triangular markings to the combined cat silhouette. One on the first layer and one on the second layer; matching the coordinating contours. Attach the combined muzzle/nose piece to the combined cat head with a foam adhesive square in the lower center and glue on the narrow top strip (backside).
6. Image of the muzzle/nose piece being secured to the combined cat head.
7. Use foam adhesive squares to attach the combined front legs to the combined cat silhouette. Use foam adhesive squares to attach the combined head to the combined cat silhouette.
8. Glue the combined cat silhouette to the front of the card. I used adhesive enamel dots to accentuate the eyes:)


Monday, November 28, 2016

Stacked Snow Bird Card

Stacked Snow Bird Card- JMRush 
Approximate Card size: W 5.50” X H 4.25”

This design is compatible with both 8X12 and 12X12 mats.

You can purchase the SVG and Cricut file here:

You can purchase the Silhouette design file here: https://www.silhouettedesignstore.com/artists/485222


1. Cut design pieces.
2. Fold the card base. Glue the oval head piece with eye openings to the solid oval head piece. Glue the ear muff design piece to the coordinating shape on the full bird silhouette.
3. Glue the eyes to the coordinating shapes on the combined oval head piece. Use pieces of foam adhesive squares to attach the beak to the  combined oval head piece. Use pieces of foam adhesive squares to attach the Half moon scarf piece to the coordinating shape on the larger scarf piece. Use pieces of foam adhesive squares to attach the squarish scarf piece to the middle of the combined scarf piece. Use pieces of foam adhesive squares to attach the earmuffs to the coordinating shapes on the combined bird silhouette. Glue the feet to the winged bird body piece.
4. Use pieces of foam adhesive squares to attach the bird head/tummy piece to the combined winged bird body and the tummy piece on top of that.
5. Use pieces of foam adhesive squares to attach the combined oval head to the combined winged bird body. Glue the combined scarf piece to the combined winged bird body. 
6. Glue the combined winged bird body to the full bird silhouette and then  glue the combined bird to the front of the card. I used adhesive enamel dots to accentuate the eyes:)


Sunday, November 27, 2016

Stacked Winter Fox Card


Stacked Winter Fox Card- JMRush 
Approximate Card size: H 5.50” X W 4.25”

This design is compatible with both 8X12 and 12X12 mats. 

You can purchase the SVG and Cricut file here:

You can purchase the Silhouette design file here: https://www.silhouettedesignstore.com/artists/485222


1. Cut design pieces.
2. Fold the card base. Glue the solid head base piece to the solid head piece with the scarf at the bottom. Glue the face piece to the head piece with ear cut outs.
3. Glue the combined face/head piece to the combined head/scarf piece. Glue the nose to the combined head piece.
4. Use foam adhesive squares to attach the combined fox head piece to the front leg body piece and then to the full body piece. Glue the combined fox to the front of the card.
5. I used adhesive enamel dots to accentuate the eyes:)


Stacked Winter Squirrel Ski Card

Stacked Winter Squirrel Ski Card- JMRush 
Approximate Card size: W 5.50” X H 4.25”

This design is compatible with both 8X12 and 12X12 mats.

You can purchase the Silhouette design file here: https://www.silhouettedesignstore.com/artists/485222

You can purchase the SVG and Cricut file here:


1. Cut design pieces. (There is an additional nose piece not shown in this tutorial) ( I ended up using a textured/marbled brown card stock for three of the four squirrel body pieces)
2. Fold the card base. Glue the skis to the squirrel base piece.
3. Glue the large squirrel piece to the coordinating shape on the combined squirrel base piece. 
4. Glue the small squirrel body piece (with no arms) to the combined squirrel base piece. 
5. Glue the tip of the single ski pole to the combined squirrel base at the coordinating shape. Tuck the single ski pole under the arm of the last squirrel body piece and glue to the combined squirrel base piece.
6. Glue the scarf to the coordinating shape on the combined squirrel base.
7. Glue the head to the combined squirrel base piece.
8. Use foam adhesive squares to attach the combined squirrel to the front of the card.Glue the small nose to the combined squirrel. I used adhesive enamel dots to accentuate the eye:)


Wednesday, November 23, 2016

Ice Skate Card


Ice Skate Card- JMRush 
Approximate Card size: W 5.” X H 3.5”

This design is compatible with both 8X12 and 12X12 mats.

You can purchase the Silhouette design file here: https://www.silhouettedesignstore.com/artists/485222


  1. Cut Design pieces. (I used double sided card stock)
  2. Glue the ice skate shapes to the coordinating shapes on the card base.
  3. Fold the combined card.
  4. Open the card and glue the solid ice skate shape to the inside coordinating shape.
  5. Using approximately 22” of 1/8” ribbon (or smaller) loop the ribbon through the bottom eyelet of the combined card. Pull the ribbon so that the ends are even each side.
  6. Thread on side of the ribbon through each eyelet.
  7. Repeat with the other side of the ribbon threading the opposite way as before ( under or over the top of the card)
  8. Tie your ribbon.

Stacked Winter Raccoon Card


Stacked Winter Raccoon Card- JMRush 
Approximate Card size: W 5.50” X H 4.25”

This design is compatible with both 8X12 and 12X12 mats.

You can purchase the Silhouette design file here: https://www.silhouettedesignstore.com/artists/485222

You can purchase the SVG and Cricut file here:


1. Cut design pieces.
2. Fold the card base. Glue the solid face to the hat scarf piece. Glue the face piece with large eye holes to the coordinating shape with smaller eye holes. Glue the nose to the muzzle piece. Glue the hat tail stripe design pieces to the coordinating shapes on the tail.
3. Use foam adhesive squares to attach the puff ball shape to the hat piece. Glue the combined face piece to the combined scarf/hat piece. Glue the eye outline piece to the combined scarf/hat piece. 
4. Use a foam adhesive square to attach the combined hat piece to the combined scarf/hat piece. Glue the combined muzzle piece to the combined scarf/hat piece.
5. Glue the combined scarf/hat piece to the smaller body piece.
6. Use foam adhesive squares to attach the combined smaller body piece to the larger one.
7. Glue the combined Raccoon to the front of the card base. I used adhesive enamel dots to accentuate the eyes:)

Stacked Arctic Fox Card


Stacked Arctic Fox Card- JMRush 
Approximate Card size: W 5.50” X H 4.25”

This design is compatible with both 8X12 and 12X12 mats.

You can purchase the Silhouette design file here: https://www.silhouettedesignstore.com/artists/485222

You can purchase the SVG and Cricut file here:


1. Cut design pieces.
2. Fold the card base. Glue the face piece with eye holes to the solid coordinating shape. Glue the the muzzle piece with a cut out mouth to it’s solid base piece. 
3. Glue the combined head piece to the coordinating shapes on the scarf/hat piece. Use foam adhesive squares to attach the combined muzzle to the combined head piece. 
4. Use a foam adhesive square to attach the combined head piece to the the smaller body piece.
5. Use foam adhesive squares to attach the combined smaller body/head piece to the larger one.

6. Glue the combined Fox to the front of the card base. I used adhesive enamel dots to accentuate the eyes:)

Monday, October 31, 2016

Pumpkin Contour Card

Pumpkin Contour Card-JMRush
Approximate size: W 5.5 “x H 4.25”

The Pumpkin Contour Card features a beveled Pumpkin design that reads “Thankful” on the front cover and contains a hidden gift card/message/picture holder section on the inside. This design is compatible with both 8X12 and 12X12 mats.


You can purchase the Silhouette design file here: https://www.silhouettedesignstore.com/artists/485222


 1.Cut design pieces. (I used double sided card stock) 
2. Fold the card base along the score lines. Apply glue to the backsides of the rounded pumpkin shape and secure to the pumpkin shape with the leaf attached.
3. Apply glue to the backsides of the two side tabs on the card base and secure to the upper panel. Glue the “Thankful” word to the combined pumpkin piece.
4. Curve the leaf as preferred and glue the center of the backside of the stem to the combined pumpkin.
5.-6. Curve the combined pumpkin. Fold the top of the card down and insert the tabs of the combined pumpkin into to the slots on the card base front.
7. Make sure the design on the front is centered as you like and then glue the tabs of the combined pumpkin on the inside of the card.
8. Apply glue to the inside of the top flap of the card base and secure the rectangular shaped piece. Align at the top and center ( top side will show through the front of the card). There is a small sliver of the shape that will show at the bottom of the front of the card base.
9. Insert gift card or pictures. 
10. I finished with a ribbon and an enamel dot:)


Tuesday, October 11, 2016

High Top Shoe Thank You


High Top Shoe Thank You-JMRush
Approximate Card size: W 4.25” X H 5.5” - Fits A2 envelopes


This design has eyelet holes to interlace a ribbon, features the cut out words “Thank You”, and is compatible with both 8X12 and 12X12 mats.


You can purchase the Silhouette design file here: https://www.silhouettedesignstore.com/artists/485222


  1. Cut design pieces. ( I used double sided card stock).
  2. Fold the card base (with only circular holes) and the shoe tongue (with lettering cut outs) along the score lines.
  3. Apply glue to the backside of the shoe tongue piece on the side with the cut out lettering.
  4. Center and secure to the inside of the shoe card base.
  5. Glue the backside of the tongue/shoe toe piece and secure it to the topside of the shoe tongue aligning it at the bottom to the card base.
  6. Glue the eyelets to the top of the combined shoe centering it and aligning around the eyelet holes.
  7. I used approximately 26” of 1/4” ribbon and  looped the ribbon through the bottom eyelet of the combined shoe. Pull the ribbon so that the ends are even each side.
  8. Thread one side of the ribbon through each eyelet crossing back and forth.
  9. Repeat with the other side of the ribbon threading the opposite way as before. Tie your ribbon:)


Thursday, July 14, 2016

Skunk Hug Gift Card Holder


Skunk Hug Gift Card Holder-JMRush
Approximate Card size: W 4” X H 5.75”

This design features character arms that open to a hidden gift card pocket, is compatible with both 8X12 and 12X12 mats, and fits most gift cards.
You can purchase this design here: https://www.silhouettedesignstore.com/artists/485222

1. Cut design pieces. (I used double sided card stock)
2. Fold the card along score lines. Glue the skunk face to the skunk head piece. Glue the tail strip to the tail base.
3. Apply glue the bottom of the side tabs on the card base. Secure by folding upward toward the card base. Glue the mouth in place. Use a foam adhesive square to attach the nose. Glue the circular cheeks in place.
4. Use foam adhesive squares to attach the combined skunk head to the front of the card base. Insert gift card.
5. Tuck the hands into the slots on the front. Glue a ribbon to the heart shape.
6. Apply glue to the bottom backside of the card and secure the tail. I used a foam adhesive square to secure the top of the tail:)

Thursday, May 5, 2016

Female Teacher Card


Female Teacher Card-JMRush
Approximate Card size: W 5.50” X H 4.25”


This card is perfect for teacher appreciation. This file is compatible with both 8X12 and 12X12 mats.

  1. Cut design pieces. 
  2. Fold the card at the score lines. Glue the dress to the body. Glue the chalk board ( rectangular piece) to the front of the card.
  3. Glue the apple piece to the apple base with a stem. Glue the long thin rectangular chalk board runner pieces on top of the chalkboard rectangular piece. Use pieces of foam adhesive squares toward the top (strap) backside of the bikini top shaped piece and attach to the combined female figure.
  4. Glue the combined female figure to the card. Glue the words “ Thank You” to the front of the card.
  5. Use foam adhesive squares on the backside of the arm piece at the wrists. Attach the arms to the combined female figure- centering it and aligning it with the bottom. Glue the tops of the arms (backsides) to the combined female figure. Tuck the combined apple into the hands. Use foam adhesive squares to attach it to the bottom layer. Finish with enamel dots as a necklace:)
  6. :)