Showing posts with label Hat. Show all posts

Friday, November 20, 2020

Winter Gnome Hug Gift Card Holder


Winter Gnome Hug Gift Card Holder-JMRush

Approximate Card size: 4” x 7.5” 


This card features character arms that open to release a hidden gift card section. This design is compatible with both 8X12 and 12X12 mats. 

You can purchase the Silhouette design file here: https://www.silhouettedesignstore.com/artists/485222


You can purchase the SVG and Cricut compatible file here: https://www.jamieandjenn.com 


1.Cut design pieces. (I used double sided cardstock)

2. Fold the card along score lines. Glue the black belt into place right above the first line of horizontal score lines and center it.

3. Apply glue the bottom of the side tabs on the card base. Secure by folding upward toward the card base. Glue the gold square belt buckle to the center of the belt.

4.Glue the coordinating hat to the hat shape on the white head/beard piece.

5.  Insert gift card. Glue the combined head piece to the card base; aligning the beard along the edges of the top the card base.

6. Glue the hat trim piece to the combined face. Curl the green holly leaves as you like. 


7. Using foam adhesive squares attach the mustache to the combined beard/Head piece. 

8. Using a piece of foam adhesive square, attach the nose to the mustache. Glue the little red holly to the coordinating shape on the holly leaves.

9.Flip the card over. Glue the other red hat to the coordinating shape. Glue the hands into place.

10. Glue the white trim pieces just above the hands on each side. 

11. I finished with enamel jewels to accentuate the holly and a ribbon:)

( I used markers to color the enamel jewels the color I wanted:)

12.  Use a piece of foam adhesive square to attach the combined holly to the hat. 


Friday, November 13, 2020

Winter Squirrel Hug Gift Card Holder


Winter Squirrel Hug Gift Card Holder

You can purchase the Silhouette design file here: https://www.silhouettedesignstore.com/artists/485222


You can purchase the SVG and Cricut compatible file here: https://www.jamieandjenn.com 


Approximate Card size: 4” x 6.25” 


This card features character arms that open to release a hidden gift card section. This design is compatible with both 8X12 and 12X12 mats.


1.Cut design pieces. (I used double sided cardstock for the card base)

2. Fold the card along score lines. Glue the face piece with holes to the coordinating solid face shape (black). Glue the white mitten edges to the outer straight edge of the mittens.

3. Apply glue the bottom of the side tabs on the card base. Secure by folding upward toward the card base.

4. Insert gift card. 

5. Glue the beige face (with cutouts)to the combined face; aligning so that the cutouts align with the cutouts on the combined face. Glue the hat to the combined face; aligning at the top of the face.

6. Glue the hat trim piece to the combined face and attach the nose with a piece of foam adhesive square.

7. Using foam adhesive squares attach the combined face to the gift card holder base. Separate the fringe on the two pieces of scarf.


8. Glue the large scarf base just under the chin of the combined face on the card base.

9. Glue the medium sized scarf piece to the coordinating shape on the lower scarf.

10.Using a foam adhesive square, attach the smallest scarf piece to the coordinating shape on the combined scarf.

11. Flip the card base over. Glue the back of the hat to the card base; aligning at the top and sides. Glue the combined mittens into place.

12. Using foam adhesive squares, attach the hat pom pom and the tail to the backside.

13. Flip the card over. Tuck the hands into the slots on the front. 

14. I finished with enamel jewels to accentuate the eyes and a ribbon:)


Wednesday, November 21, 2018

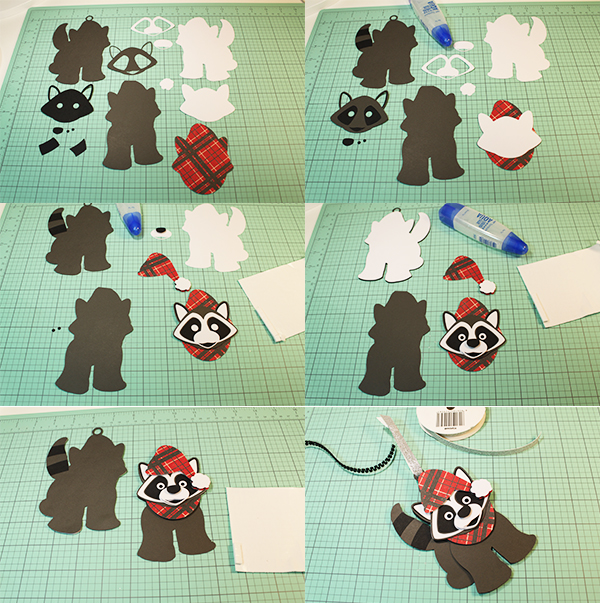
Winter Raccoon Gift Tag Ornament


Winter Raccoon Gift Tag Ornament-JMR
Approximate size: H 5.25” X W 4”

This design can be used as a gift tag and ornament and is compatible with both 8X12 and 12X12 mats. 
You can purchase the Silhouette design file here: 

You can purchase the SVG and Cricut compatible file here:https://www.jamieandjenn.com  Coming Soon:)

1. Cut design pieces. I used double sided card stock. (The hat piece is missing from the first two images..sorry:)
2. Glue the solid face to the hat scarf piece. Glue the face piece with large eye holes to the coordinating shape with smaller eye holes. Glue the hat tail stripe design pieces to the coordinating shapes on the tail.
3. Attach the nose to the muzzle piece using a foam adhesive square. Use foam adhesive squares to attach the puff ball shape to the hat piece. Glue the combined face piece to the combined scarf/hat piece. Glue the eye outline piece (white) to the combined scarf/hat piece. 
4. Glue the combined muzzle piece to the combined scarf/hat piece. Flip the raccoon tag base over and glue the coordinating shape label (white) to the backside;centering it. Flip it back over. Use a foam adhesive square to attach the muzzle to the combined hat/face pie and glue the tiny eyeballs into place.
5. Use a foam adhesive square to attach the combined hat piece to the combined hat/face piece. Use foam adhesive squares to attach the combined Hat/Face piece to the raccoon body with two legs.
6. Use foam adhesive squares to attach the combined smaller body piece to the larger one. Loop a ribbon through the top circular hole and tie. I used adhesive enamel dots to accentuate the eyes:)

Polar Bear Gift Tag Ornament

Polar Bear Gift Tag Ornament-JMR
Approximate size: H 5.50” X W 3.5”

This design can be used as a gift tag and ornament and is compatible with both 8X12 and 12X12 mats. 

You can purchase the Silhouette design file here: https://www.silhouettedesignstore.com/artists/485222

You can purchase the SVG and Cricut compatible file here:https://www.jamieandjenn.com  Coming Soon:)


  1. Cut design pieces. I used double sided card stock.
  2.  Glue the circular bear face with eye holes to the coordinating solid shape. Glue the nose muzzle piece to it’s solid coordinating shape base piece. Glue the hat design piece to it’s coordinating hat shape piece.
  3. Use foam adhesive squares to attach the two leg bear silhouette to the full bear silhouette shape. Use foam adhesive squares to attach the nose to the combined muzzle piece, The combined muzzle to the combined face, and the hat puff ball to the end of the combined hat.
  4. Glue the head /scarf piece to the combined body as shown.
  5.  Loop a ribbon through the circular hanger ay the top and use foam adhesive squares to attach the combined head to the combined body. 
  6.  Use foam adhesive squares to attach the combined hat to the combined body. I used adhesive jewels to accentuate the eyes:)

Tuesday, November 21, 2017

Labrador Retriever Sweater Hat Card


Labrador Retriever Sweater Hat Card- JMRush 
Approximate size: H 4.25” X W 5.5”

This design file is compatible with both 8X12 and 12X12 mats.

You can purchase this Silhouette design file or SVG bundle here: https://www.silhouettedesignstore.com/artists/485222

  1. Cut design pieces. 
  2. Fold the card base. Glue the dog silhouette with two and half legs to the coordinating solid dog silhouette shape. Glue the hat trim and puff ball to the hat. Glue the sweater to the other dog silhouette.
  3. Glue the sweater combination dog silhouette to the larger dog silhouette. (I used foam adhesive squares on the torso of the sweater dog silhouette and glue on the head, legs, and tail.)
  4. Use foam adhesive squares to attach the dog ear to the combined dog. Glue the collar on. Use a foam adhesive square to attach the combined hat to the combined dog.
  5. Apply glue to the backside of the combined dog and a foam adhesive square to the back of the hat.
  6. Center and attach to the front of the card:)

Tuesday, April 25, 2017

Graduation Hat Pocket Gift Card


Graduation Hat Pocket Gift Card-JMRush
Approximate Size: W 7.25” X H 3.75”

This design has a sliding compartment that is sized to hold American paper currency or most gift cards and is compatible with both 8X12 and 12X12 mats.

You can purchase the Silhouette design file here: https://www.silhouettedesignstore.com/artists/485222 

  1. Cut design pieces. I used double sided card stock.
  2. Fold the score lines on the two card bases.  (There is a enlarged photo below to assist in folding the card bases. Green lines fold down. Red folds up. The lower card base if turned so that the point is pointing up instead of down.) Glue the thinner word to the thicker word base. Glue the small oval to the larger oval base. Glue the smaller hat pieces to their larger coordinating shapes. ( There is a small tab in the center of the smaller top hat piece that can be used to secure a real tassel or thread if you prefer. Make sure this tab is up and not glued down if you decide to not use the tassel piece provided) Glue the side banner pieces (2) to the coordinating shape on the full banner. Glue the smaller curved banner piece to it’s coordinating larger shape.
  3. Apply glue to the side tabs on the lower card base and fold the bottom section to them.
  4. Apply glue to the side tabs on the upper card base and secure to the upper rectangular panel.
  5. This is what it should look like.
  6. Push down on the top of the upper card base and crease the folds.
  7. Apply glue to the top section of the upper card base and secure the combined top hat piece to it; aligning at the top of the card.
  8. Glue the bottom combined hat piece to the lower card base at the coordinating “v” shape. Glue the combined word to the combined curved banner piece.
9.  Use foam adhesive on the center backside of the combined curved banner and secure to the coordinating shape on the combined full banner piece. (You can glue the side edges down to the combined full banner if you want a more rounded appearance). Using a thin round dowel, wrap the tassel piece around to the backside.

10.   Apply glue to the very top to secure the tassel piece

11.  Apply glue to the center of the combined top hat. Secure the oval shape of the tassel to it. ( You can attach a real tassel to the tab if not using the tassel provided)

12.  Glue the combined small oval piece on top of the oval shape of the tassel.

13.  This is what it should look like:)

14.  Apply glue to the lower section on either side ( where my fingers are pointing) and attach to the lower section.

15.  Insert a gift card or money. The top section will flex.

16.  Insert the upper combined card base into the lower combined card base.

17.  Glue the combined banner to the front of the lower combined card base.


Tuesday, December 13, 2016

Stacked Christmas Cat Card


Stacked Christmas Cat Card- JMRush 
Approximate Card size: H 5.50” X W 4.25”

This design is compatible with both 8X12 and 12X12 mats. 

You can purchase the Silhouette design file here: https://www.silhouettedesignstore.com/artists/485222


1. Cut design pieces.
2. Fold the card base. Glue the largest cat silhouette (with tail) to the cat silhouette (solid with hat and scarf). Glue the oval head shape without ears to the solid cat head without a pom pom. Glue the center white chest section to the front two leg section; aligning the coordinating shapes at the top right. Glue the small rounded muzzle pieces to the muzzle base ( that has a coordinating shape plus a long vertical line). Glue the small triangular face markings to either side of the cat head with ear and eye cut outs.
3. Glue the Nose to the combined muzzle piece. Glue the solid head with a pom pom on the right side to the solid cat head piece with a hat and scarf. Glue the combined cat head with ear/eye openings to the combined solid cat head piece.
4. Glue the combined cat head to the combined cat head hat /scarf piece. Use pieces of foam adhesive squares to attach the cat silhouette without a tail to the combined cat silhouette base.
5. Glue the last two triangular markings to the combined cat silhouette. One on the first layer and one on the second layer; matching the coordinating contours. Attach the combined muzzle/nose piece to the combined cat head with a foam adhesive square in the lower center and glue on the narrow top strip (backside).
6. Image of the muzzle/nose piece being secured to the combined cat head.
7. Use foam adhesive squares to attach the combined front legs to the combined cat silhouette. Use foam adhesive squares to attach the combined head to the combined cat silhouette.
8. Glue the combined cat silhouette to the front of the card. I used adhesive enamel dots to accentuate the eyes:)


Wednesday, November 23, 2016

Stacked Winter Raccoon Card


Stacked Winter Raccoon Card- JMRush 
Approximate Card size: W 5.50” X H 4.25”

This design is compatible with both 8X12 and 12X12 mats.

You can purchase the Silhouette design file here: https://www.silhouettedesignstore.com/artists/485222

You can purchase the SVG and Cricut file here:


1. Cut design pieces.
2. Fold the card base. Glue the solid face to the hat scarf piece. Glue the face piece with large eye holes to the coordinating shape with smaller eye holes. Glue the nose to the muzzle piece. Glue the hat tail stripe design pieces to the coordinating shapes on the tail.
3. Use foam adhesive squares to attach the puff ball shape to the hat piece. Glue the combined face piece to the combined scarf/hat piece. Glue the eye outline piece to the combined scarf/hat piece. 
4. Use a foam adhesive square to attach the combined hat piece to the combined scarf/hat piece. Glue the combined muzzle piece to the combined scarf/hat piece.
5. Glue the combined scarf/hat piece to the smaller body piece.
6. Use foam adhesive squares to attach the combined smaller body piece to the larger one.
7. Glue the combined Raccoon to the front of the card base. I used adhesive enamel dots to accentuate the eyes:)

Monday, November 14, 2016

Stacked Polar Bear Card


Stacked Polar Bear Card- JMRush 
Approximate Card size: W 5.50” X H 4.25”


This design is compatible with both 8X12 and 12X12 mats. 

You can purchase the Silhouette design file here: https://www.silhouettedesignstore.com/artists/485222

You can purchase the SVG and Cricut compatible file here:https://www.jamieandjenn.com 

1. Cut the design pieces.
2. Fold the card base. Glue the circular bear face with eye holes to the coordinating solid shape. Glue the nose muzzle piece to it’s solid coordinating shape base piece. Glue the hat design piece to it’s coordinating hat shape piece.
3. Use foam adhesive squares to attach the thin bear silhouette to the full bear silhouette shape. Use foam adhesive squares to attach the nose to the  combined muzzle piece and the hat puff ball to the end of the combined hat.
4. I used adhesive enamel dots to accentuate the eyes and attached the combined nose/muzzle piece to the combined face piece using foam adhesive squares.
5. Glue the combined face to the oblong piece aligning at the top.
6. Use foam adhesive squares to attach the combined face piece to the combined bear body silhouette.
7. Use foam adhesive squares to attach the combined hat to the combined bear.
8. Glue the combined bear to the front of the card:)


Monday, August 22, 2016

Witch Treat Box

Witch Treat Box-JMRush
Approximate Box size: W 2.75” X W 1” X H 4.25”
This treat box design has an attached lid and is compatible with both 8X12 and 12X12 mats.


You can purchase the Silhouette design file here: https://www.silhouettedesignstore.com/artists/485222


  1. Cut design pieces. ( I used double sided card stock)
  2. Flip the box base over like shown (pretty side down). Fold the box base score lines.
  3. Apply glue to the backside of the tab on the bottom right. Attach to the upper panel to the right.
  4. Apply glue to the backside of the tab on the bottom left. Attach to the panel to the left.
  5. Apply glue to the long vertical tab on the left and to the bottom horizontal tab. Attach to the panel to the right. Your box will be complete.
  6. Tuck the tab into the slot in the back.
  7. Glue the witch’s collar, face, and hat to the front of the box.
  8. Glue the witch’s eyes inside the coordinating shape on the box base.
  9. Use a piece of foam adhesive to secure the nose into place. I used enamel dots to accentuate the eyes and finished with a ribbon to decorate the hat. Fill with goodies:)

Tuesday, May 3, 2016

Female Graduate Card


Female Graduate Card-JMRush
Approximate Card size: H 5.50” X W 4.25”


This design is compatible with both 8X12 and 12X12 mats. 


1. Cut design pieces. Fold the card at the score lines.
2. Glue the robe with cut lines to the solid robe background piece. Glue the small hat brim piece to the hat base.
3.- 4. Use foam adhesive squares on the backside of the arm piece at the wrists. Attach the arms to the combined robe piece- centering it and aligning it with the bottom. Glue the tops of the arms to the combined robe piece.
5. Glue the arm robe piece on top of the combined robe piece.
6. Glue the combined pieces to the front of the card. Glue the solid triangular neck piece into place. 
7. Glue the small triangular shirt piece to the from of the card.
Glue the V shape to the front of the combined robe. 
8. Tuck the combined hat and diploma into the hands. Use foam adhesive squares to attach them to the bottom layer. Finish with enamel dots as a necklace:)