Showing posts with label hanukkah. Show all posts

Tuesday, December 1, 2020

Hanging Tea Light Lantern


You can purchase the Silhouette design file here: https://www.silhouettedesignstore.com/artists/485222


You can purchase the SVG and Cricut compatible file here: https://www.jamieandjenn.com


Reindeer Hanging Tea Light Lantern
Cricut grouping measurement: W 11.6347

Hanging Tea Light Lantern 
Cricut grouping measurement: W 11.6181


Gnome Hanging Tea Light Lantern

Scroll down for more construction instructions


Wreath Hanging Tea Light Lantern


Snowflake Hanging Tea Light Lantern 
Cricut grouping measurement: W 11.6694


Snowman Hanging Tea Light Lantern
Cricut grouping measurement: W 11.4111

Star David Tea Light Lantern
Cricut grouping measurement: W 9.8722

Nativity Hanging Tea Light Lantern 
Cricut grouping measurement: W 11.5556
Pinecone Hanging Tea Light Lantern
Cricut grouping measurement: W 11.5514
Poinsettia Hanging Tea Light Lantern
Cricut grouping measurement: W 11.4111
Santa Belt Hanging Tea Light Lantern
Cricut grouping measurement: W 11.6444
Star Hanging Tea Light Lantern
Cricut grouping measurement: W 11.3833

Christmas Tree Hanging Tea Light Lantern
Cricut grouping measurement: W 11.6639


Hanging Tea Light Lantern (Flameless)-JMRush
Lantern size: W 2.5 x D 2.5 x H 5”
Cricut grouping measurement: W 11.6181


This Flameless Hanging Tea Light Lantern features cut outs and when vellum paper is used, a layered transparent frosted glass effect is created. This lantern has a secure bottom that allows it to be hung and still allows access to the tea light on/off switch. This design is compatible with both 8X12 and 12X12 mats. 

 You can purchase this Silhouette design file or SVG bundle here: https://www.silhouettedesignstore.com/artists/485222

You can purchase this Cricut compatible SVG design file here: https://www.jamieandjenn.com

1.Cut design pieces. ( I used double sided card stock and vellum paper) This tutorial is being used for multiple design files. Yours may vary from tutorial images.
2. Fold all score lines. 
3. Line up the two lantern window pieces. Apply glue to the long side tab of the lantern and secure to the other lantern window base piece.
4. Glue the vellum paper to the window panels; centering around each of the cut out sections.
5. Apply glue to the other long side tab of the lantern window base and secure to the inside of the other lantern window base piece; creating a box.
6. Apply glue to one top tab and secure the top tab to the inside of the next angled triangle.
7. This is what it should look like:)
8.-10. Repeat for the rest of the top tabs until fully enclosed.
11. Image of the last two tabs being secured.
12. Apply glue to the inside of one of the circular hanger pieces. Align with the other circular hanger piece and secure.
13. Apply glue to the bottom two tabs of the Lantern square base and secure to the inside of the sides. 
14. Repeat for the two top tabs creating a shallow box.
15. Apply a dab of glue to the inside of the lantern tea light base just under the slot. (This will help to secure the tab when it passes through.)
16.  Tuck the end tab into the slot creating a circular tube shape.
17. Secure until dry.
18. Place the narrow circular ring piece and square piece over the tube shape you just created.
19. Apply glue to the outside of the tabs on the square side and secure downward to the square piece.
20. Flip this piece over so the circular side is up. Apply glue to the outside of the tabs on the circular side and secure downward to the circular piece. Apply glue to the tops of the ring and tabs and secure the thicker circular ring to the top.
21. This is what it should look like:)
22. Place a flameless tea light candle inside the lantern square base; centering it. Apply glue to the bottom of the square side of the combined 
lantern tea light base. Place inside the lantern square base and secure.
23. Apply glue to the inside edges of this piece and place the lantern window piece inside the box. Secure until dry. I finished this lantern with a ribbon:)


Bottom Image:)


Gnome Hanging Tea Light Lantern


1. Follow the above directions for the lantern base. (You will only have one set of the gnome decor in this file.) 
2. Using pieces of foam adhesive squares, attach the mustache to the top of the window; centering it ( make sure you chose the side that the circle hanger faces). Glue the belt buckle to the center of the lantern base. Curl the holly as you like.
3. Glue the nose to the mustache. Glue the red holly to the holly leaves.
4.  Using pieces of foam adhesive squares, attach the brim of the hat just above the nose/mustache.
5. Using enamel jewels, decorate the holly. I finished with a small pom pom glued to the top just under the circular hanger:)


Santa Belt file additions:)


Friday, December 11, 2015

Snowflake Lantern Top Cookie Box (Flameless)

Snowflake Lantern Top Cookie Box (Flameless)-JMRush 

size: W 3.25 x D 3.25 x H 5”
This Flameless Snowflake Lantern Cookie Box features cut outs and when vellum paper is used, a layered  frosted glass effect is created. This design has a separate box that will fit 4 medium sized cookies and the snowflake decorative piece doubles as a gift tag and ribbon end holder:) This design is compatible with both 8X12 and 12X12 mats.

1.Cut design pieces.
2. Flip the two Lantern top panels over. Apply glue to the bottom of the tab on the right side of the left panel. Align and secure to the next panel.
3.Glue the circular hangers together. ( Make sure the stems of this piece remain separate)
4. Glue one of the stems to the inside of the top of the third snowflake panel.
5. Fold all score lines.
6.Glue the vellum pieces into place over the snowflake cut out panel pieces.Apply glue to backside of the upper tab next to the circular hanger.
7. Connect this tab to the next Snowflake panel lining up the seem.
8. Apply glue to the backside of the tab to the left of the circular hanger panel and connect it to the snowflake panel with the circular hanger again lining up the seems. ( make sure that one of the circular hanger stems is still free)
9.Repeat.
10.Repeat with the last tabs closing your box shape.
11.Glue the stem of the circular hanger directly across from where it is already glued.
12. This is what it should look like.
13. Glue the largest snowflake cut out to the base.
14. I used a piece of foam adhesive square to attach the smaller snowflake to the combined snowflake base and used a adhesive jewel to decorate the center. 
15.  Apply glue to the top tabs of the larger cookie square base and secure to the inside of the sides.
16. Repeat for the bottom tabs creating a box.
17. Apply glue to the top tabs of the smaller square candle base and secure to the inside of the sides.
18. Repeat for the bottom tabs creating a shallow box.
19. Using hot glue, attach a flameless votive candle to the top of the shallow candle base making sure that the switch is accessible through the rectangular cut.
20. This is what it should look like.
21. This is an extra picture- sorry
22. Using 17” of ribbon, feed it through the cut slots on one side making the ends meet.
23. You will not want to finish the following steps until you are ready to insert the cookies/treats and deliver.  Place cookie in the bottom box and turn the candle on. Place the candle box on top of the cookie box and the lantern piece on top of all. Wrap the ribbon across the bottom and to the slots on the other side. Secure by placing the ribbon ends through the snowflake decorative piece. Your goodies are ready to go:)

Tuesday, December 1, 2015

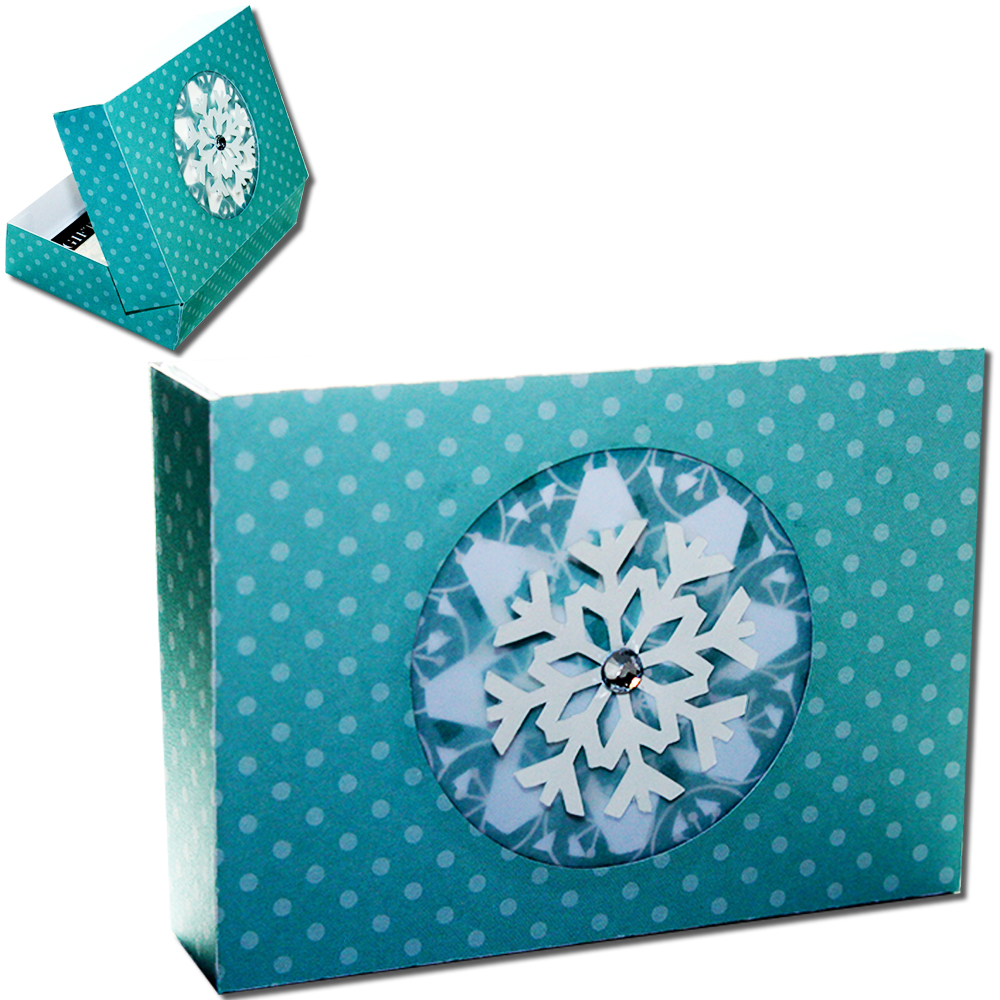
Snowflake Gift Card Box


Snowflake Gift Card Box-JMRush
Box size: W 3.5 x D 2.5 x H .75”

This gift card box has a hinged top lid and is sized to fit most gift cards. This box features a cut out on the top lid and when vellum paper is used, a layered transparent effect is created. 

You can purchase this design here: https://www.silhouettedesignstore.com/artists/485222


1.Cut design pieces.
2. Fold all score lines.
3.Apply glue to the bottom of the top tabs. Secure to the top panel.
4. Apply glue to the next set of tabs. Secure to the rectangular shape just above the tabs.
5. Apply glue to the last set of tabs. Secure to the last rectangular panel. 6.Your box will be complete now. Apply glue to the top circumference and very center of the largest snowflake.
7. Glue on the circular vellum piece. Apply glue to the top circumference of the vellum circular piece.
8. Attach to the underneath of the box lid.
9. Apply glue to the very center of this piece and attach a snowflake to the center.
10. I placed an adhesive jewel to the center of the inside top snowflake. Repeat for the top of the box:)


Monday, November 23, 2015

Christmas Lantern (Flameless)


Christmas Lantern (Flameless)-JMRush
Lantern size: W 3 x D 3 x H 7”

This Flameless Christmas Lantern features cut outs and when vellum paper is used, a layered transparent frosted glass effect is created. This design is compatible with both 8X12 and 12X12 mats.
You may also want to check out: Santa Kissing Momma Lantern 

You can purchase this design here: https://www.silhouettedesignstore.com/artists/485222

http://jmrushdesigns.blogspot.com/2015/12/santa-kissing-momma-lantern-flameless.htmland the Nativity Scene Lantern (Flameless) http://jmrushdesigns.blogspot.com/2015/12/nativity-scene-lantern-flameless.html


1.Cut design pieces. ( This picture shows more snowflakes then what is contained in your file. They were unnecessary and deleted:)
2. Fold all score lines. Glue the vellum paper to the back sides of the window panels.
3.Apply glue to the long side tab of the lantern window base and secure to the other lantern window base piece.
4. Apply glue to the top tabs of the Lantern square base and secure to the inside of the sides.
5. Repeat for the bottom tabs creating a shallow box. Apply glue to the front side of the window panels.
6. Flip the Lantern window base over ( You will be working on this inside of the lantern) and secure the window panels centering each one to each window cut out on the window base. Apply glue to circular part of one of the hangers.
7. Glue the circular hangers together. ( Make sure the stems of this piece remain separate) Glue one of the stems to the inside of the top of the second window panel. 
8. Flip the Lantern over again ( the outside is facing you now). Apply glue to the top tabs and to the side long tab.
9. Secure the Long side tab to the other side creating a box.
10. Begin to secure the top tabs to the inside of the next angled triangle. 
11. The other Circular hanger stem will be glued to the inside of the opposite side of the lantern. 
12. This is what it should look like:)
13. Finish securing all of the top tabs. 
14.Place the Lantern in it’s base. Glue the snowflakes on to the outside of the window panels.
15. Attach the small snowflake to the large one using a piece of foam adhesive square and then attach the snowflake to the lantern. I used a adhesive gem for the center of the snowflake. ( Please ignore the extra unnecessary snowflakes shown in the photo:)
16. Finish with a ribbon and place a flameless candle inside.