Showing posts with label Pilgrim. Show all posts

Saturday, November 19, 2016

Pilgrim Boy Hug Treat Box


Pilgrim Boy Hug Treat Box-JMRush
Approximate box size: W 3.” x D 2.25 x H .75”
(W 4.5” X H 4.75” including character)

This treat box features character arms that open to a small treat box. This design is compatible with both 8X12 and 12X12 mats.

You can purchase the Silhouette design file here: https://www.silhouettedesignstore.com/artists/485222


1.Cut design pieces. (I used double sided card stock for the box base).
2. Glue the full pilgrim head with eye cut outs to the slightly larger one with a collar shape on the bottom. Glue the pilgrim face with large eye openings to the pilgrim face base that has smaller eye openings. Glue the cuff pieces with circle cut outs to the slightly larger cuff base pieces; aligning on the smallest edge. Glue the hat dimension pieces to the hat piece.
3. Glue the combined pilgrim face pieces to the combined pilgrim head piece. Glue the pilgrim hair to the combined combined head piece. Fold the score lines on the box base. Glue the large open rectangular buckle piece to the rectangle belt piece. Glue the hat trim piece to the combined hat. Glue the small open rectangular buckle to the combined hat.
4. Glue the combined pilgrim head to the box base. Glue the combined hat to the pilgrim combined box base. I used a small piece of foam square adhesive to attach the brim of the hat and added enamel dots to the pilgrim’s eyes. Apply glue to the two top tabs of the box base and secure them to the top (head) panel.
5. Apply glue to the bottom two tabs and secure them to the bottom panel creating a box.
6. Apply glue to the bottom tab of the center narrow strip section. Secure the center narrow strip tab to the backside of the inside of the box.
7. Glue the hands to the coordinating shapes on the box base hands. Glue the cuff pieces into place. The hands tuck into the slots of the center strip.  Glue the combined belt piece on the front of the box:)

Pilgrim Girl Hug Treat Box


Pilgrim Girl Hug Treat Box-JMRush
Approximate box size: W 3.” x D 2.25 x H .75”
(W 3.75” X H 5” including character)

This treat box features character arms that open to a small treat box. This design is compatible with both 8X12 and 12X12 mats.

You can purchase the Silhouette design file here: https://www.silhouettedesignstore.com/artists/485222


1.Cut design pieces. (I used double sided card stock for the box base).
2. Glue the full pilgrim head with eye cut outs to the slightly larger one with a scalloped bottom. Glue the pilgrim face with large eye openings to the pilgrim face base that has smaller eye openings.  Glue the two hand pieces to the cuff base pieces with scalloped edges.
3. Glue the combined pilgrim face pieces to the combined pilgrim head piece. Glue the pilgrim hair to the combined combined head piece. Fold the score lines on the box base.
4. Glue the combined pilgrim head to the box base. Glue the larger half oval shaped hat piece to the combined pilgrim on the box base. 
5. I used a small piece of foam square adhesive to attach the brim of the hat and added enamel dots to the pilgrim’s eyes.
6. Apply glue to the two top tabs of the box base and secure them to the top (head) panel.
7. Apply glue to the bottom two tabs and secure them to the bottom panel creating a box.
8. Apply glue to the bottom tab of the center narrow strip section. Secure the center narrow strip tab to the backside of the inside of the box.
9. Glue the hands to the coordinating shapes on the box base hands. The hands tuck into the slots of the center strip. Glue the apron piece on the front of the box:)

Monday, October 26, 2015

Pilgrim Cone Container

Pilgrim Cone Container-JMRush

Basket size: W 4" X  H 2.25”
Pilgrim Size (approximate): W 6” X H 5.”

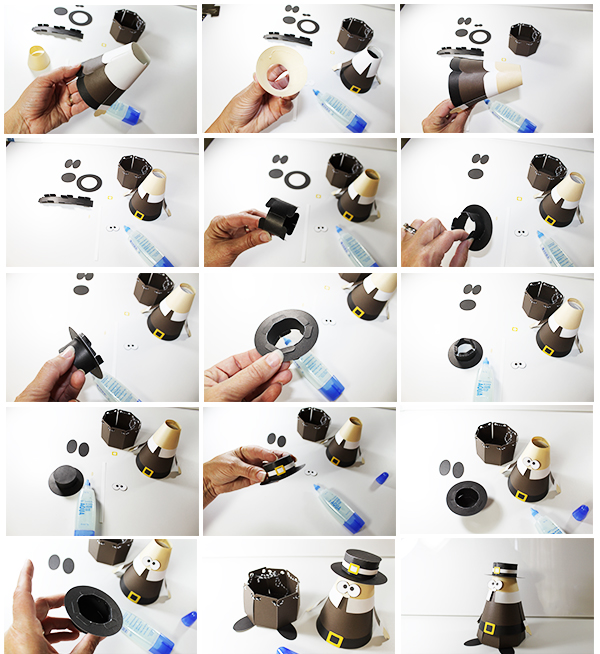
This Pilgrim Cone Treat container can be filled with goodies for a gift or used as a center piece for your Thanksgiving feast. 20” of 1/4” ( or smaller width) ribbon or twine is needed to complete the basket. This design is compatible with 8x12 or 12X12 mats.


  1. Cut the design pieces.
  2. Pre-fold all score lines.
  3. Using 20” of 1/4” or smaller ribbon or twine, lace it through the holes of the Octagonal design piece to create a basket. Tie a bow to secure.
  4. Starting with the largest curved body piece, insert the tab into the slot.
  5. Apply glue to the inside of the cone on the inside of the tab.
  6. Secure into place. Repeat for each Curved cone body section.
  7. Repeat for each Curved body section.
  8. Apply glue to the inside of the second largest curved body piece.
  9. Place it on top of the largest curved cone body section and secure. Make sure that the seems align in the back.
  10. Glue the rectangular belt buckle onto the largest Cone section on the front of your pilgrim.
  11. Apply glue to the back side of the hands and secure them onto the arm pieces.
  12. Apply glue to the backside of the rectangular cuff pieces and secure them on top of the wrists of the arm pieces.
  13. Apply glue to the backsides of the top of the arms. 
  14. Secure the arms onto the the cone sections with the belt buckle.
  15. Apply glue to the inside of the collar cone body section.
  16. Secure the collared section on top of the belt buckle sections, making sure the the seams in the back align.
  17. Apply glue to the inside of the face section.
  18. Glue to on top of the belt buckle sections, aligning the seams in the back.
  19. Glue the whites of the eyes to the solid eye section.
  20. Connect the hat section together by placing the tab into the slot
  21. Place the open circular ring on top of the hat section.
  22. Apply glue to the bottom of the top of the bottom hat section tabs. 
  23. Secure onto the bottom circular brim of the hat.
  24. Apply glue to the top of the hat tabs.
  25. Place the full circle piece on top and secure into place.
  26. Glue on the hat band and buckle. (Seam goes in the back).
  27. Glue on the eyes and the nose.
  28. Apply glue to the inside of the hat.
  29. Place the hat on top of the cone sections and secure into place.
  30. Fill your pilgrim with goodies to give as a gift or use him as a festive Holiday decoration:)